How to configure cloud storage with Comet
This guide instructs users on the different ways cloud storage can be configured with Comet.
For a more technical overview on how cloud storage works with Comet, as well as detailed information on requirements to configure specific cloud storage types, please visit our cloud storage technical documentation.
Options for configuring cloud storage
Comet is storage-agnostic and can support any S3-compatible cloud storage provider, as well as SFTP and WebDAV. At a high level, there are two ways that cloud storage can be configured with Comet:
Direct-to-cloud, where the backup data goes directly from the Comet client to the cloud storage provider. This is the most common use case and is supported in both Self-Hosted and Comet-Hosted Servers.
Through a Comet Storage Gateway first, and then to the Cloud, which means the backup data will pass through the Comet Storage Gateway first, and from there, gets uploaded to the cloud storage provider (in memory).
This is handy for the following:
a. For backup replication, when the backup data passes through the Server first, the Server can direct a replica to a secondary storage location. This setup is only possible on a Self-Hosted Server.
b. If no Storage Template exists for your chosen S3-compatible provider, you can configure a Storage Gateway, and then configure the Storage Gateway as a Storage Template.
c. For airtight white-labelling, as it may be possible for a very savvy client to break through any direct-to-cloud white labelling.
Direct-to-cloud configuration
Direct-to-cloud backups can be configured manually on a Storage Vault level, or as a Storage Template which allows you to easily provision a Storage Vault for your user.
Storage Template
The Storage Template section is used to manage default storage options. Setting up a Storage Template allows you to easily provision a Storage Vault for your user.
When adding a Storage Vault for a new or existing account, you can simply assign a Storage Template instead of manually creating a storage location per account. Comet will automatically separate user data and therefore there is no need to create separate bucket locations manually.
Steps to configure a Storage Template
Step 1:
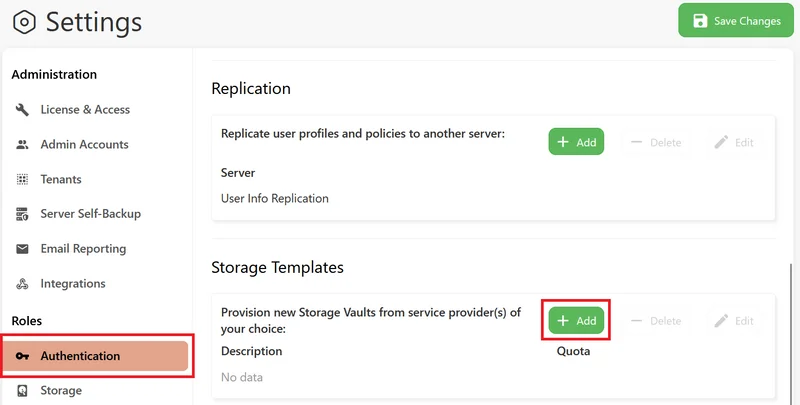
Go to Settings > Storage Templates. Click on ‘Add’.
Step 2:
The Storage Template can be renamed in the Description field. Then click on the ‘Type’ dropdown to select the storage type / provider to be configured.
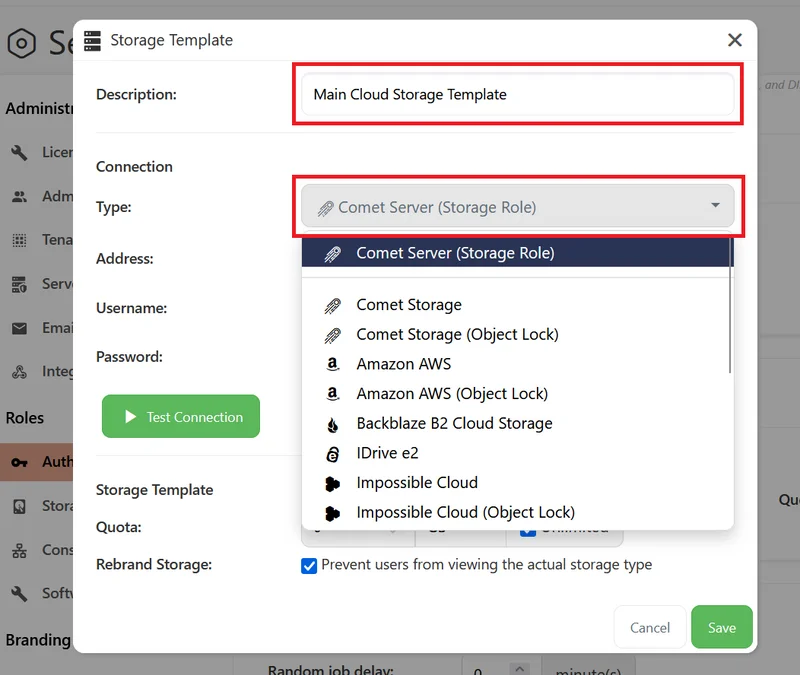
Several cloud storage providers are readily available to be configured as a Storage Template. If your cloud storage provider is not found in this list, they cannot be configured as a Storage Template and will have to be configured as a Storage Vault instead.
Or, they can be configured in Storage Gateway as an ‘S3-compatible’ storage type, and then configured as a Storage Template, with the knowledge that the backup data will then pass through the Self-Hosted Storage Gateway first.
Step 3:
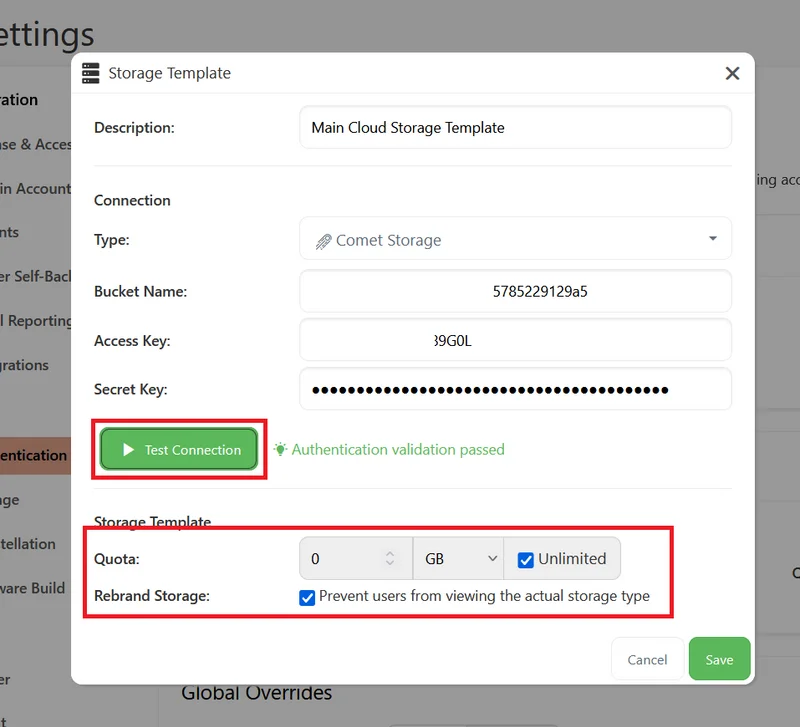
In the Storage Template wizard, configure the following:
a. Storage type: Put in the storage information required by your selected provider. Then click on 'Test Connection' to check that the configuration is accurate.
b. Quota: A storage quota can be set per template, which will be applied to each Storage Vault requested from that template.
c. Rebrand Storage: You may hide the storage brand from your end users in the Comet Backup client and web portal interfaces.
Step 4:
Save your changes within the Storage Template configuration window

You can now request a Storage Vault from this template.
Through the Server, to the Cloud configuration
This method can be configured at the Storage Gatway location on your Self-Hosted Comet's Settings page.
Once configured, the cloud storage can then be configured as a Storage Template from which you can automatically request a Storage Vault.
Once the Storage Template has been configured and given a name, an end user will see the named template as a storage location, without exposing where the data is stored (such as, not seeing cloud storage credentials or location). All they will see is that the data is stored by the Self-Hosted Storage Gateway (this can be changed via white-labelling and policies).
Storage Gateway
Storage Gateway is only available with Self-Hosted Comet.
When using cloud storage as the storage location for Storage Gateway, the upload stream is proxied through to the cloud storage account (if possible) or buffered in memory. No data touches the local disk (no IOPS penalty). However, under memory pressure, the operating system may write to the swap file in proportion to the transfer load.
Steps to configure cloud storage in Storage Gateway
Step 1:
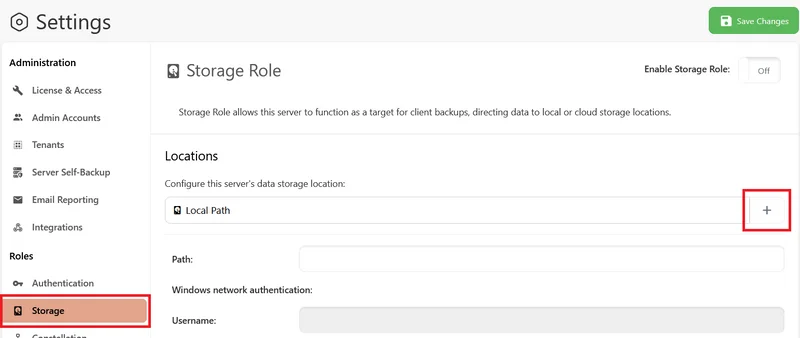
Go to Settings > Storage Gateway, and click on the plus sign.
Step 2:
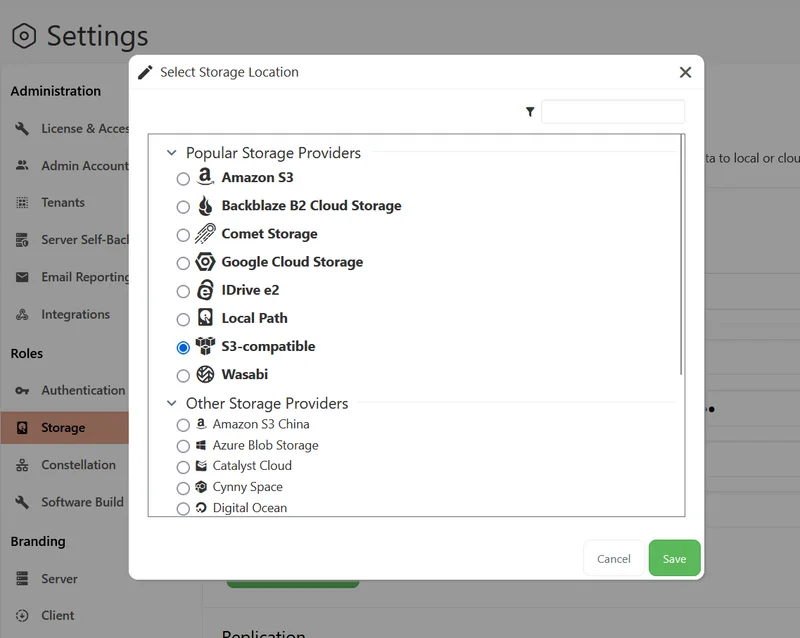
Choose the cloud storage you would like to configure. Some storage providers are easily available and the configuration fields are customized to their required information (bucket name, secret key, etc.).
If your storage provider is not in the list, choose ‘S3-compatible.
Step 3:
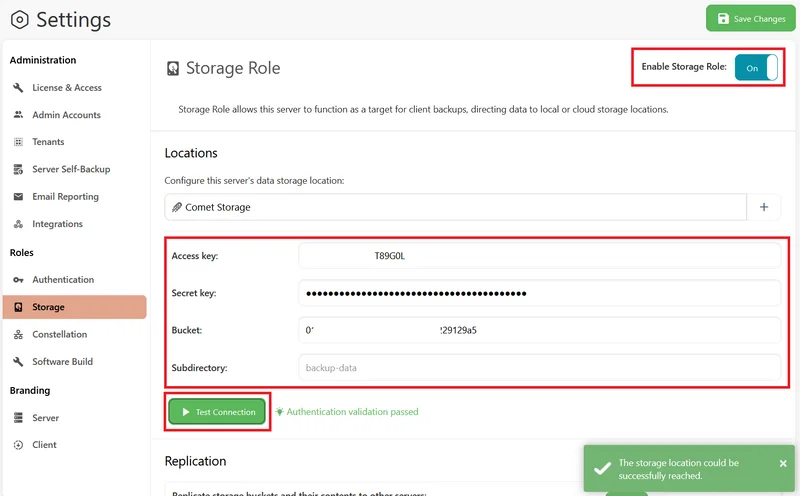
Configure your selected cloud storage and click on 'Test Connection' to check that the configuration is accurate.
Make sure that Enable Storage Gateway is on.
Step 4:
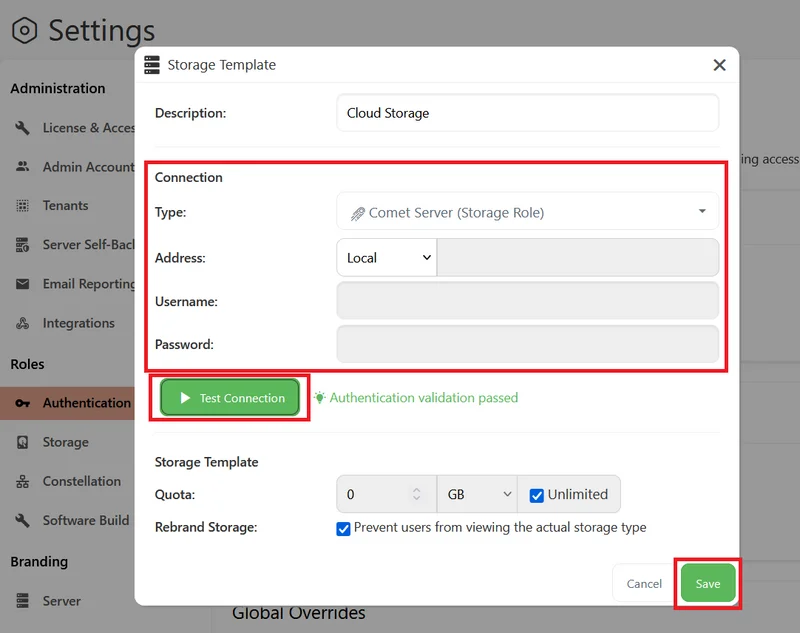
After configuring cloud storage in Storage Gateway, go to the Storage Templates tab and set up the Storage Gateway as a Storage Template. Make sure that the storage Type is pointed to Comet Backup (Storage Gateway), and the address is set to Local.
Once the Storage Gateway has been configured as a Storage Template, a Storage Vault can be automatically requested.
Storage Gateway Replication
With the cloud storage set as the storage location for a Storage Gateway, the backup data could be replicated onto another storage location through the Storage Gateway Replication feature.
This is covered in more detail in our separate Storage Gateway Replication guide.
Storage Vault Configuration
A Storage Vault is a location where the backed-up data can be stored. All data within a Storage Vault is compressed, encrypted, and deduplicated. A Storage Vault is the unit of deduplication; data is not deduplicated between multiple Storage Vaults.
Cloud storage and on-prem storage (e.g., SFTP, local path, FTP, SMB) can be configured on a Storage Vault. Storage Vaults are configured per user profile.
Configuring a Storage Vault on the Comet Management Console
Step 1:
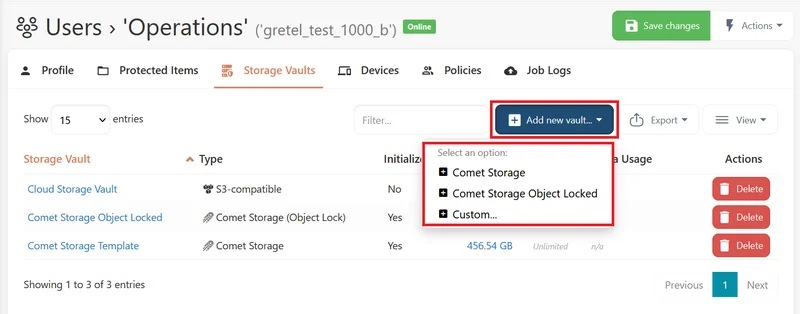
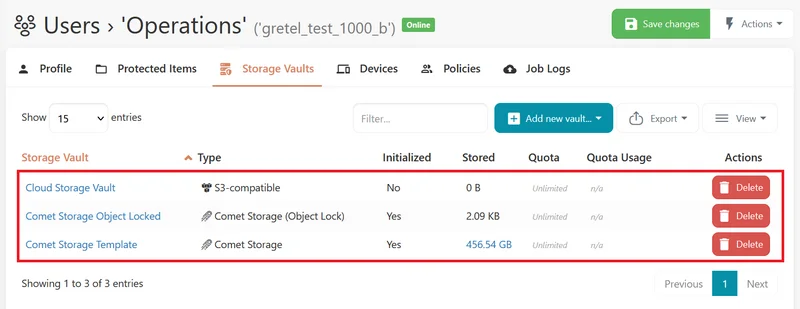
Access the user profile you would like to configure a Storage Vault for, and go to the Storage Vaults tab.

Step 2:
Click on ‘Add new vault’, and –
a. If a Storage Template is available, click on the Storage Template and a Storage Vault will automatically be requested from the template. If the cloud storage is configured directly as a Storage Template, then this configuration will be a direct-to-cloud backup.
If the cloud storage is configured as the storage location for a Storage Gateway, then all data will go through the Self-Hosted Storage Gateway first, and then sent to the cloud storage.
b. If no Storage Template is available because the storage provider cannot be configured as a Storage Template, click on ‘Custom’. This configuration will be a direct-to-cloud backup.
Step 3:
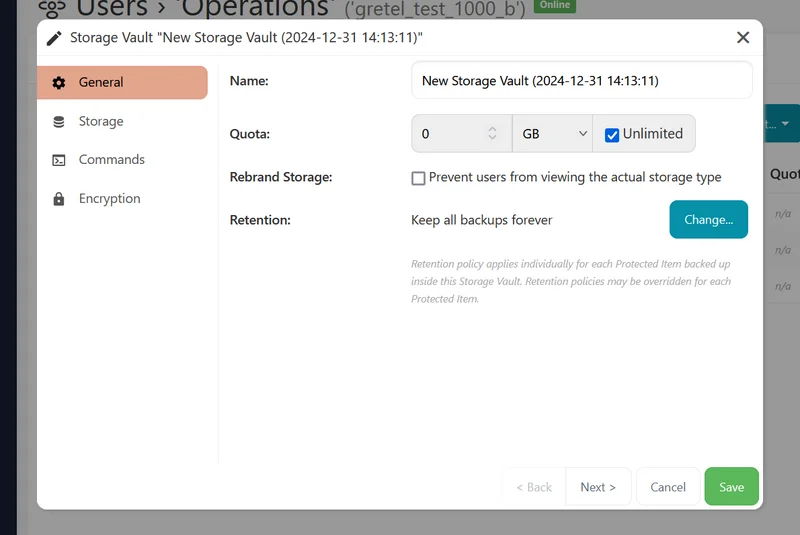
In the General tab in the Storage Vault setup wizard, the following can be configured:
a. Name: The Storage Vault can be renamed.
b. Storage Quota: A quota can be applied per Storage Vault. This is a great feature for limiting an end user is allowed to back up. If a quota is about to be exceeded, the next backup will throw an error.
c. Rebrand Storage: Option to hide the storage brand in the Comet Backup client software and in all the web interfaces.
d. Retention: Storage Vault retention rules are the default for all data stored, unless a Protected Item has its own set of retention rules. When a Storage Vault is first created, the default, no-change-by-policy retention rule is 'Keep all data forever'.
Please visit our retention guide for more information on possible retention configurations.
Step 4:
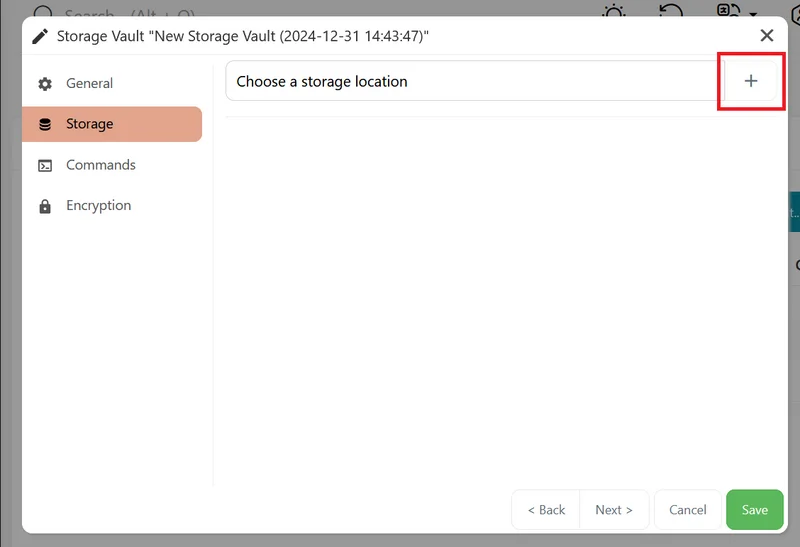
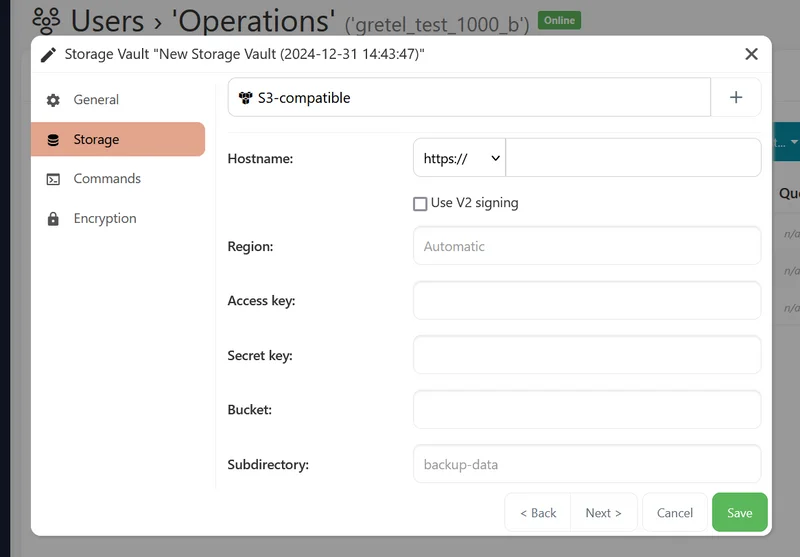
Click on Next, and in the Storage tab, click on the plus sign next to ‘Choose a storage location’.
Step 5:
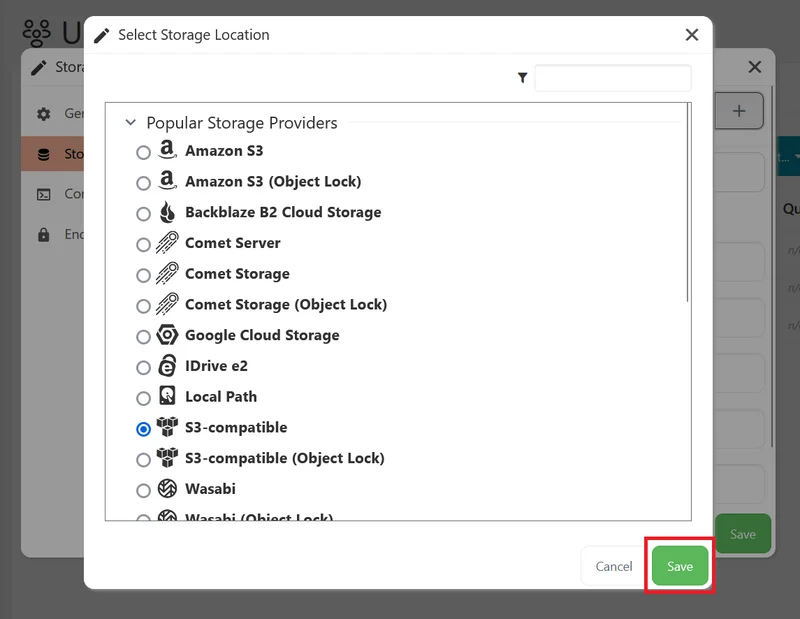
Choose the storage type and click Save. Some storage providers are readily configurable and showing they require for setup (bucket name, secret key, etc.).
If your storage provider is not in the list, choose ‘S3-compatible’ or ‘S3-compatible (Object Lock)’ if using object lock.
Step 6:
Configure the access and secret keys, bucket name, and other required information. For more information on required information per storage provider, please access our cloud storage technical documentation.
Click on ‘Next’ when done.
Step 7:
The Commands tab is for configuring commands to run before and after any backup job. For more information about the Commands feature, please see details under the Overview and Concepts section.
Step 8:
After configuring the Commands tab, click on Save. The Storage Vaults will now be available to use for backups.
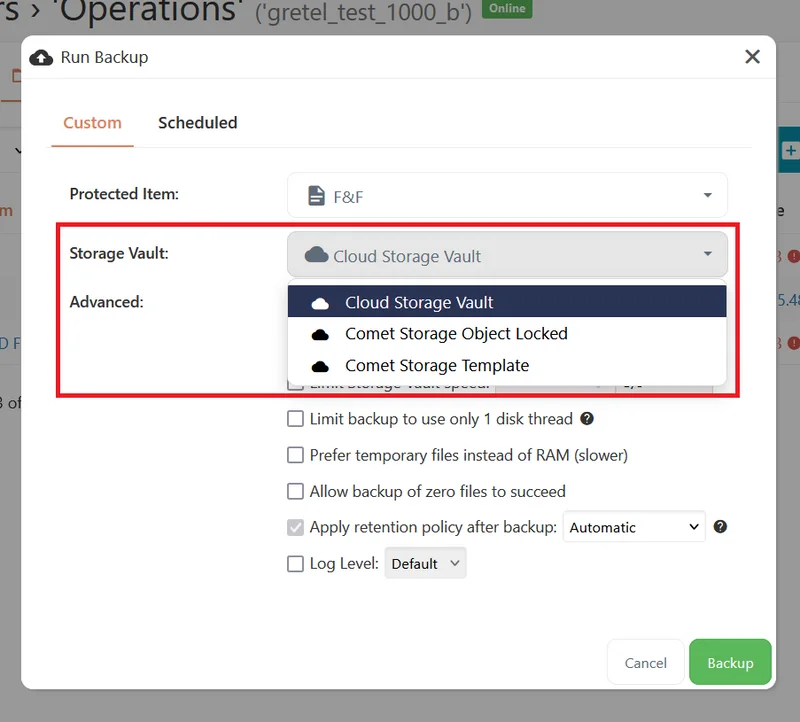
When setting up a backup schedule or running a manual backup, make sure you are directing the backup to the correct Storage Vault.
Configuring a Storage Vault on the Comet Client
A Storage Vault can also be configured, or requested from a Storage Template, on the Comet Backup Client.
Step 1:
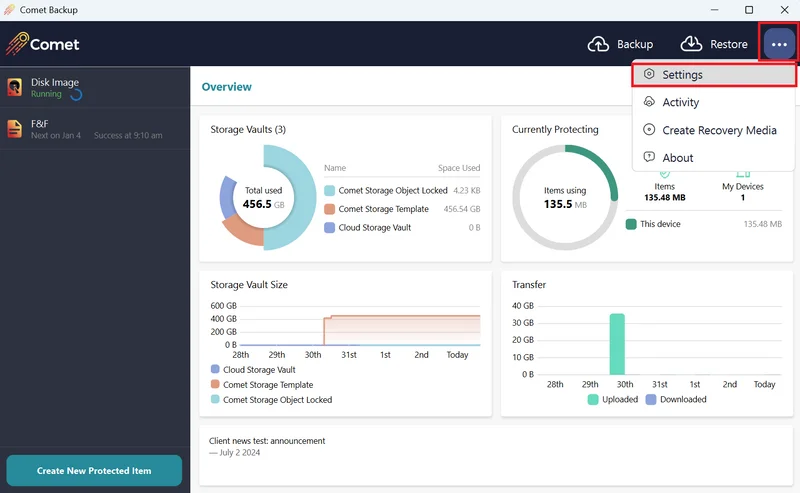
In the Comet Backup Client, click on the ellipsis, then click on 'Settings'.
Step 2:
Here, you will see all the Storage Vaults already available for this device to back up to, or to restore from. To add a new Storage Vault, click on the plus sign.
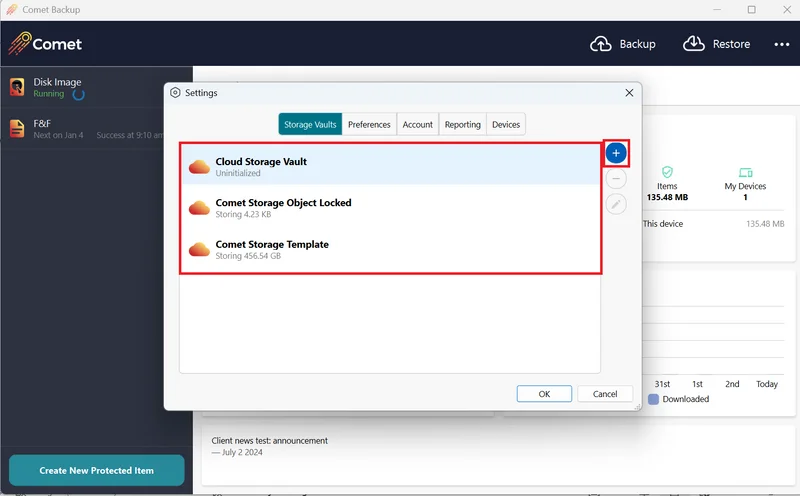
Step 3:
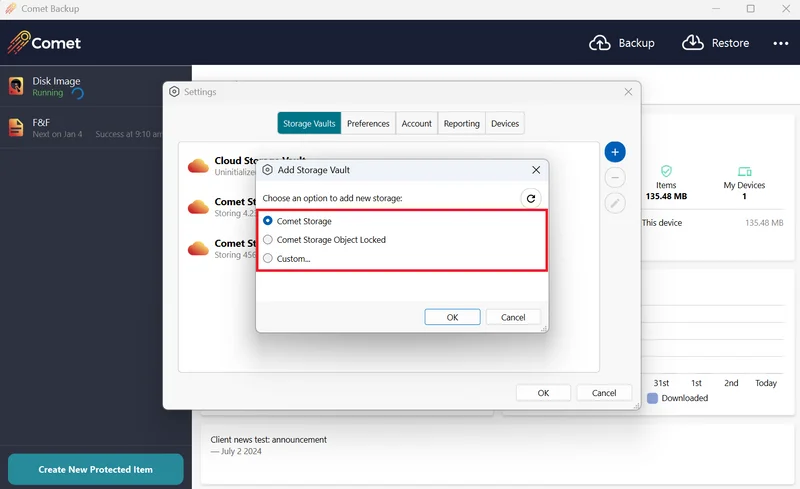
You will see the available Storage Templates here and you can automatically request a Storage Vault by selecting the Storage Template and then clicking on 'OK'.
If there are no Storage Templates configured, you can set up a cloud storage by clicking on ‘Custom’, then 'OK'.
The Storage Vault setup wizard is the same here as in the Comet Management Console, except for the re-branding option. This can only be ticked or un-ticked in the Comet Management Console.
