Self-Hosted Management Console configuration
Overview
The Comet Management Console can be configured either via the Settings page, or by editing the configuration file directly.
This guide will include screenshots of the Settings page where appropriate, and also include references to the configuration file.
Settings page
You can configure Comet Management Console via the Settings page.
You can access the Settings page by logging in to the Comet Management Console web interface, then clicking the Settings, under the System menu.

Configuration file
As an alternative to the Settings page, it is possible to edit the Comet Management Console's configuration via the cometd.cfg file. You can edit this file if you are experiencing any issues accessing the Comet Management Console web interface.
File validation and access
The configuration file is in JSON format. Any changes made to this file must be valid JSON syntax. This mostly boils down to escaping backslash characters in text strings - wherever you intend for a backslash (\ ) character to appear, please use two backslashes (\\) instead.
The Comet Management Console application may overwrite any changes to the cometd.cfg file, unless it is stopped first. After making changes, you should then restart the server software following the instructions in the previous "Install the server application" section.
On Windows, if the application has been installed in the Program Files directory, then it may be necessary to run the editor as Administrator in order to save changes to the file. On Linux, the file may be owned by the root or cometd users, and it may be necessary to run the editor as a different user in order to save changes to the file.
Windows
On Windows, Comet Core Service Manager includes a built-in configuration file editor that
- automatically checks for valid JSON syntax, and
- ensures that all Administrator user operations are handled correctly.
We would recommend using the Comet Core Service Manager feature to edit the cometd.cfg file on Windows.
Serial number
Enter your serial number.

In cometd.cfg, this field can be set in the License section > SerialNumber property.
- See also Licensing
Network
Configure which network interfaces and URLs the Comet Management Console will be accessible on.

The Comet Management Console can listen on multiple addresses, ports, and interfaces.
If you are updating an existing Comet Management Console's network address, also see Updating Comet Network Address/URL Considerations documentation.
Change host/port, or use multiple ports
By default, the Comet Management Console listens for connections on 127.0.0.1 port 8060. It is expected that this would be changed to e.g. port 80 or 443. Once the hostname and port are configured for the first time, they should be kept the same so that any installed client software will still be able to log in.
In cometd.cfg, each listener is configured with an object under the ListenAddresses section. Each object entry in the ListenAddresses section has (at minimum) a ListenAddress property, which should be a text string in the format ip:port.
Comet Management Console supports binding to an IPv6 address. You may need to enter IPv6 bind addresses using square-bracket syntax (e.g. [0000:1111::2222]).
Configure SSL Certificate
Configuring an SSL certificate is very strongly recommended to improve security, as malicious network operators are no longer able to intercept passwords.
Using an SSL certificate with Comet Management Console also increases performance. The server will only negotiate an HTTP/2 pipelined connection if an SSL certificate is configured. This significantly improves TCP utilization.
In addition to this, some web browsers will show a warning
- if the login page is not protected by SSL (e.g. Chrome 56, released January 2017), or
- if the website is not protected by SSL (e.g. Chrome 68, released in July 2018).
HTTP Config
- In the Network Interface field, put in the IP address for interface (LAN, or WAN if directly connected to the internet)
- In the Port field, put in the port for all connections to the Comet Management Console.

HTTPS Config
- In the Network Interface field, indicate the interface accessible from the internet by direct connection or port forward.
- In the Port field, use 443 if using 'Automatic' SSL configuration
- In the SSL Configuration field, put in the URL for the certificate, pointing to the server's WAN IP.

Use an existing SSL certificate
Comet Management Console supports using an existing SSL certificate in either X.509 (PEM) or PKCS12 file format.
Self-signed certificates are supported, however, you should consider using a free certificate from Let's Encrypt as described below.
In cometd.cfg, in one object within the ListenAddresses section, change the ListenAddress property to use the port 443.
Comet takes SSL certificates in
- X.509 (PEM) file format
- usually has a
*.crt,*.cer,*.pem, or*.keyfile extension - The X.509 format is a plain-text format. You can inspect the files with a plain-text editor, like Notepad or Nano. The certificate file should start with the text
-----BEGIN CERTIFICATE-----. The key file should start with the text-----BEGIN PRIVATE KEY-----.
- usually has a
- PKCS12 file format
- usually has a
*.pfx,*.p12file extension
- usually has a
Comet Management Console does not support other file formats for SSL certificates. If your SSL certificate is in another file format (e.g. if it has a *.der, *.pks, *.jks, *.p7b, or *.p7c extension), it should be converted to X.509 or PKCS12 format first before using it with Comet Management Console.
Existing X.509 (PEM) certificate

- Certificate
- Local certificate file (or certificate with chain). The certificate should be in X.509 (PEM) format.
- If you have a single combined .crt file containing both certificate and intermediate certificates, use it with this
SSLCertPathoption and do not use theSSLIntermediateoption.
- Intermediate
- Local file containing the intermediate certificate (or chain thereof) in X.509 (PEM) format.
- This automatically produces a chain containing your main certificate and the intermediate certificate.
- Key
- Local certificate key file. The key file should be in X.509 (PEM) format and should not be encrypted.
Existing PKCS12 certificate

- PKCS12
- The path to the PKCS12 file (pfx/p12).
- Password
- The password to decrypt the PKCS12 file
Troubleshooting
Please check the Comet Management Console logs for more information.
Once your Comet Management Console is functional on the HTTPS address, we recommend using the third-party website https://www.ssllabs.com/ssltest/ to validate your SSL configuration for any hidden issues.
"tls: failed to parse private key" or "tls: failed to find any PEM data in key input" errors
This error message can mean that the key file is either encrypted, or, in the wrong format.
Open the file with a plain-text editor, like Notepad or Nano:
- If the file contains unreadable characters, it is in the wrong file format. You should convert it to X.509 (PEM) format before using it with Comet.
- If the file contains readable characters, but it starts with
-----BEGIN ENCRYPTED PRIVATE KEY-----, then the encryption must be removed before using it with Comet.
Use a free, automatically-renewing SSL certificate
Comet Management Console integrates Let's Encrypt support, allowing you to receive a free valid SSL certificate for the Comet Management Console. The certificate is trusted by all major web browsers, it will be renewed automatically, and requires no intervention from the Comet Management Console administrator. The only requirements for this feature are
- The server must be listening on ports 443 and 80; and
- the domain name must be publicly accessible, and the DNS for the domain name must point to this specific Comet Management Console instance.
In order to enable this feature, in the License and Access settings of your Comet Management Console, create a new listen address;
- Set the network interface to either:
- the public IP address if available,
- the LAN address if the server is behind NAT, with the ports forwarded, or
- "All IPv4 interfaces" to listen on all interfaces.
- Set the port to
443 - Set SSL Certificate to "Automatic"
- Enter the public DNS hostname or a comma-separated list of domain names for which the SSL certificate should be valid.
Port 80 is sometimes used by Let's Encrypt's challenges, and will also be used as an HTTPS redirect to port 443.
Troubleshooting
Please check the Comet Management Console logs for more information.
The Comet Management Console must be able to access letsencrypt.org in order to issue the SSL certificate.
Provider downtime
You can check the status of the Let's Encrypt service at https://letsencrypt.status.io/ .
Rate limits
The SSL certificate provider has rate limits on certificate issuances.
- To avoid reissuing the same certificate every time the Comet Management Console is restarted, Comet will automatically cache the generated SSL certificate.
- If you modify your SSL configuration very frequently, you may encounter a rate limit from the SSL certificate provider, preventing the SSL certificates from being generated.
- Current rate limits can be seen on https://letsencrypt.org/docs/rate-limits/ .
Error "Can't supply TLS certificate for domain XYZ: acme/autocert: host not configured"
Or
Error "Request on XYZ cannot be satisfied by any configured SSL certificate: acme/autocert: host "XYZ" not configured in HostWhitelist
When Let's Encrypt is used, the Comet Management Console associates your domain name with the valid SSL certificate.
However, if someone tries to connect to the server using https:// {direct IP} or https:// {wrong domain name} there is a problem as Comet does not have a valid certificate for the request. Comet prefers to drop the connection rather than serve a mismatched certificate.
If you see this error message including a wrong domain name:
- There is a misconfiguration. Either a client is unintentionally connecting using the wrong domain name, or, you have misconfigured Let's Encrypt to not mention a domain name that should be included.
- A researcher may be scanning the entire IPv4 internet using the Reverse DNS (RDNS) name of your server. It's possible that the RDNS name is out of date compared to the expected domain name for accessing this server.
If you see this error message including an IP address:
- It's possible that someone tried to connect to your server on
https:// {direct IP}. At the time of writing, it is not possible to receive a Let's Encrypt certificate for a bare IPv4 address. - A researcher may be scanning the entire IPv4 internet, and connecting to the open
:443port using the IP address of your server.
Enabling HTTP to HTTPS redirection
Comet Management Console allows you to add a Listener on multiple IP/port pairs. Each IP/port pair that you enter will allow you to access the Comet Management Console web interface on that interface.
Currently (July 2021 and earlier), if you enter a plain domain name (i.e. example.com without HTTP/HTTPS or port) into a web browser, the domain will be resolved using HTTP on port 80. This may change in the future, but the practical reality of the internet today is that it is a general requirement to listen for HTTP requests on port 80 and automatically redirect them to HTTPS on port 443.
Comet has a built-in, automatic feature for redirecting HTTP to HTTPS. If you have a listener configured for port 443 and no listener on port 80 for the same IP address, Comet Management Console will automatically listen on port 80 and redirect traffic to port 443.
You can see this behaviour in Comet Management Console's log file around when Comet Management Console starts up: Listening on interface '0.0.0.0:80' (redirecting).... This text suffix is displayed as secure (HTTPS serving the Comet Management Console web interface), insecure (HTTP serving the Comet Management Console web interface) or redirecting (HTTP serving a HTTPS redirect).
Customizing the HTTPS security levels
Comet automatically chooses an HTTPS security level. In current (21.6.x) versions of Comet, this is TLS 1.2 or TLS 1.3, with a certain set of ciphers, and no HSTS (HTTP Strict Transport Security). This configuration is sufficient to get an "A" grade on the Qualys SSLLabs test and retains a high level of browser compatibility. Future versions of Comet may choose different HTTPS security settings as the threat landscape evolves. Past versions of Comet may use weaker HTTPS settings.
No customization is available for the HTTPS security level. If you want to customize the HTTPS security level, to use a different version of TLS, to configure the ciphersuites, or to enable HSTS (HTTP Strict Transport Security) headers, you should configure a reverse proxy in front of Comet Management Console to terminate TLS and forward to Comet Management Console over plain HTTP. For more information about this, please see the Reverse Proxy section.
Session options

Choose how long to stay logged into the Comet Management Console. The default session timeout is 30 minutes and the maximum time is 48 hours (2880 minutes).
Audit logging
Note: This feature is only available on the Advanced Plan.
Available in Comet 23.3.7 and later
Audit logging is a useful way to keep track of all changes happening on the Comet Management Console. Audit logging listens to Comet Management Console's internal event stream, and depending on your filters, writes the events to a log file. The events are identical to the events you can find in Webhooks and Websockets, and this is just another way to retrieve them.
Options
- Key: A string label of your choosing
- File Name: The name of the file for the log. Note that the year, day of the year, and ".log" are appended as well (e.g. "test" would become "test-YYYYDDD.log" or
test-2023270.log) - Allow Event Types: A list of event types you want to send to this audit log. If adding this via Config File, use an empty list to get everything
- Data Details (aka Level): The verbosity of the attached data. Currently options are only "full" or "none"
- Log Rotation (aka Pruning): If enabled, Comet Management Console will only retain logs for the last specified number of days
Configuration via Web UI

Configuration via Config File
    "AuditFileOptions": {
        "Docs": {
            "Filename": "docs-test",
            "AllowEventTypes": [
                4100,
                4101,
                4102
            ],
            "Level": "full",
            "PruningEnabled": true,
            "PruningLimit": 7
        }
    },
IP rate limiting
Note: This feature is restricted to the Growth Plan and Advanced Plan.
Comet Management Console supports IP-based rate limiting. This reduces the bandwidth for the entire Comet Management Console.
IP rate limits can be configured in the server settings under License and Access.

Alternatively, you can follow these example changes to the cometd.cfg file directly:
"IPRateLimit": {
    "Rules": [
        {
            "MatchRegex": ".*",
            "BytesPerSecond": 1048576
        }
    ]
},
You can configure multiple rules. Each rule creates a rate-limiting domain. Incoming requests are matched against a domain, and the domain is limited as a whole. Incoming requests will be assigned to the first rate-limiting domain that matches.
Rate limits apply separately to ingress and egress traffic (e.g. a 10 MB/s limit will allow simultaneous 10 MB/s upload and 10 MB/s download).
Admin accounts

Mult-factor authentication can be configured for admin accounts.

Further restrictions can be applied through Policy settings.

In cometd.cfg, each object entry in the AdminUsers section represents a user who can log in to the Comet Management Console interface.
Username
There are no character nor length restrictions on administrator usernames.
Usernames are case-sensitive.
Password
There are no character nor length restrictions on administrator passwords.
Change or reset administrator password
You can reset the administrator password by clicking the 'Reset' button.
In cometd.cfg,
- Find the object entry for the user in question under the
AdminUserssection. - Change the
PasswordFormatvalue to 0 (zero). - Change the
Passwordfield to the desired password. - The password will be hashed and encrypted after first login.
Allow login via
Comet's Manangement Console and Storage Gateway supports two-factor authentication for administrators. For more information, please see the How to Set Up MFA Guide.
You can configure which sets of information are sufficient in order to log in to the Comet Management Console:
- Password alone: if this option is checked, the password alone is sufficient to log in to the Comet Management Console. If you are enabling two-factor support, this option should normally be disabled.
- Password and TOTP together: if this option is checked, the combination of password + TOTP code will allow the administrator to log in to the Comet Management Console.
- Password and FIDO2 WebAuthn together: if this option is checked, the combination of password + FIDO2 WebAuthn authenticator will allow the administrator to log in to the Comet Management Console.
In cometd.cfg,
- the
AllowPasswordLoginproperty sets whether a valid password alone is sufficient to log in. - the
AllowPasswordTOTPLoginproperty sets whether both the Password and TOTP together are sufficient to log in. - the
AllowPasswordWebAuthnLoginproperty sets whether both the Password and FIDO2 WebAuthn authenticator together are sufficient to log in.
IP allowlist
It is possible to restrict the IP address of an Administrator logging in to Comet Management Console.
This feature is not currently configurable from the web-based Settings page owing to the significant potential for locking yourself out. You must make this change in the console's configuration file: that ensures you have a way to remove it, if necessary.
In the configuration file cometd.cfg,
- Find the object entry for the user in question under the
AdminUserssection. - Add a
IPWhitelistfield, with the value, a regular expression to match against IP addresses.
For example:
"AdminUsers": [
    {
        "Username": "my-user-account",
        "IPWhitelist": "127\\.0\\.0\\.1",
You should use \\. to represent a literal . character - one slash is required at the regex-level, and the second slash is required because the configuration file is a JSON document.
An example of how to use a regular expression to allow for dynamic IP:
"AdminUsers": [
      {
          "Username": "my-user-account",
          "IPWhitelist": "127\\.0\\.0\\.[0-9]{1,3}",
To whitelist multiple addresses you must use a vertical line "|" between each IP.
An example of how to whitelist multiple addresses:
"AdminUsers": [
      {
          "Username": "my-user-account",
          "IPWhitelist": "127\\.0\\.0\\.1|172\\.0\\.0\\.1",
To whitelist all private IP ranges:
"AdminUsers": [
      {
          "Username": "my-user-account",
          "IPWhitelist": "^(127\\.)|(192\\.168\\.)|(10\\.)|(172\\.1[6-9]\\.)|(172\\.2[0-9]\\.)|(172\\.3[0-1]\\.)|(::1$)|([fF][cCdD])",
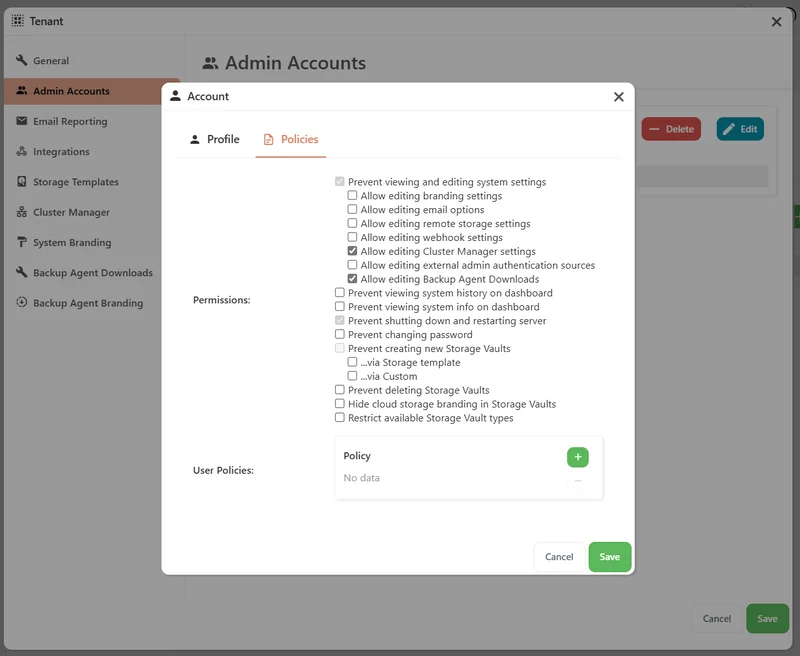
Policies (Administrator account)
It is possible to restrict the actions of administrator accounts in Comet Management Console.
The following restrictions are available:
Permissions
- Prevent viewing and editing server settings
- Allow editing branding settings
- Allow editing email options
- Allow editing remote storage settings
- Allow editing webhook settings
- Allow editing Cluster Manager settings
- Allow editing external admin authentication sources
- Allow editing Backup agent downloads settings
- Prevent viewing server history on dashboard
- Prevent viewing server info on dashboard
- Prevent shutting down and restarting server
- Prevent changing password
- Prevent creating new Storage Vaults
- via Storage template
- via Custom
- Hide cloud storage branding in Storage Vaults
- Restrict available Storage Vault types
User Policies
Adding policies to the user policies list limits the admin user to assigning only those listed policies to users. The admin user will be restricted from editing all user policies.
External authentication sources
Comet Management Console supports using external authentication sources to verify administrator credentials during login. If an external authentication source is configured, then any administrator usernames that do not match a normal internal account are checked against the external authentication source.
If the external authentication source does successfully validate the administrator credentials, a new Comet administrator account will be created for the user. You can choose the default permissions for the created administrator account.
The account will be permanently associated with this authentication source; Comet Management Console does not store its password and always defers to the specific external authentication source for checking its password during login. This means that any password changes or account suspensions are immediately reflected in Comet.
The following types of external authentication source are available:
LDAP
Comet Management Console supports using an LDAP server (e.g. Microsoft Active Directory, 389ds, or OpenLDAP) as an external authentication source. LDAP authentication sources can only be used for managing top-level admins; they are not compatible with tenants.
You must specify the LDAP address, port, and protocol security (plain, STARTTLS, or LDAPS). The default port for plain and STARTTLS is 389. The default port for LDAPS port is 636.
There are several possible ways to verify account credentials against your LDAP server. In the Comet Management Console configuration, the %{USER} and %{PASS} macro substitutions are supported to refer to the supplied logon credentials.
Method 1. Bind as own-user only
An example configuration for a domain MYDOMAIN.example.com:
| Field | Value |
|---|---|
| LDAP Bind User | %{USER}@MYDOMAIN.example.com |
| LDAP Bind Password | %{PASS} |
| LDAP Search DN | (blank) |
| LDAP Search Filter | (blank) |
This will allow users to log in to Comet Management Console with their domain credentials.
The account's supplied credentials from the logon form (i.e. %{USER} / %{PASS}) will be validated if Comet is able to bind to the LDAP server as this account (only).
This approach performs no validation of the user's groups, nor if these credentials are for a user account or some other type of LDAP object (e.g. a Computer) i.e. there is no distinction between authenticating the account and authorising it for use.
Method 2. Bind as own-user, search, and rebind
Example configuration:
| Field | Value |
|---|---|
| LDAP Bind User | %{USER}@MYDOMAIN.example.com |
| LDAP Bind Password | %{PASS} |
| LDAP Search DN | CN=Users,DC=mydomain,DC=example,DC=com |
| LDAP Search Filter | (&(objectClass=user)(sAMAccountName=%{USER})(memberof=CN=Administrators,CN=Builtin,DC=mydomain,DC=example,DC=com)) |
The account's supplied credentials from the logon form will be validated if
- Comet is able to bind to the LDAP server as this account, and
- search for user accounts with this name that are a member of the
Administratorsgroup, and - there is exactly one unambiguous user result for this search, and
- Comet is able to re-bind to the LDAP server using the DN of the user from the search with the original supplied password
This requires that the bind user has sufficient permissions to perform the search above.
Compared to "Method 1" above, this approach allows you to verify properties of the user account, distinguishing between two steps of authenticating the credentials and authorising the login.
The above Search Filter is a sample only. Active Directory supports the memberof and sAMAccountName filters by default. Other directory servers should modify the search filter as appropriate to check usernames and group memberships.
MemberOfplugin for 389ds: https://directory.fedoraproject.org/docs/389ds/design/memberof-plugin.htmlMemberOfoverlay for OpenLDAP: http://www.openldap.org/doc/admin24/overlays.html#Reverse%20Group%20Membership%20Maintenance
Method 3. Bind as read-only user, search, and rebind as own-user
Example configuration:
| Field | Value |
|---|---|
| LDAP Bind User | CometCredentialValidationUser@MYDOMAIN.example.com |
| LDAP Bind Password | CometCredentialValidationPassword |
| LDAP Search DN | CN=Users,DC=mydomain,DC=example,DC=com |
| LDAP Search Filter | (&(objectClass=user)(sAMAccountName=%{USER})(memberof=CN=Administrators,CN=Builtin,DC=mydomain,DC=example,DC=com)) |
The account's supplied credentials from the logon form will be validated if
- Comet is able to bind to the LDAP server as this hardcoded account, and
- search for user accounts with this name that are a member of the
Administratorsgroup, and - there is exactly one unambiguous user result for this search, and
- Comet is able to re-bind to the LDAP server using the DN of the user from the search with the original supplied password
Compared to "Method 2" above, this allows you to restrict the search process to a dedicated account, and restrict search permissions from other user accounts.
Two-factor authentication for LDAP-authenticated administrator accounts
If you are using LDAP external authentication for admin accounts, logging in to Comet Management Console with LDAP credentials causes a stub/passwordless administrator account to be created. The only way to log in to this account is via a successful LDAP handshake.
After the stub account is created (marked as "External" in the Comet Management Console Settings page > "Admin accounts" area) you can set up 2FA for this account in the same way as for any Comet admin account. Then, both a successful LDAP handshake and the 2FA credentials will be required to log in to the Comet Management Console web interface.
An alternative approach is if your LDAP server has built-in 2FA. For example, if you are using (e.g.)...
- DUO Authentication Proxy (DUO LDAP Proxy)
- Azure Multi-Factor Authentication Server
- Any LDAP server (e.g. Active Directory) using RADIUS authentication, with a 2FA RADIUS solution such as e.g.
- GreenRADIUS
- YubiX / YubiRADIUS (discontinued)
- multiOTP + FreeRADIUS
...as your LDAP server inside Comet, the LDAP handshake will hang until the administrator completes an out-of-band 2FA handshake using the provider's own system (e.g. a push notification gateway). This provides two-factor authentication outside of Comet itself.
"Primary bind exempted from 2FA" when using DUO Authentication Proxy
By default, DUO Authentication Proxy does not prompt for 2FA for any LDAP bind. You need to configure the DUO Authentication Proxy software to choose which accounts are subject to 2FA prompts. For instance, an interactive user account should be subject to this, but service accounts (e.g. for Method 2 / 3 above) should not be subject to a 2FA prompt as they would be unable to complete it.
Please see https://help.duo.com/s/article/4989?language=en_US for more information.
OpenID Connect 1.0
This section applies to Comet 23.6.8 and later.
Comet Management Console supports using OpenID Connect 1.0 (OIDC) compatible authentication providers for external authentication and management of administrator users. OIDC sources can be used for authentication of both top-level and tenant admins.
The following OIDC-compatible authentication sources (OpenID Providers, or OPs) can be used:
- Microsoft Entra ID (formerly known as Azure AD v2) (from Comet 23.6.8)
- Google (from Comet 23.6.8)
- "Generic" OpenID Providers that implement OpenID Connect Discovery using
.well-known/openid-configurationdiscovery documents (from Comet 23.6.8)
Configuring an OIDC authentication source consists of two parts: the Comet Management Console configuration, and the configuration at the OP. Both ends of this must be done manually; Comet does not support OIDC Dynamic Client Registration.
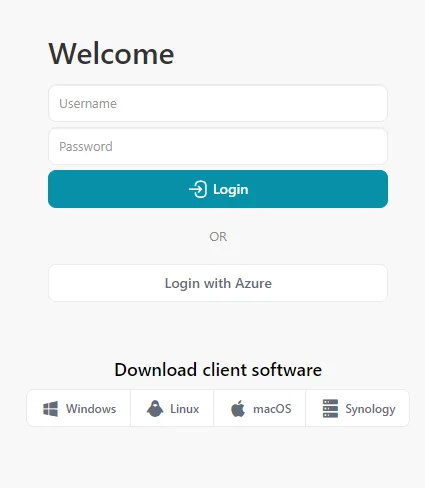
When an OIDC authentication source is configured, authentication using that source can be started by clicking on the "Login with ..." button on the Comet Management Console login page, which will redirect the browser to the external authentication provider.
OpenID Connect 1.0 configuration at Comet Management Console
Where to configure an OIDC authentication source depends on whether you are an unrestricted top-level admin, or a tenant admin or top-level admin with the "Prevent viewing and editing server settings" permission checked:
- Top-level admins can configure an OIDC authentication source for the top-level or for any tenant from the "External authentication sources..." button in the "Admin Accounts" settings section, or for a single tenant from the same location within a Tenant dialog (accessible from the Tenants settings section).
- Tenant admins or restricted top-level admins can configure an OIDC authentication source from the "External authentication sources..." button in the "Integrations" settings section.
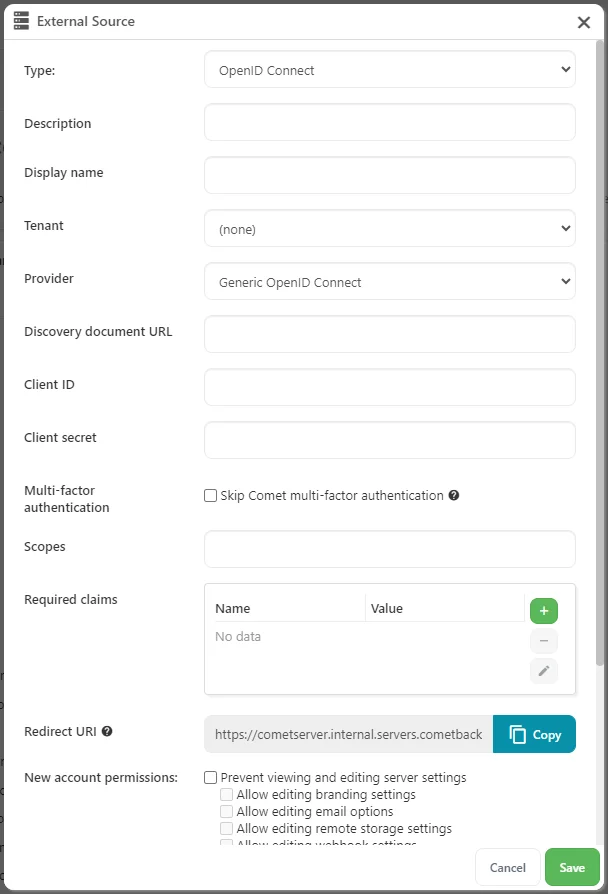
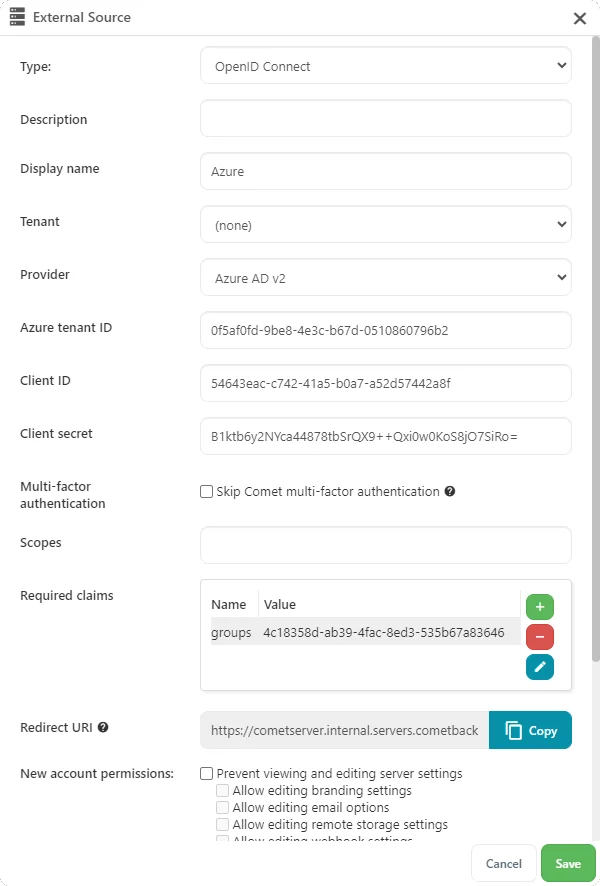
The following fields apply to all OpenID Connect authentication sources:
| Name | Required? | Description |
|---|---|---|
| Description | No | A human-readable description of the authentication source. |
| Display name | Yes | The name to use on the "Login with ..." button on the Comet Management Console login page. |
| Tenant | Yes | The tenant to which this source belongs. This can only be changed by a top-level admin. Choose the value "(none)" to configure a source for the top-level tenant. |
| Provider | Yes | The type of OIDC provider, e.g., Google or Azure AD. This changes which other fields are required. |
| Client ID | Yes | An OAuth 2.0 client ID. This must be generated at the OP and then entered into Comet. |
| Client secret | Yes | The OAuth 2.0 client secret associated with the client ID. This must be generated at the OP and then entered into Comet. |
| Skip Comet multi-factor authentication | No | Whether or not Comet should enforce its own multi-factor authentication. See here for more details. |
| Scopes | No | A comma-separated list of OpenID Connect scopes to request from the OP. This will affect the information that the OP returns to Comet and should be used to ensure that required claims are present in the ID token. Comet will always request the scopes necessary to authenticate if no required claims are configured. |
| Required claims | No | A set of OpenID Connect claims whose presence (and optionally value) will be checked for in the ID token returned from the OP. See here for details on required claim validation. |
| Redirect URI | N/A | The redirect URI that must be configured at the OP. This field is generated automatically based on the Comet Management Console's hostname and the OIDC authentication source's ID, and cannot be edited. |
| New account permissions | No | A set of default permissions to apply to admin users created by this authentication source. An admin user with permissions applied to their account cannot enable or disable settings that are restricted on their own account. |
Comet requests the following OpenID Connect scopes from all providers:
openid: required for OpenID Connect.profile: basic information about the user. Used for authentication purposes and to generate a username.email: information about the user's email address. Used to generate a username.
Generic OpenID Connect provider configuration
The following fields apply to OIDC authentication sources with the provider type "Generic OpenID Connect":
| Name | Required? | Description |
|---|---|---|
| Discovery document URL | Yes | The URL of the OpenID Connect discovery document for the OP. This is normally a URL ending with .well-known/openid-configuration. |
Microsoft Entra ID (Azure AD v2) provider configuration
To register an OpenID Connect provider in Azure AD, see the following links:
- https://learn.microsoft.com/en-us/azure/active-directory/develop/quickstart-register-app
- https://learn.microsoft.com/en-us/azure/active-directory/develop/v2-protocols-oidc#enable-id-tokens
The following fields apply to OIDC authentication sources with the provider type "Azure AD v2":
| Name | Required? | Description |
|---|---|---|
| Azure tenant ID | Yes | The tenant ID for the Azure AD tenant to which the app registration belongs. |
Google provider configuration
To register an OpenID Connect provider in Google, see the following links:
The following fields apply to OIDC authentication sources with the provider type "Google":
| Name | Required? | Description |
|---|---|---|
| Hosted domain | No | The domain of a Google Cloud organization. This controls the value of the hd parameter submitted to Google in the OIDC request. Setting this field also causes Comet to validate the value of the hd claim returned in the ID token against it, restricted the allowed users to those who belong to the Google Cloud organization. |
Required claim validation
The "Required claims" field causes Comet to enforce the presence and value of claims in the ID token returned from the OP. This can be used to restrict which users at the OP are allowed to be administrators in Comet.
How claims are validated depends on how the claim is configured in Comet, and the type of data returned in the ID token for that claim:
- For a claim configured in Comet with only a name and no value, only the presence of that claim name in the ID token is checked. The value associated with the claim is ignored.
- For a claim configured in Comet with a name and a value, validation depends on the type of data of the value associated with the claim in the ID token:
- If the claim value is a string, the claim is valid if the configured value and the value in the ID token are equal.
- If the claim value is a JSON array, the claim is valid if any of the array entries are equal to the configured value.
- If the claim value is of any other type (such as a JSON object), the claim is considered invalid.
Example: Requiring Azure AD v2 group membership
A common use case for required claims is to enforce that a user at the OIDC OP should be allowed to be an administrator in Comet. One way to enforce this is using group membership: create a group that includes the users who should be Comet admins, ensure that the group membership is included in the ID token, and add a required claim to the OIDC authentication source in Comet.
This section will give an example of one way to do this using Azure AD v2. It assumes you already have an Azure AD v2 OIDC authentication source configured in your Comet Management Console; this section only covers how to add group membership validation to the existing source.
- Create a new "cometbackup-admins" group with the group type "Security" in Azure AD by following these instructions.

Note the value of the "Object Id" field; this is what will be sent to Comet Management Console.
-
From Manage > Members, add the Azure AD users you wish to be Comet Management Console administrators.
-
Navigate to the existing app registration that was used to configure the existing OIDC authentication source, and then to the "Token configuration" section for that app registration.
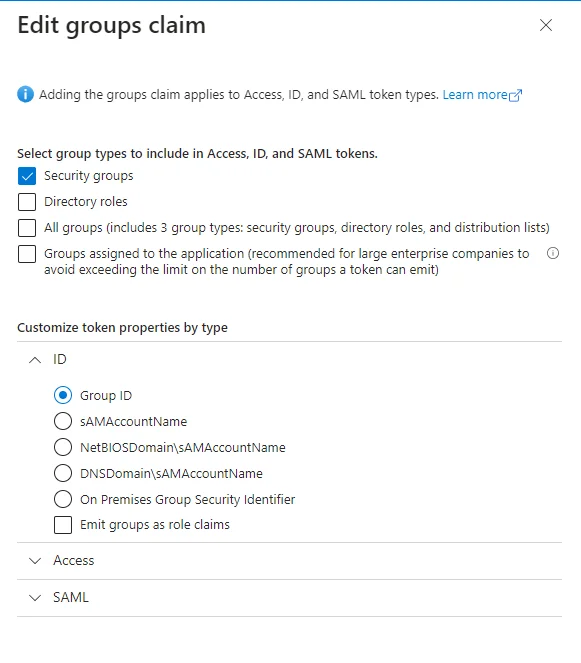
-
Click "Add groups claim". Ensure that "Security groups" is checked, and that "Group ID" is selected in "Customize token properties by type" > ID. Save this groups claim.
Groups are now included as the groups JSON array claim in the ID token returned from Azure AD to Comet. The next step is to ensure that they are validated.
-
In the Settings page in Comet Management Console, navigate to the existing OIDC authentication source and edit it.
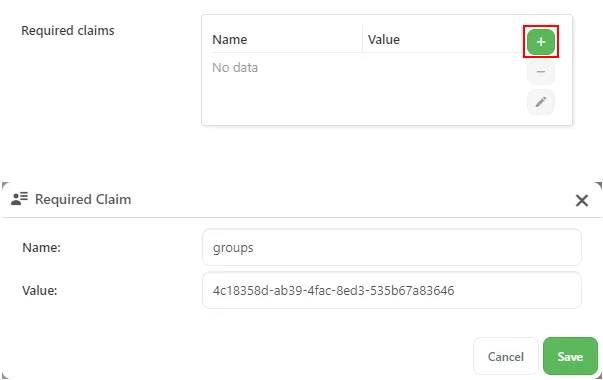
-
Add a new required claim with the name
groupsand the value of the "Object Id" of the Azure AD group from step 1.
No additional scopes are needed; group claims are included by default once step 4 is complete.
- Save the OIDC authentication source and the server settings using the "Save Changes" button.
The Comet Management Console will now validate group membership of authenticating users and prevent those who are not members of the group from logging into Comet. Existing admin users who are not members of the group will retain their Comet admin accounts, but they will no longer be able to authenticate.
When a user without the configured group attempts to authenticate, they will be rejected and the following message will appear in the System Logs:
/api/v1/auth/sso/oidc/callback: failed admin OIDC login (failed to validate claims: missing value for required claim groups)
Multi-factor authentication with OpenID Connect
Comet supports its standard multi-factor authentication when an administrator authenticates using OpenID Connect; if an admin user has multi-factor authentication enabled on their account, Comet will prompt them to complete the appropriate MFA process when they have successfully authenticated at the OIDC OP and have been returned to the Comet Management Console web interface.
However, if a user has MFA enabled at their OP as well as Comet, they will be prompted to perform MFA twice --- once when authenticating at the OP, and again when they are returned to Comet. To avoid this, OIDC authentication sources can use the "Skip Comet multi-factor authentication" option to opt out of Comet's MFA even if admin users belonging to that source have it enabled for their account. This will cause Comet to fully defer to the OP for MFA; if the OP does not have MFA enabled or the user does not have it configured for their account at the OP, then no MFA will occur at either side.
System Self-Backup

System Self-Backup makes periodic copies of Comet's own database and configuration files, for safe-keeping.
System Self-Backup is a feature which is available only on Self-Hosted Comet Management Console. Comet-Hosted is a managed service which has a separate, regular backup. In Comet 24.3.0 or newer, daily System Self-Backup is enabled by default which saves the config files to: {server installation directory}/selfbackup.
We strongly recommend that you double check these settings and change it to run an hourly or daily backup to some off-site location.
On Windows, this will save a zipped copy of the contents of: C:\ProgramData\Comet, and, on Linux/Unix, this will save a zipped copy of the contents of /var/lib/cometd/. We recommend that you use the built-in System Self-backup function, rather than accessing these files directly, as they may be in-use. The System Self-Backup function can take a safe copy of in-use files.
For recovery, you will need to obtain the last zipped System Self-Backup file from just before the incident happened.
Because Comet Backup's normal operation requires access to a running Comet Management Console, if the Comet Management Console itself is unavailable, it is not possible to use Comet Backup to back up or restore the Comet Management Console. To avoid problems when restoring, the Comet Management Console Self-Backup feature stores all files in a simple zip file, allowing easy copy-and-paste recovery of the configuration and database files.
The backed-up data includes:
- User profiles
- User Policies
- Job History
- The Recent Activity page is based on Job History data, and therefore will be preserved during recovery
- Device News
- System Configuration
- Branding
- Files uploaded on the Settings page are included. Any branding images that were configured using custom on-disk paths may not be included.
- Serial License lease
Target
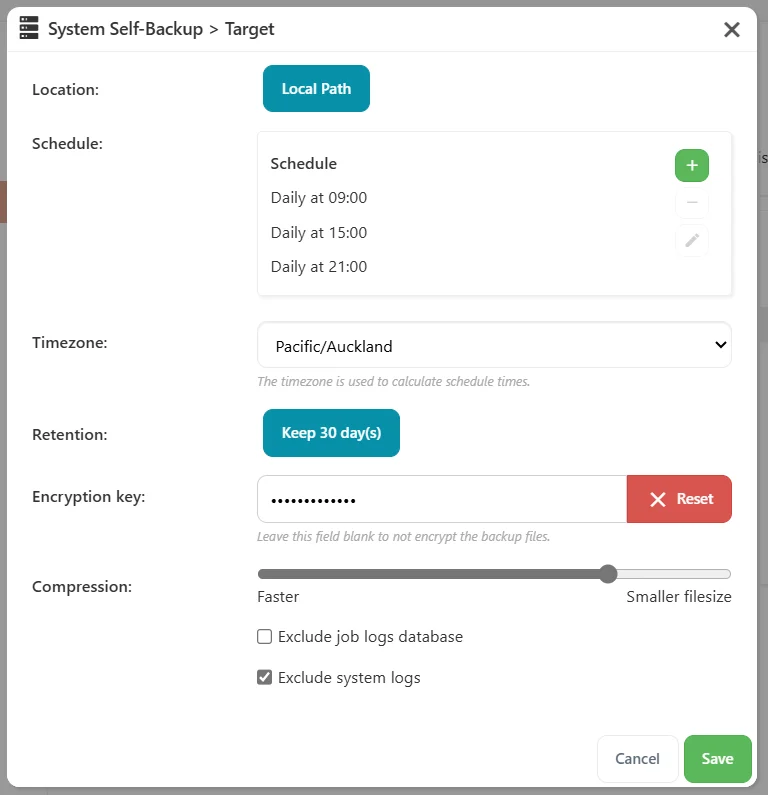
You can set up multiple targets for Self-Backup.
- Specify a location for where you want to backup your server data. All of Comet's normal locations are supported.
- Set a schedule for when this backup runs, using the timezone selected. All of Comet's normal schedule options are supported.
- Choose a retention range. Retention can be set up for Management Console Self-Backup to restore from any version within your retention range. All of Comet's normal retention options are supported.
- The target locations should be residing on separate locations. This avoids retention policies of one target to run with another target's backups.
- (optional) Add an encryption key. This will be the password to access the data (zip file)
- Compression lets you customize how the backup archive will be compressed.
- 'Faster' will build the archive quicker meaning less CPU cycles for your server but will result in a larger backup archive.
- 'Small filesize' will try to compress the archive to make it as small as possible but will take longer and more CPU cycles in doing so.
Exclude job history databaseorExclude system logscan be selected to trim down the backup archive size. This can be used to have a quicker and more frequent small backups, and then include the job history/System Logs on a less frequent and occasional backups.
On-demand Self-Backup

Backup now button is available to start the Management Console Self-Backup for all targets without waiting for their scheduled job.
Self-Hosted Management Console and Storage Gateway loss
Check out this guide on how to recover your management console.
System Self-Backup video tutorial
Integrations
Comet integrates with a handful of third party services. Check out the Third-party Service Addons for more details.
System branding
You can configure the appearance of the Comet Management Console web interface.

For more information on re-branding the Comet Management Console, please refer to our re-branding guide.
Additionally you can change the Backup Agent Branding.
Management Console
Management Console was previously known as "Authentication Role".

The Self-Hosted Comet software is split into separate features, as described in the "Application Architecture" section. If your Self-Hosted install is expected to only run a Storage Gateway or Management Console in your infrastructure, the other features should be disabled.
In cometd.cfg, the AuthenticationRole > RoleEnabled option configures whether the Management Console feature is enabled.
The Comet Management Console is responsible for managing users and job history logs. When this role is enabled, the following data files are used:
cometd-users.db- This file contains user profile information for all users. The expected file-size is small.cometd-jobs.db- This file contains textual job information for all job history. The file-size may grow to some tens of MB, or larger, depending on the retention and volume of job entries.
It is not safe to copy these .db files while Comet is running. You can backup these files and more using the System Self-Backup option.
Management Console properties

Keep job logs for: XX day(s) is how long to keep job logs in the job history before it automatically deletes after the specified time. Job history is located under Accounts > Job History.
Please note that if you have legal requirements to keep customer logs for an extended period of time, you should ensure this setting is configured appropriately. This setting affects the customer backup job reports; the Comet Management Console's server-side log entries; it does not affect the retention period for actual backed-up data within each customer's Storage Vault.
Missed backups
The Management Console is responsible for maintaining historical logs of each job. Comet Management Console can generate a virtual "missed" job corresponding to when a backup job was expected to run on schedule but no backup job was found. You can control generation of Missed Backup jobs via the AuthenticationRole > GenerateMissedBackupEvents property. This property defaults to true, but has no effect if the Management Console is disabled.
In general, we would suggest leaving this property enabled for primary servers, and disabling it for replica servers.
Missed backups are detected the following basis:
- A background task performs calculations every half-hour.
- If a scheduled backup job was expected to run at time
T, and no backup job for the same username, Protected Item, and Storage Vault occurred within the time rangeT - 5m...T + 15m, then a missed backup job will be injected with the start and stop time set toT.
Comet Management Console does not generate missed backup jobs for a time period older than the "Keep job logs for: XX day(s)" setting, as these would be automatically removed.
When extending the time period of the "Keep job logs for: XX day(s)" to a longer period, there is a blank period in the past for which Missed backup jobs may be eligible to be generated. To avoid this issue, or for any other reason, you can set a cut-off date before which no missed backup jobs will be generated, via the AuthenticationRole > NoMissedBackupEventsBefore configuration property (as a unix timestamp).
Internal database integrity checks
Comet Management Console supports running integrity checks on its internal database files (*.db3 files). It may take an extended amount of time to run these integrity checks.
The integrity check level for the Management Console job logs database (comet-jobs.db3) can be configured from the cometd.cfg file, by setting the AuthenticationRole > DatabaseCheckLevel property to a value from the below table.
Note that you do not need to enable this feature, unless, you have specific indicators that signal it will be useful.
| Value | Behaviour |
|---|---|
0 | Default - same as 2 |
1 | No checks (fastest) |
2 | wal rollup |
3 | wal rollup, and quick db3 check |
4 | wal rollup, and extended db3 check |
5 | wal rollup, extended db3 check, and compact db3 file size (slowest) |
Management Console replication

Management Console Replication replicates this Console's data (i.e. user profiles and policy group configurations) to the other Comet Management Console in one direction (the replica doesn't replicate data back to the main).
System logs and job logs are not replicated (currently).
For Storage Gateway Replication (i.e. storage buckets and their content) refer to the Storage Gateway Replication documentation.
Summary for setting up the replication server:
Self-Hosted Instruction: Install a new Comet Management Console meeting the system requirements (can be installed on a virtual machine or VPS) and ensure Management Console is enabled in the settings.
Comet-Hosted Instruction: For Comet-Hosted, provision a new Comet-Hosted Management Console from the Account Portal.
- On the Management Console you'd like to replicate, configure the Management Console replication settings on the Settings page to point at the new Management Console (this can be Self-Hosted or Comet-Hosted)
Storage Template

The Storage Template section is used to manage default storage options which are available when requesting a new Storage Vault for a user. When adding a Storage Vault for a new or existing account, you can simply assign a Storage Template instead of manually creating a storage location per account. Comet will automatically separate user data and therefore there is no need to create separate bucket locations manually.
The Storage Template will automatically assign a bucket location within the storage location. It is possible to configure it with your Self-Hosted Storage Gateway location/s and to a cloud storage provider directly.
Configure a Storage Template using a Self-Hosted Storage Gateway
You can configure your Storage Template to use a Self-Hosted Storage Gateway location in your Comet Management Console (there is no limit to the number of Storage Gateways a Management Console can connect to).
Once the Storage Template has been configured and given a name, an end user will see the named template as a storage location, without exposing where the data is stored (such as, not seeing cloud storage credentials or location). All they will see is that the data is stored by the Self-Hosted Storage Gateway (this can be changed via white-labelling and policies).
For a single Self-Hosted Comet install with Management Console and Storage Gateway enabled, create a new Storage Template. Leave the Address dropdown on Local and the Storage Template will use the current Self-Hosted install as the storage location.

To add an additional Self-Hosted Storage Gateway as a Storage Template option, create a new Storage Template, change the Address dropdown to Remote and input the credentials, such as IP address, username and password for your other Self-Hosted Storage Gateways.

Configure a Storage Template to backup directly to a cloud provider
You can configure a Storage Template with one of the supported cloud storage providers. When using this Storage Vault, the data will backup directly to the storage location and not pass through your Self-Hosted Storage Gateway (unlike using your cloud storage as the storage destination for Storage Gateway).
When assigning this Storage Vault to an account, the access keys granted will only have permissions for its own subdirectory and won't be able to access other accounts' data.
Create a new Storage Vault, change the Type dropdown to one of the supported cloud providers, and input your cloud storage details (Master key is required).
Current supported providers for direct-to-cloud Storage Template
- Amazon AWS
- Backblaze B2 Cloud Storage
- Comet Storage powered by Wasabi
- IDrive e2
- Impossible Cloud
- Storj DCS
- Wasabi Hot Cloud Storage
- Custom IAM-Compatible
Video tutorial
See our video on how to configure direct-to-cloud storage with Comet:
Email reporting
Email reports can be configured on the Comet Management Console in the Email Reporting tab. Configuring it here will have reports sent on ALL users configured on the Comet Management Console. It is also possible to configure email reports per User, on the User profile, or as a Policy template which can be applied to multiple users.
You should set the "Send as" properties to configure how email appears to the recipient.
In cometd.cfg, these properties can be set in the Email section > FromEmail and FromName properties.

Refer to our guide on managing backups efficiently with email reporting for more information on setting up email reporting.
Delivery method
You can choose to send email via one of four options:
None (Do not send email)
Select this option to disable sending email from the Comet Management Console.
The Comet Management Console will be unable to send email. You can use this option if you want to disable all outbound email from a Comet Management Console.
In cometd.cfg, this option can be set in the Email section > set the Mode property to "" (empty string).
MX Direct
MX Direct allows you to send email from this Comet Management Console without needing to configure a custom SMTP server. However, there is a greater chance of the email being discarded as spam. For more information, please see the "Failed email delivery with MX Direct" section in the Troubleshooting document.
In cometd.cfg, this option can be set in the Email section > set the Mode property to "builtin".
SMTP server
If this option is enabled, Comet will send email via an SMTP server.
The following options should be configured:
- Deliver via: SMTP Server
- Send as (display name):
- Send as (email):
- SMTP server address:
- SMTP server port:
- Username:
- Password:
- Security: one of "SSL/TLS" (default port 465), or "STARTTLS" (default port 587), or "Plain" (default port 25)
- Option to accept invalid SSL certificate from the remote SMTP server
- You should leave this option unchecked. However, if you encounter errors, you may choose to enable it.
- In comparison to how SSL certificates are used for HTTPS, it is surprisingly common for SMTP servers to use an invalid SSL certificate.
Custom HELO / EHLO
This option is available for the MX Direct and the SMTP Server options.
This field is optional and does not need to be specified.
When Comet Management Console submits an email to a remote mail transfer agent (MTA) - either directly to the MTA listed in the recipient's MX record, or indirectly via an SMTP MTA - it does so using the SMTP wire protocol. The SMTP wire protocol begins with a handshake stating the submitter's hostname (HELO or "extended hello"). The communication may then be unauthenticated (for receiving email from the wider internet) or authenticated (for submitting an email that is to be transferred further) before describing the email's contents.
As a spam prevention measure, the SMTP hostname field is often validated by the remote MTA using Forward-confirmed reverse DNS (FCrDNS). If the validation does not complete, the remote MTA may refuse to accept the inbound email, or treat it as a spam email. To successfully pass the validation, (A) the hostname specified in the HELO message should match the DNS name of the server, and (B) the DNS name of the server should pass a FCrDNS roundtrip.
By default, Comet Management Console will automatically use the server's own network hostname for the HELO handshake. However if you have not configured the PC's hostname to be a fully qualified DNS name, or the PC's hostname does not match the DNS for purposes of FCrDNS, you may use this settings field in Comet Management Console to customize the hostname submitted via HELO.
For MX Direct mode, it is recommended to set this value to your email domain. For SMTP Server mode, setting this field is optional and usually not required if your SMTP server requires authentication otherwise, as these credentials take precedence over the simple hostname check. However, some SMTP servers such as Google SMTP relay require setting the HELO to a valid value for compatibility.
Gmail account
If this option is enabled, Comet will send email via a Gmail account. Internally, this uses known configuration information for Gmail's SMTP server.
The following options should be configured:
- Deliver via: Gmail account
- Send as (display name):
- Email address: example@gmail.com
- Password: Enter your Gmail password
Gmail accounts with two factor authentication
If you are using two factor authentication for your email account then you will need to create a Gmail Application-Specific password or the email will not work.
Log into your Google account and visit your App passwords page. You may be asked to sign in to your Google account.
Click Select app and select Mail. Click Select device and select Other.
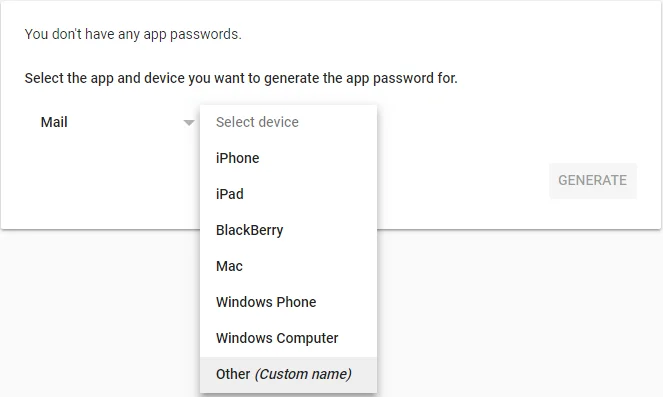
Type in the name of the device and click Generate.
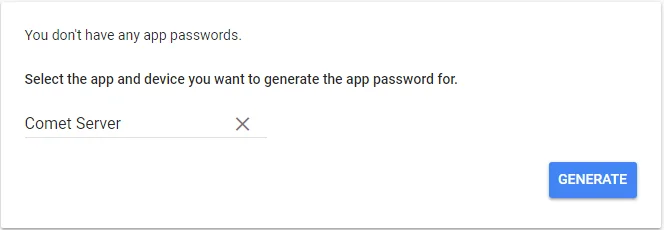
You will be given a password which you will use when setting up the Gmail account with Comet.
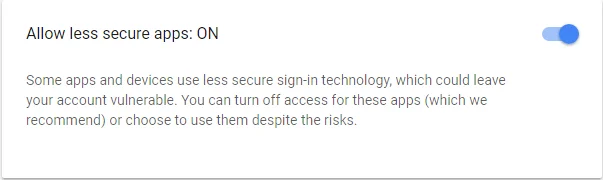
Allow less secure apps
If your Gmail is not working with Comet then you will have to enable the "Allow less secure apps" setting.
Log into your Google account and open the security settings.

Scroll down until you see Allow less secure apps and turn it ON.
Backup Agent branding
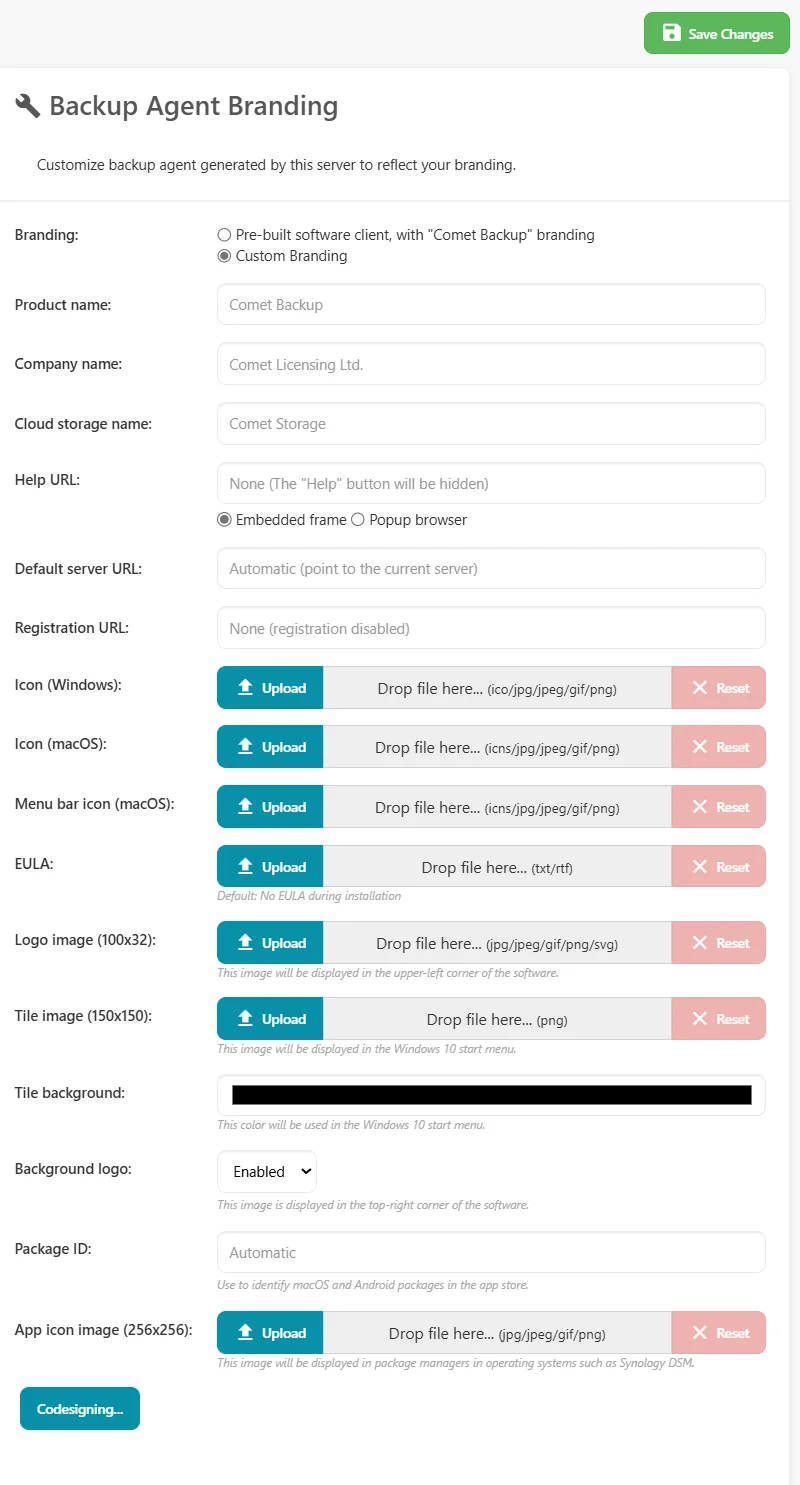
The Backup Agent Branding section is for rebranding the Comet desktop client. This can also be configured within cometd.cfg. When you make changes to your branding, it is required to update the desktop clients for the changes to apply. It is possible to update the branding for multiple devices at once using the Bulk device upgrade feature).
For more information, please refer to our full guide on re-branding the Comet Backup Client and details on codesigning the Comet Backup Client.
There is also a separate guide on re-branding the Comet interface.
Max Builders
In the cometd.cfg file (easily accessible with the "Edit configuration file" option in the Comet Core Service Manager) there is the variable labelled MaxBuilders located under SoftwareBuildRole. This option allows you to specify the max number of builders Comet can use when building the client installers. The default value is 0 which sets this to your CPU core count - 2.
Backup Agent downloads

The Backup Agent Downloads is the part of Comet Management Console responsible for generating branded client software installers and making them available for download. When this role is enabled, the Download backup agent page appears in the Comet Management Console web interface.
Options

Enable/disable the ability to download the Comet client for anyone visiting the Comet Management Console web interface.
Tenants
Prior to Comet 21.12.0, this feature was named 'Organizations'.

The tenants feature provides a way to divide your Comet Management Console into isolated zones. This can be used for any multi-tenancy purpose such as supporting resellers, client grouping, etc.
You can configure this feature either by the cometd.cfg file, or via the API without requiring a service restart, or via the Settings page (>=21.12.0).
To set up your Comet Management Console for multiple tenants:
- The tenant hostname(s) must resolve to the existing Comet Management Console
- The tenant hostname(s) must be unique (different from the existing Comet Management Console hostname, and different from other tenant hostnames).
Example: Your Comet Management Console will already be 'listening' for communications on a URL, eg: example.com, which, in turn, resolves to 123.123.123.123.
When adding a tenant, in the 'Hostname' section, add a new, unique URL for the tenant, eg: tenant.com. This URL should also resolve to 123.123.123.123 (or to wherever the Comet Management Console is located).
We would recommend that the tenant URL, and its resolution, should be something that you have configured and verified prior to adding the new tenant.
The tenant hostname should also be entered as a hostname on the top-level network settings.
In an automatic certificate (i.e. Let's Encrypt) configuration, these can be entered as a comma-delimited list in the existing network interface (e.g. backup.companyname.com,backup.tenant1.com).
If custom SSL certificates are being used, you will need to ensure that the certificates cover all tenant addresses, either by:
- creating a separate network interface for each domain's certificates,
- using a wildcard certificate and assigning tenants as subdomains of this domain.
When the Comet Management Console web interface is accessed from the configured hostname, the tenant's own branding will be used.
- In the tenant configuration, the hostname should be specified as a plain domain name only, such as
tenant.com, and excluding any port (e.g.:443) or protocol (e.g.https://). It is only possible to separate tenants based on the domain name, not the port or protocol.
Tenants are isolated from each other, but the usual top-level administrator does have hierarchal visibility into seeing a tenant's users, policies and so on. When logged in as a top-level administrator, any items belonging to a tenant (such as users, jobs, policies, and Storage Gateway buckets) are all specially marked with a badge containing the tenant name.

Each tenant has its own isolated set of:
- Admin user accounts. You can create admin accounts that will have limited visibility only to this tenant's set of customers.
- It is possible to reuse an Admin username between multiple tenants (>=21.3.0)
- Software Build
- Branding. When accessed on the configured hostname, the web interface and the Comet Backup software download would have your tenant's custom branding applied to it.
- Email return address
- User accounts and devices
- User Policies
- Storage Template settings. You can assign each reseller a different set of Storage Template providers, from a cloud provider or otherwise.
- It is possible to select the local Storage Gateway. In this case, the resulting Bucket will belong to the isolated tenant.
- It is possible to configure a remote Storage Gateway. In this case, the resulting Bucket on the remote Storage Gateway will belong to the same tenant as the credentials used.
- Cluster Manager
Some features are still system-wide:
- Bulk Upgrade Campaign: A tenant administrator does not have access to the bulk upgrade campaign page.
- Storage Gateway: The tenants feature does not allow tenant administrators to configure the Storage Gateway to store data in different locations other than what the top-level administrator has configured. If Storage Gateway is used, then buckets will be appropriately isolated for each tenant.
- Email deliverability configuration: Any email reports sent on behalf of the tenant can be delivered with the tenant's own configured 'From' name and return address. However, the actual deliverability configuration and/or SMTP details would be the same as for the top-level administrator.
- Replication. The replica Comet Management Console should be manually configured to have the same tenant IDs by copying the
Organizationssection in thecometd.cfgfile.
A tenant admin can only log in to the Comet Management Console web interface from their configured hostname with the matching branding. The top-level administrator account can only log in to the Comet Management Console web interface from a hostname that is not used for a tenant.
During API calls, tenant visibility restrictions are automatically applied based on your supplied credentials. A tenant admin user account can use the API to access their isolated zone without any API code changes.
- Prior to Comet 21.3.0, the top-level administrator could log in from any hostname, even with mismatched branding. Prior to Comet 21.3.0, administrator usernames were required to be unique across all tenants.
Transfer user across tenants
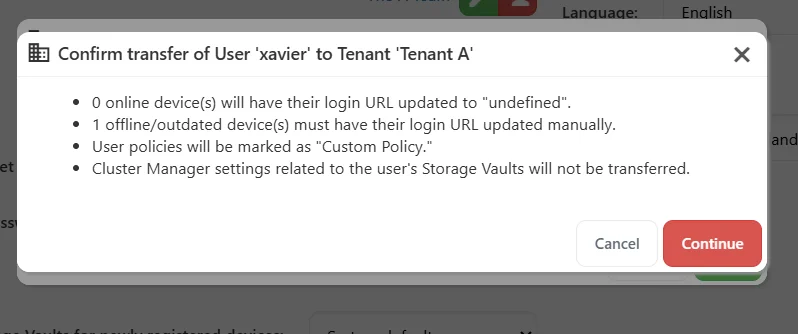
Main administrators will be able to move a user from one tenant to another. However this has several implications on the affected user and its devices.
- User Policies tied up with the previous tenant will be reset
- Only Online and up-to-date (>= 22.9.3) devices will have their login URL updated to the new tenant. Offline devices at the time of transfer will need its login URL to be updated manually so it can connect to the Comet Management Console again.
- If a user has Storage Vaults being cleaned up by Cluster Manager from the previous tenant, this needs to be sorted out prior to transfer. Cluster Manager from the previous tenant will not be unable to find the user as it has moved and it can purge that user's underlying bucket.
Go to the user profile you would like to transfer to a different tenant.

Choose the tenant you would like to transfer to user to under New Tenant.
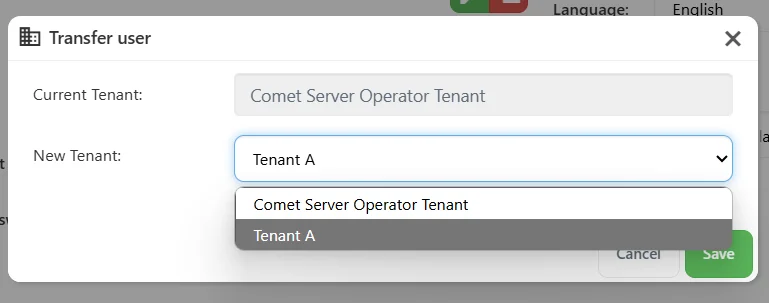
Confirm transfer of the user to the other tenant.
Tenant Cluster Manager
-
System wide Cluster Manager is required to be enabled.
-
Main administrator can configure the tenant's Cluster Manager configuration or they can leave it up to the tenant administrator.
-
Tenant administrator's Cluster Manager setting will only be available if (a) the entire system has Cluster Manager enabled and (b) permission is allowed to the tenant administrator


(a) a Comet has Cluster Manager enabled

and
(b) permission is allowed to the tenant administrator

Tenant Backup Agent downloads
System wide Backup Agent Downloads is required to be enabled.
Main administrator can configure the tenant's Backup Agent Downloads configuration. Backup Agent Downloads cannot be disabled by a tenant administrator.
- Tenant administrator's Backup Agent Downloads setting will only be available if:
(a) a Comet Management Console has Backup Agent Downloads enabled

and
(b) permission is allowed to the tenant administrator under the policy settings.

Storage Gateway

The Storage Gateway is the part of Self-Hosted Comet that is responsible for receiving and replicating any data uploaded by a Comet Backup account. When this role is enabled, the following data files are used:
cometd-buckets.db- This file contains metadata and authentication information for all Storage Vaults. The expected file-size is small.
It is not safe to copy these .db files while Comet is running.
In cometd.cfg, the StorageRole > RoleEnabled option configures whether the Storage Gateway is enabled.
When the Storage Gateway is enabled, data is sent to the Storage Gateway for storage in which ever destinations are selected, be it local path, or sending the data into a cloud-storage account you may have with a supported third party. This is discussed in better detail in the Storage Configuration section.
Note: when the storage destination is a cloud service, data will necessarily pass through your Comet Management Console to the cloud. This ensures that your storage choices are not visible to the end-user. If you are likely to encounter bandwidth issues, then you may wish to consider sending user data directly from the end-user to the cloud service. This will potentially expose your data storage choices to the end-user, as the credentials for access must be stored in the desktop client. You can control access to the desktop client via User Policies
Locations

You must configure a location where this Comet Management Console can store data. The path might be a local disk path, or a network account, or a cloud storage provider. For more information about the supported storage types, please see the Storage Configuration documentation.
Storage Gateway replication

Storage Gateway Replication replicates Storage Gateway data (i.e. storage buckets & its content) to the other Storage Gateways in one direction (the replica doesn't replicate data back to the main).
You can have your Replication server store the data using a cloud service provider or using your own storage.
For Management Console Replication (i.e. user profiles and policy group configurations) refer to the Management Console Replication documentation.
Summary for setting up the replication server:
-
Install a new Self-Hosted Comet meeting the system requirements (can be installed on a virtual machine or VPS)
-
On the Replication server, configure the Storage Gateway (can store data using a cloud service provider or your own storage)
-
On the main server, configure the Storage Gateway replication settings on the Settings page, to point to the replica
*Note: The admin account used for authentication must not have 2FA enabled.
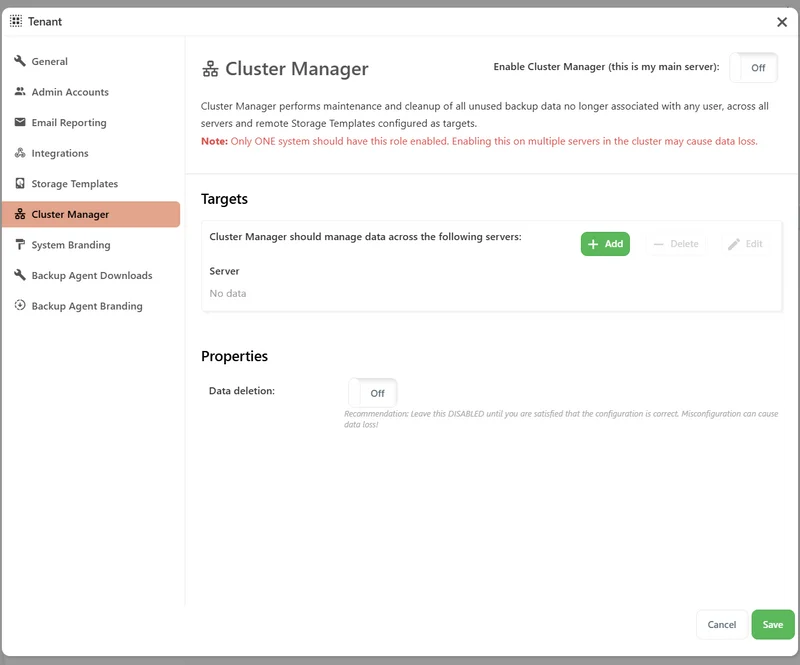
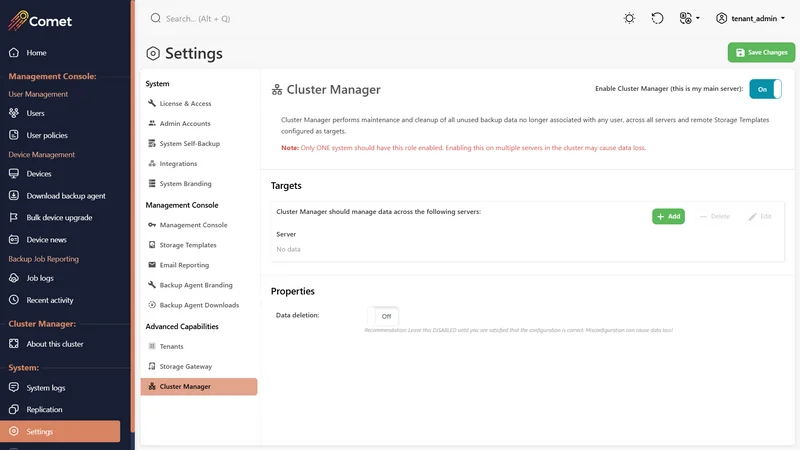
Cluster Manager

The Cluster Manager is the part of Comet responsible for providing global insight across multiple Comet installs (Comet-Hosted or Self-Hosted).
Recall that Self-Hosted Comet is designed to separate the Management Console and Storage Gateway to allow independent scaling.
- A small MSP using Comet software might have only a single Comet Management Console,
- A large MSP might have one Management Console and a dozen Storage Gateway installs,
- A white-label MSP might have a dozen different Management Console's all backed by a single Storage Gateway.
These latter cases are perfectly valid scenarios, but present some complexity when answering questions like "which user accounts are using this bucket" and "is this bucket safe to delete". The Cluster Manager communicates with all your Comet installs to produce a global overview of your entire cluster to help answer these questions.
Enabling Cluster Manager is optional. However, it is necessary if you want to automatically remove unused storage buckets from your Storage Gateway.
The Cluster Manager was formerly known as the "Constellation" role. The Constellation role was formerly known as the "Overseer" role.
Choose one (and only one) of your installs to have Cluster Manager enabled. You can then use the Report features inside Comet > "About this Cluster" > "View last scan result" or "Bucket users" to find which buckets are in-use by which accounts.


In cometd.cfg, you can enable the Cluster Manager by setting the property ConstellationRole > RoleEnabled to true.
Targets

When setting up the Cluster Manager you must add the other Management Consoles / Storage Gateways to manage.
In cometd.cfg, fill the Servers array with all your installs (including the Cluster Manager), in the same format as for replication targets and remote storage buckets.
If you add a new Comet Management Console, you should add it to the Cluster Manager Targets list.
If you add a tenant, you should add it to the Cluster Manager Targets list.
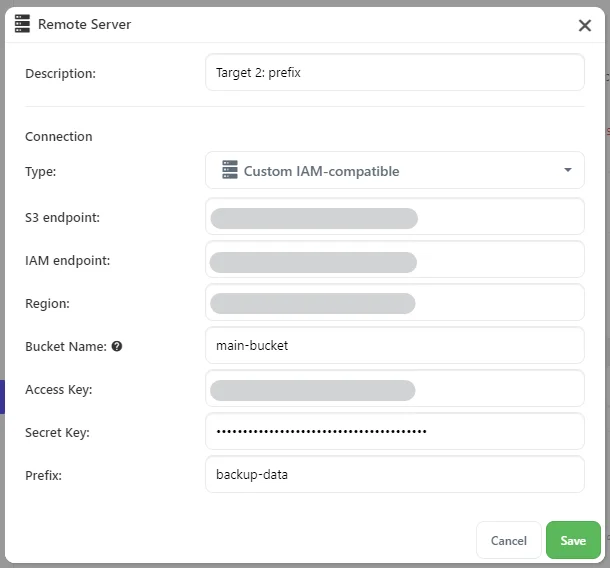
Custom IAM-Compatible target
If you have Storage Vaults in both the main bucket and prefix, you will need to configure two targets. This will allow Comet to list Storage Vaults inside both main and prefix.
- Target 1: the main bucket
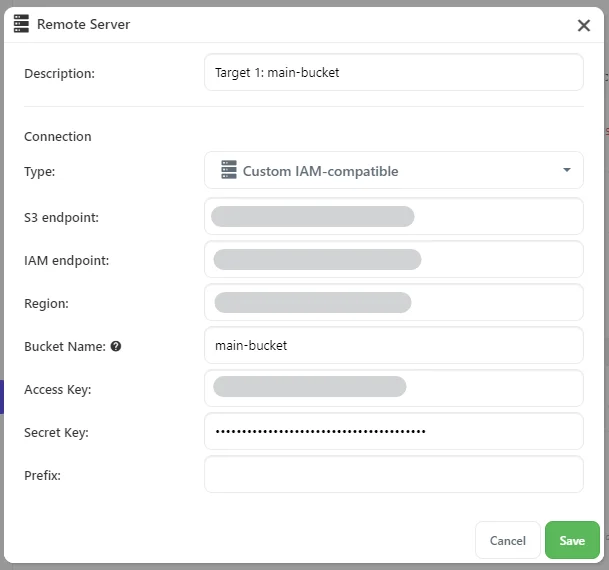
- Target 2: the prefix
Properties

The Cluster Manager will automatically produce a bucket usage report every hour, listing for each bucket (A) which Self-Hosted Storage Gateway the bucket exists on, and (B) which users have a Storage Vault configured pointing to this bucket. This information is sufficient to identify unused buckets in order to reclaim storage space on your Storage Gateway.
In the default configuration, no data will be deleted as a result of running this report. Once you are happy with the result of this report, you can enable the deletion feature to allow the Cluster Manager to delete unused buckets automatically.
Please keep an eye on the System Logs in order to draw attention to any correctness issues with the report.
In cometd.cfg, you can configure this option via the ConstellationRole section > DeleteUnusedData property.
Risks
It is essential that the Cluster Manager has access to every single one of your Management Consoles (Self-Hosted and/or Comet-Hosted) and Self-Hosted Storage Gateways. If a new Management Console is added to your infrastructure, but not added to the list of installs managed by the Cluster Manager, then Cluster Manager will see that the buckets are unused and remove them.
Such an issue should be obvious when the customer's next backup job fails to run. If the issue is noticed early, then recovery should be possible by reverting to an earlier filesystem snapshot (if available) or by re-uploading the data. However, if backup jobs are performed infrequently, or if the issue occurs at the same time as another outage, it may be more difficult to recover from the issue.
If an Management Console is found to reference a Storage Gateway outside the Cluster Manager vision, then a warning message will be added to the log file.
Saving changes
If you are applying changes via the Comet Management Console web interface, the Comet Management Console will restart to save your changes. The Comet Management Console will be automatically restarted by the service system. Any running backup jobs will resume automatically.