Disk Image walkthrough
Overview
This is a walkthrough of using the Disk Image backup type.
Note: The backed-up disk image data will deduplicate with other data existing inside the Storage Vault. A backup of Files and Folders in the same data volumes should achieve a high degree of space savings.
Backup using Disk Image
Create a Protected Item using the Disk Image backup type

- Note: Using this Protected Item will incur a Booster charge - see Pricing, and requires Windows 7, or Windows Server 2008 R2, or later.
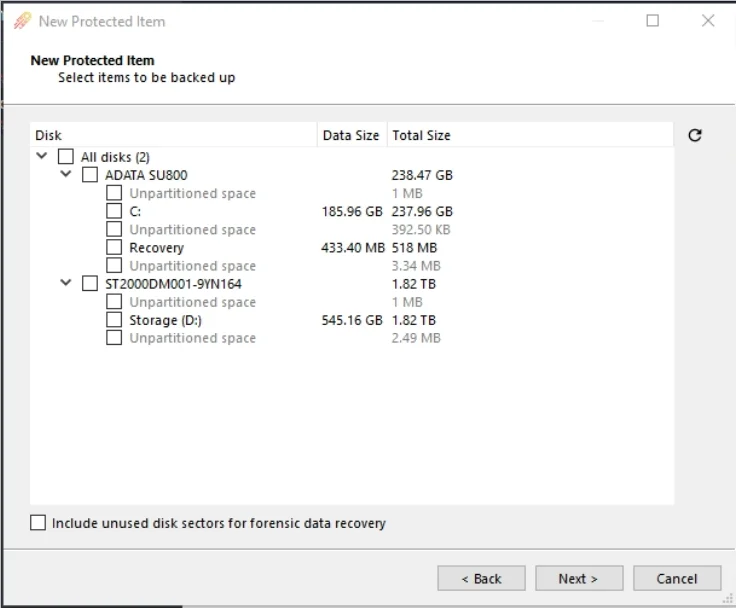
Select partitions for backup
Select any currently-attached drives or individual partitions from any drive for backup. It is possible to select “all drives” and exclude individual disks or partitions.
- If there is any change to the partition structure of a drive, it will cause that drive to be recognized differently in Comet. If such a drive is selected, Comet will warn that the drive can no longer be found. You must reselect the drive and/or partitions.
Include unused disk sectors for forensic data recovery
Comet will exclude unused space from the disk in the backup, but turning on this option will include any non-indexed and marked-as-deleted files in the free space. This could be used for forensic data recovery, but keep in mind that it will lengthen the backup time.
Restore Disk Image protected items
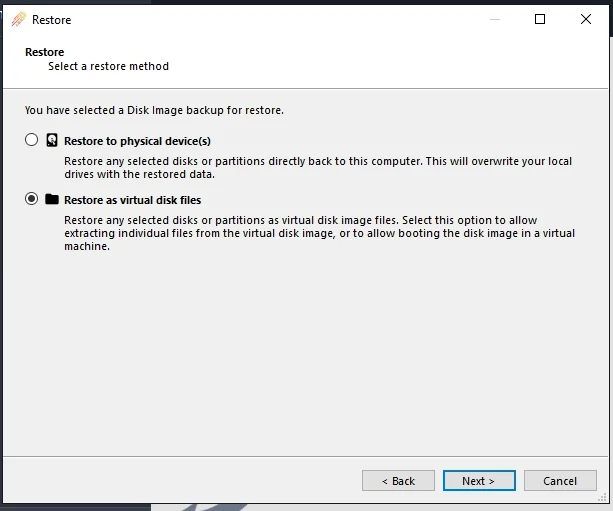
Restore options
The Restore wizard inside Comet Backup allows restoring of backed-up disks and partitions directly to physical disks and partitions, without requiring temporary spool space. Alternatively, it can be restored as virtual disk files.

- It is possible to perform single files extraction with alternative software. Click here for our recommended software for extraction.
Restore to physical device(s)
In order to restore to physical hardware, the target disk or partition should be unmounted (not in use). Comet may be able to do this automatically from within the currently booted OS if no programs are using the target drive (e.g. for a non-boot drive).
-
If the goal is to restore to the boot drive, first, reboot the PC into a recovery environment.
-
When restoring a smaller partition into a larger one, Comet will automatically extend the restored filesystem to the fill the target partition. Comet does not support restoring a large backed-up partition into a smaller physical partition. The partition must be shrunk using the OS’s partition manager prior to performing the backup.
Restore from Windows boot environment
-
Select a backed-up disk or partition to restore, from the left-hand column
-
Select a target disk or partition to write to, from the right-hand column
-
Click the Add to restore queue button
-
Repeat steps 1-3 as necessary for other disks and partitions
-
Click the Restore button to begin the restore job

- The Edit function can be used to repartition the local drives using Windows Disk Management. After doing so, the Refresh function may be used to refresh the view of the local disks and partitions able to be selected for restore.
Restore from Linux boot environment
Steps to restore an entire disk, without spooling:
-
Restore just the
disk.vmdkfile (without the data extents), and open it in a text editor in order to read the partition sizes. -
Recreate partitions to the exact target size
-
Single partitions can be restored without any local spool disk, using the "Program Output" restore option, and selecting only a single partition file for restore:
dd of=/dev/sdx1 bs=8M
Restore as virtual disk files
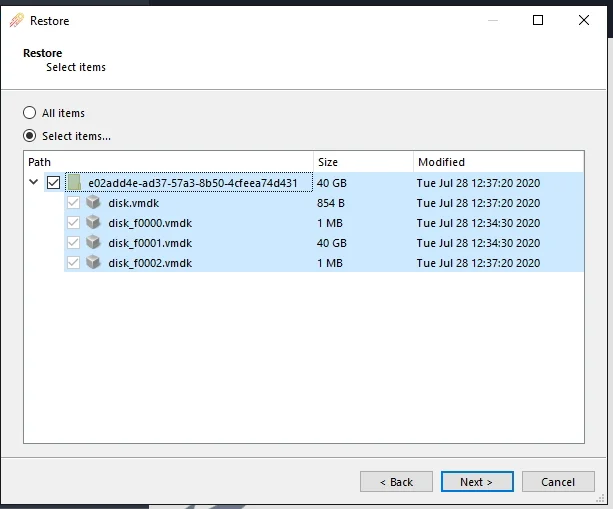
There is one plain text VMDK descriptor file containing metadata about the whole drive, plus separate raw image files for each partition’s extent on the disk. The plain text file is labelled disk.vmdk by default.
Partitions of the disk that were not selected for backup are represented as zero extents in the VMDK descriptor file. The effect of this is that the restored disk image will appear to have the full disk size, even if only a small amount of partitions inside it were selected. However, the zero extents will be compressed inside the Storage Vault.

The VMDK disk images may be restored, then, optionally, do one of the following:
Granular restore
This allows a user to browse the filesystem in a VMDK disk image and restore the single files and/or folders without downloading the whole VMDK disk image in advance. For more details, see the appendix.

Restore as VMware virtual disk
Added in 23.9.5, disk image backup can now be restored as a VMware-compatible virtual disk which can be imported and used without any conversion.
The disk.vmdk descriptor file must be restored. Virtual data disk files will either be restored as one single extent (disk-flat.vmdk) if the partition table is available or as individual extents, e.g. disk_f0002-flat.vmdk.
Create USB Recovery Media
The Comet Backup desktop app supports the creation of USB Recovery Media from the wizard on the Settings screen.
This allows a user to boot from the USB device, type-in the username and password for the Comet user profile, and make a full restoration from backup onto the drive(s) of the connected PC. In this fashion, bare-metal restorations can be achieved.
Refer to the full Recovery Media guide for full instructions.
Video tutorial
Amazon Web Service AWS

Creating a Virtual Machine in the AWS cloud from a Comet Disk Image Backup
- All example commands executed in Windows PowerShell
You will need:
- An AWS account and API access keys for it
- Access to EC2 and S3 using your API access keys
- A correctly configured AWS EC2 environment
- Amazon generic guide: https://docs.aws.amazon.com/vm-import/latest/userguide/vmimport-image-import.html#import-image-prereqs
Perform restore in Comet to create VMDK files
- Note: The restored files will be the same size as the original disk size, so ensure you have enough space in your restore location.
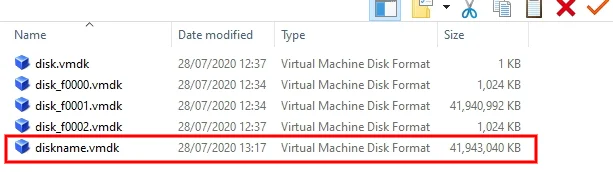
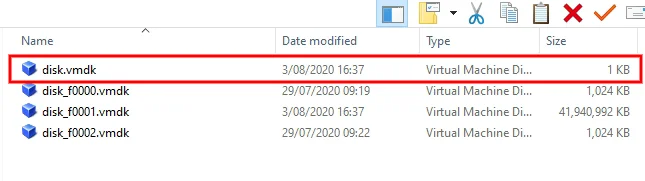
- Produces files as shown below
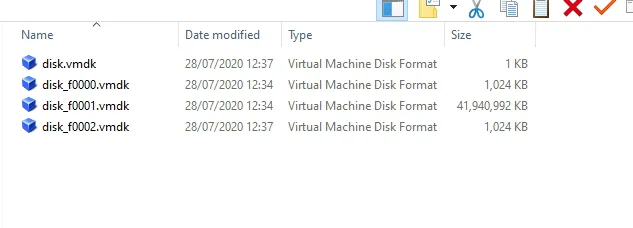
Concatenate the restored files to produce a single VMDK
- When concatenating the files, don’t include the 1 KB descriptor file. Running the example command below will produce a singleton file the size of the original partition as shown.
- Example command:
cmd /c copy /b .\disk_f0000.vmdk+.\disk_f0001.vmdk+.\disk_f0002.vmdk diskname.vmdk
Upload the VMDK file to the AWS folder
-
Example command:
aws s3 cp .\diskname.vmdk s3://bucketname/subfolder/ -
Verify the contents of the storage folder:
aws s3 ls bucketname/subfolder/(note the trailing '/') -
Create a local file.json file for importing the image into AWS
Example:

Run the AWS import-image command with file.json as parameter
- Example command:
aws ec2 import-image --region <yourregionname> --disk-containers "file://C:\path\to\file.json" - Initial response similar to:
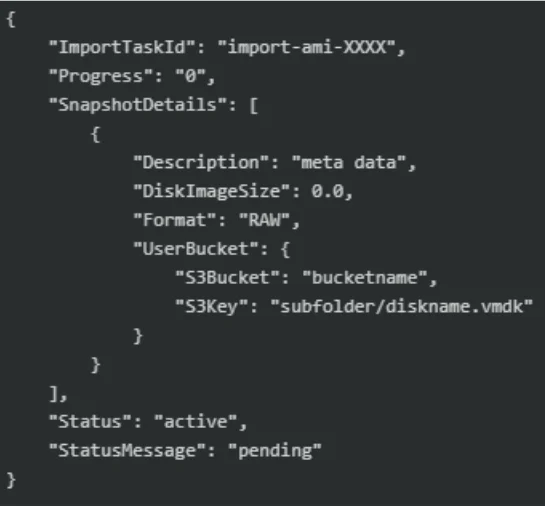
Note the 'ImportTaskId' in the form of: “import-ami-XXXX”
- Example command to show ongoing progress:
aws ec2 describe-import-image-tasks --import-task-ids import-ami-XXXX --region <yourregionname> - Ongoing progress similar to:
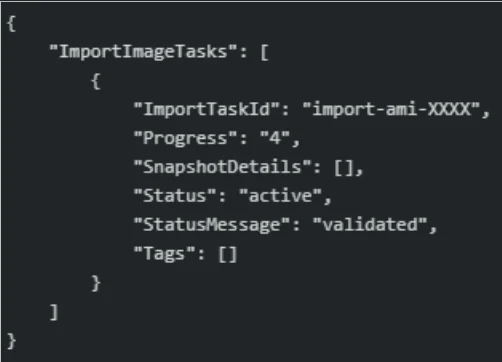
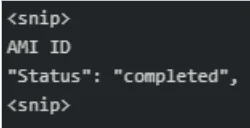
- When the command to show ongoing progress returns
“Status”: “completed”,note down theAMI ID
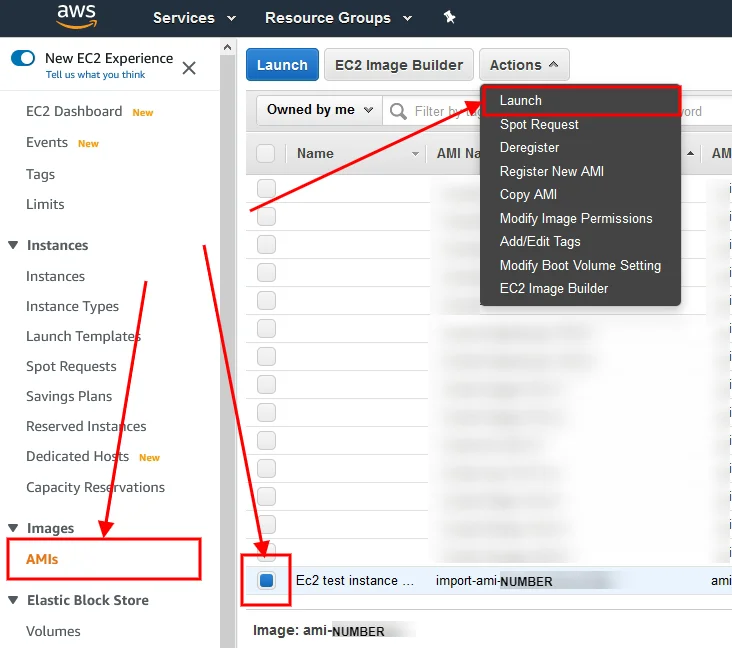
Connect via RDP
- Log in to AWS website
- Select ‘Services’ drop-down
- Select ‘EC2’

- Select 'AMIs'
- Tick to select the
AMI IDfrom the previous step - Actions
- Launch
- Configure and launch

- Select the launched instance
- Select Connect
- Download remote connection details
- Use your preferred Remote Desktop program to connect using the downloaded details

Azure
Creating a Virtual Machine in the Azure cloud from a Comet Disk Image Backup
- All example commands executed in Windows PowerShell
- Azure accepts only VHD file format, so images must first be converted to this format. Example instructions included below.
- Install and configure MS Azure command-line interface (CLI): https://aka.ms/installazurecliwindows
- If using an existing VM, Microsoft recommends that it be prepared first: https://docs.microsoft.com/en-us/azure/virtual-machines/windows/prepare-for-upload-vhd-image?toc=/azure/virtual-machines/windows/toc.json
Perform restore in Comet to create VMDK files
- Note: The restored files will be the same size as the original disk size, so ensure you have enough space in your restore location.
Produces files as shown below
Convert VMDK to VHD format
- We used QEMU utility with the 1 KB VMDK file from the previous step (with fixed-size-type required by Azure).
- Example command to convert VMDK file to VHD format:
.\qemu-img.exe convert C:\path\to\disk.vmdk -O vpc -o subformat=fixed C:\path\to\disk.vhd - Note: The disk.vhd image just produced can now be imported, without further changes, into any locally-installed MS Hyper-V program.
Resize the VHD file upwards to the nearest megabyte multiple if needed
- The size of the disk.vhd file from the previous step must be a multiple of megabytes (ie: the VHD file-size needs to be a number exactly divisible by 1024).
- Example command to find file size:
ls C:\path\to\diskname.vhd = X - Our example produced a file of size X = 41943040 KB
- X/1024/1024 must be a whole number. You may need to resize your own file upwards to a megabyte-multiple.
- An exact next-biggest megabyte-multiple for our example 40 GB disk = 42951770112 bytes.
- We resize our example file to illustrate:
- Example command to resize the disk.vhd file upwards to a megabyte multiple:
resize-vhd C:\path\to\diskname.vhd -SizeBytes 42951770112 - Note: This creates a resized VHD file of size 42951770624 bytes. Azure 'resize' command adds 512 bytes for their footer 42951770112 + 512
Create empty managed disk on Azure
- Example command to create empty managed disk on Azure using the size parameter from the previous step:
az disk create --name azure-disk-name --resource-group azure-resource-name --sku standardssd_lrs --hyper-v-generation V1 --location australiaeast --for-upload true --upload-size-bytes 42951770624 - Use your own preference parameters for disk-name, resource-group, hard-disk type, location. Other VM parameters, such as CPU and RAM allocation, can be added later. Location parameter can be selected via:
az account list-locations -o table
Grant write access to obtain ‘sasURI’
- Example command to grant write access to Azure:
az disk grant-access -n azure-disk-name -g azure-resource-name --access-level Write --duration-in-seconds 86400 - Produces an sas-URI: similar to: "https://xx-xxxxx-xxxxxxxxxx.blob.core.windows.net/xxxxxxxxxx/abcd?sv=2017-04-17&sr=b&si=xxxxxxxx-xxxx-xxxx-xxxx-xxxxxxxxxxxx&sig=xxxx%3D"
- Note: Azure charges while disk is writeable
Upload the VHD file to Azure
- We used the convenient AzCopy https://adamtheautomator.com/azcopy-setup/
- Command format:
AzCopy.exe copy "C:\path\to\diskname.vhd" "sas-URI" --blob-type PageBlob - Example command to upload the VHD file to Azure, using the sas-URI from the previous step:
AzCopy.exe copy "C:\path\to\diskname.vhd" "https://xx-xxxxx-xxxxxxxxxx.blob.core.windows.net/xxxxxxxxxx/abcd?sv=2017-04-17&sr=b&si=xxxxxxxx-xxxx-xxxx-xxxx-xxxxxxxxxxxx&sig=xxxx%3D" --blob-type PageBlob - Note: To reduce costs, revoke write-access when finished uploading.
- Example command to revoke write access:
az disk revoke-access -n azure-disk-name -g azure-resource-name
Create the new VM in Azure
- Example command to create the new VM in Azure using the azure-disk-name file uploaded from the previous step:
az vm create --resource-group azure-resource-name --location australiaeast --name new-vm-name --os-type windows --attach-os-disk azure-disk-name - Use your parameters for resource group, location, vm name.
- Example result from command to create new VM in Azure:

- Copy the ‘publicIpAddress’ field
Connect via RDP
- Use your preferred Remote Desktop program to connect to the ‘publicIpAddress’ from previous step: “XXX.XXX.XXX.XXX”
VirtualBox
Creating a VirtualBox Virtual Machine from a Comet Disk Image Backup
Getting started
- This backup method requires VirtualBox v6.x if MS Hyper-V is running simultaneously, otherwise earlier versions will work.
Perform restore in Comet to create VMDK disk files
- Note: The restored files will be the same size as the original disk size, so ensure you have enough space in your restore location.
- Produces files as shown below
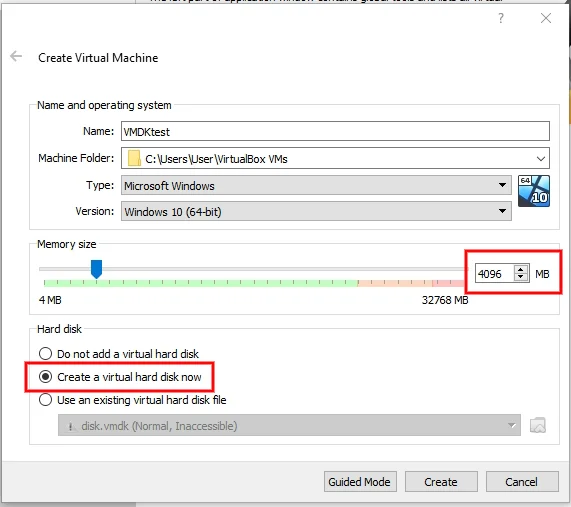
Open VirtualBox and create a new virtual machine
- Select ‘New’ on main screen of VirtualBox as shown below

- Allocate RAM and virtual hard disk space. Use your own preferences for system requirements
Add hard disk
- Open VirtualBox Settings as shown below
- Storage
- SATA Controller
- Add Hard Disk
- Select the 1 KB “disk.vmdk” file restored earlier (as shown below)

Finalize configuration and Start
- Finalize CPU, RAM, etc.
- Start the VM
