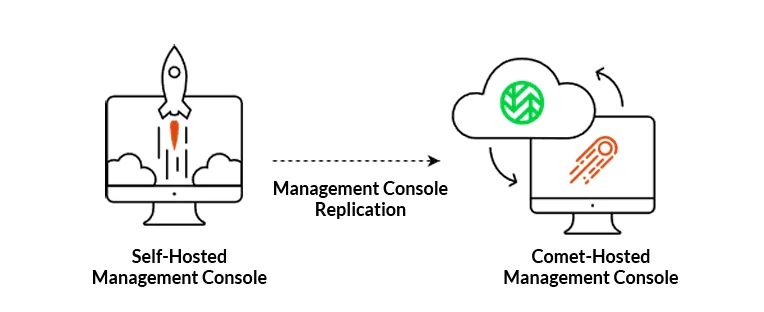
Self-Hosted to Comet-Hosted migration guide
Prerequisites
- A Comet-Hosted already created, using a different Domain/IP from your current Self-Hosted Management Console.
- Self-Hosted Management Console on 24.8.0 (or later).
Users, policies and settings migration
To perform the migration of users and setting from your Self-Hosted, we will replicate the Management Console role to the Comet-Hosted Management Console.
You do not need to disable backups while Management Console replication is setup between your Self-Hosted and Comet-Hosted Management Console. Any changes made on your Self-Hosted will automatically be sent (replicated) to your Comet-Hosted Management Console.
Management Console replication
-
Go to the My Services page on the Comet Account Portal.
-
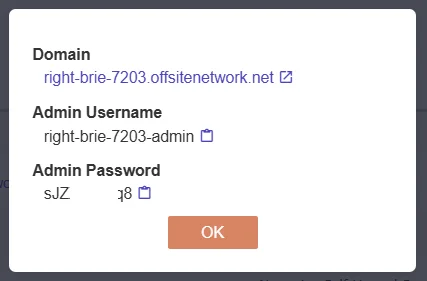
Copy the Domain/IP for your new Comet-Hosted, as shown in the screenshot below.

- Copy the admin username and password for this Management Console by clicking the Actions drop-down on the right side of your Comet-Hosted under Login Details.
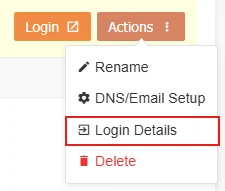
- Upon clicking Login Details, you will be shown the username and password in a pop-up. Copy the username and password.
- On your Self-Hosted Management Console, head to the Settings Page then Management Console. Click the "Add" button on Replication settings.

- A new pop-up to configure Management Console Replication between your Self-Hosted and Comet-Hosted. Enter the following information:
-
Description: Can be any name, for this example we will use “Comet-Hosted Migration”
-
Address: Leave the drop-down as Remote and enter the Domain/IP of your Comet-Hosted Management Console. In this example, it is https://right-brie-7203.offsitenetwork.net/
-
Username: Enter the admin username for your Comet-Hosted Management Console
-
Password: Enter the admin password for your Comet-Hosted Management Console
-
Cleanup: Leave as None

- Once these settings are entered, click Save on the pop-up. Then click “Save Changes” in the top right of the settings page. You can check if it is working by clicking the Replication Page.
- You can further confirm this by logging into your Comet-Hosted and checking that all user and device information are there. You will notice that all devices are currently offline. This is expected and the device migration will be performed later.
Manual steps: branding and codesigning
The above migration will copy all data except the following:
-
Branding settings
-
Codesigning settings
Re-branding the Comet Management Console and backup agent as well as codesigning will need to be setup again from scratch on your Comet-Hosted.
Device migration
Our recommended way to perform the device migration is to change the Domain/IP your Comet-Hosted is running on to the same as your Self-Hosted. This is so all devices, online or offline, will automatically connect to the Comet-Hosted and work as normal.
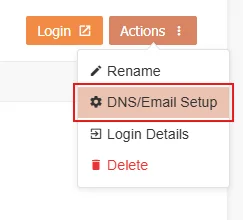
To change the Domain/IP of your Comet-Hosted, go back to the My Services tab of your Comet Account Portal, then click on Actions. Under Options, click on DNS/Email Setup.
Type in the Domain/IP of your Self-Hosted in the Custom Domain field and hit Save at the top-right.
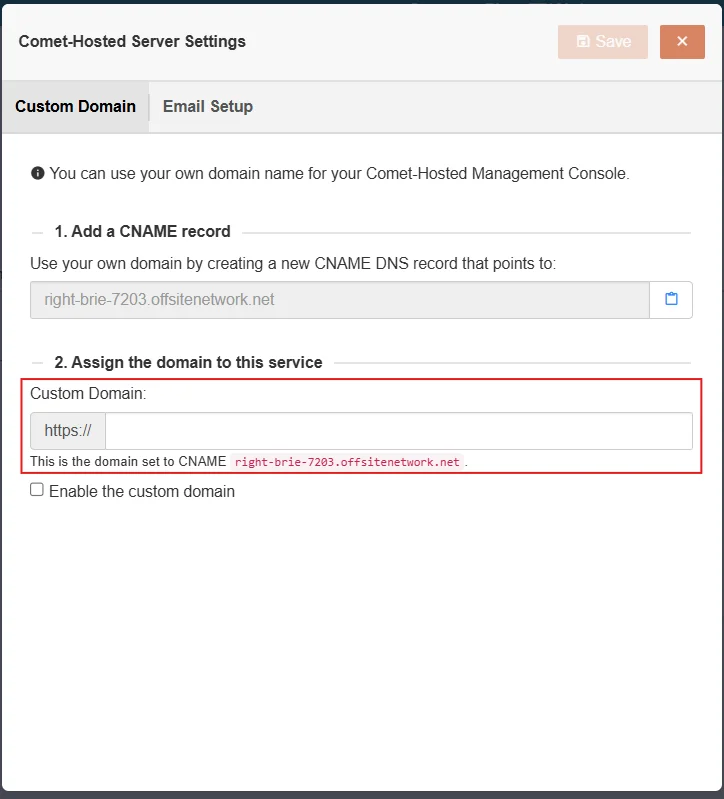
It will take 10 or so minutes for the CNAME record to update fully, and then devices will appear online on your Comet-Hosted Management Console.
Using a new Management Console IP/Domain
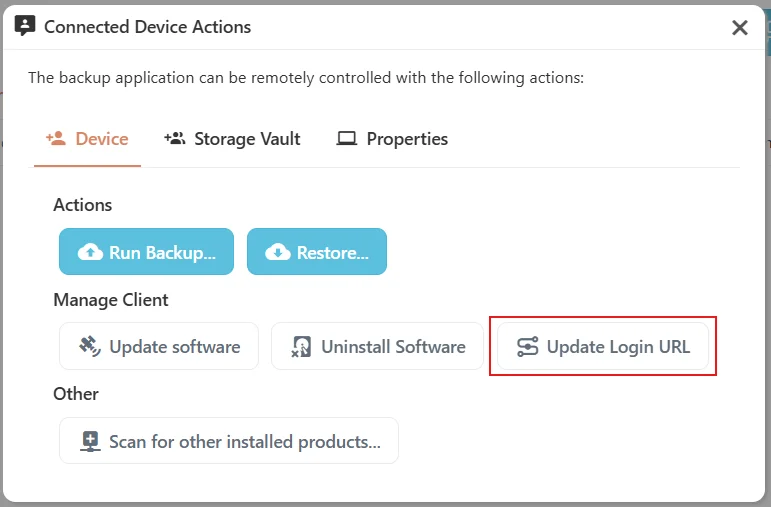
You can choose a new IP/Domain for your Comet-Hosted. To migrate devices to your new IP/Domain you can use the “Update Device Login URL” feature. The limitation of this feature is it can only be performed for online devices.
On your Self-Hosted, head to the Devices page. Select the actions button for an online device.

Here, click on Update Login URL.
Then enter the new IP/Domain and click on Update.
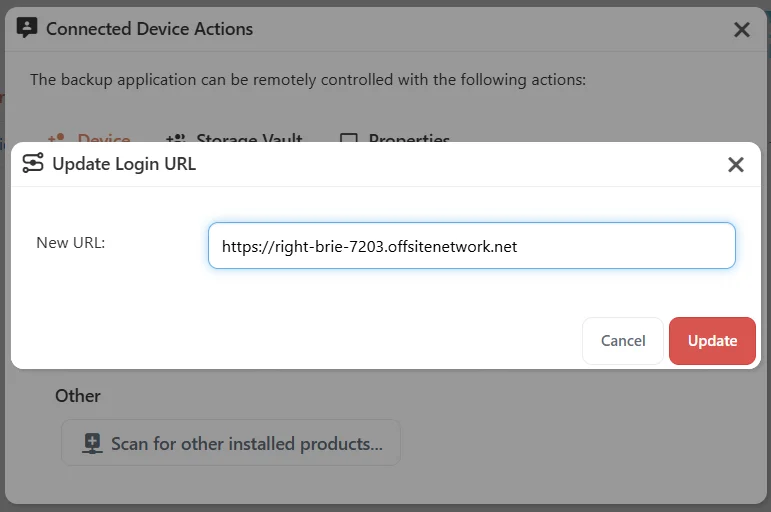
Once updated, the device will now appear as Online on your Comet-Hosted.
Final steps
Once the migration is complete, you will need to disable replication on your Self-Hosted. If replication is left enabled, any changes that occur on your new Comet-Hosted will be reverted by the Self-Hosted.
Storage migration
Direct-to-Cloud
If you are already using Direct-To-Cloud Storage Vaults and/or Templates, no Storage Migration is required. This includes the following:
- Amazon S3
- Amazon S3 (Object Lock)
- Backblaze B2 Cloud Storage
- Comet Storage
- Comet Storage (Object Lock)
- Google Cloud Storage
- IDrive e2
- Impossible Cloud
- Impossible Cloud (Object Lock)
- Impossible Cloud (Partner API)
- Impossible Cloud (Partner API) (Object Lock)
- S3-compatible
- S3-compatible (Object Lock)
- Wasabi
- Wasabi (Object Lock)
- Amazon S3 China
- Amazon S3 China (Object Lock)
- Azure Blob Storage
- Catalyst Cloud
- Cynny Space
- Digital Ocean
- Filebase
- OpenStack Swift
- Storadera
- Storj DCS
Local Path
If you are using Local Path Storage Vaults, no Storage Migration is required.
FTP
If you are using FTP Storage Vaults, no Storage Migration is required.
SFTP
If you are using SFTP Storage Vaults, no Storage Migration is required.
SMB
If you are using SMB Storage Vaults, no Storage Migration is required.
WebDAV
If you are using WebDAV Storage Vaults, no Storage Migration is required.
Spanned
If you are using Spanned Storage Vaults, a Storage Migration may be required. This will depend on the underlying vaults configured as part of the Spanned Storage Vault.
Please reach out to Comet Support for assistance here.
Comet Backup (Storage Gateway)
If you are using Comet Backup (Storage Gateway) Storage Vaults, a Storage Migration is required for this to continue working.
Please reach out to Comet Support for assistance here.