Recovery Media
About the Recovery Media
Recovery Media is a standalone, bootable operating system. The recovery media allows you to boot a device into the recovery operating system, in order to run the Comet Backup application and connect to your Comet infrastructure (Management Console and/or Storage Gateway) over the network, to replace the device's primary operating system during a Disk Image restore.
Comet Backup includes a built-in feature to create custom recovery media on a removable USB flash drive, a external USB hard drive, or an ISO file, via the "Create Recovery Media" menu option:
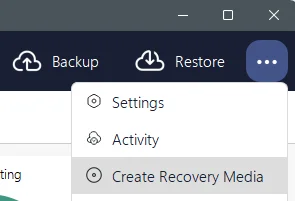
The following options are available:

WinRE
WinRE is the default option for creating Recovery Media within the Comet Backup desktop app. It can be created either on a physical USB drive, or as an ISO file.
System requirements
This option is only available if the Comet Backup device is running Windows.
This option requires that Windows Recovery Environment is installed and available on your PC. If it is not installed, you may be able to install it via the reagentc /info command.
Create as USB
Selecting this option allows you to create a minimal USB Recovery Media based on the Windows Recovery Environment. This option is recommended when restoring a physical PC.
This option requires a removable USB drive of at least 2GB in size and up to 32GB. The size requirements may be larger if additional drivers get installed into the image.
External USB hard drives are not widely compatible with this option. However, they may boot correctly depending on your hardware. Check the "Show all drives" checkbox to show available external USB hard drives.
Create as ISO
Selecting this option allows you to create a minimal ISO image file based on the Windows Recovery Environment. This option is recommended when booting the ISO in a virtual environment or in a cloud VM.
Configuration
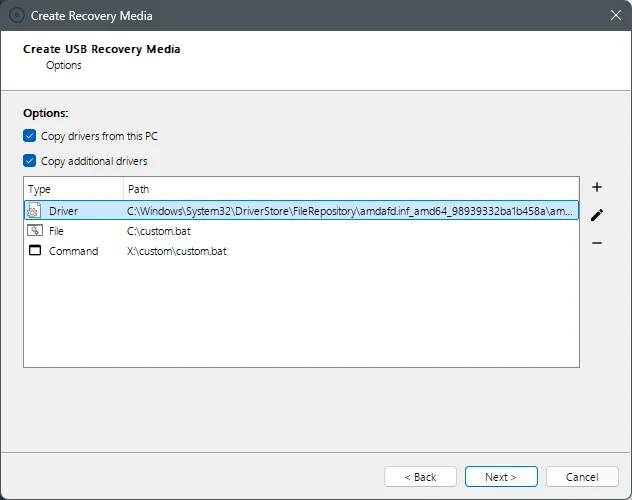
On most common hardware, WinRE will successfully boot in a basic way without requiring additional drivers. However, adding additional drivers to the generated recovery media may be necessary for some hardware and may improve your experience when using the recovery media.
You can choose whether the current OS drivers are copied into the recovery media. This feature extracts in-use third-party drivers from the current OS using the dism /export-driver technology.
- The exact selected drivers will depend on your running OS. In our experience it mostly includes OEM drivers. The included drivers could be of any type (chipset/network/graphics/audio/usb/pcie/storage/...). There are no guarantees about what drivers will be added, but it should generally be helpful in making sure you can use the device.
Optionally, you can choose to add (slipstream) additional drivers and programs into the image.
- You can add drivers in
*.inffile format. This is the standard file format for driver installation packages on Windows. When choosing this option, the Comet Backup desktop app will open a file picker to theC:\Windows\System32\DriverStore\FileRepository\directory that contains most currently-installed driver packages on the current PC. - You can add custom files and folders. These will be copied to the resulting media under the virtual
X:\custom\directory. - You can add a custom command to run during startup. For instance, this may be useful to run any driver installer that was only available as a custom installer exe file. Because custom files and folders are copied under the virtual
X:\custom\directory, your resulting custom command to run should take the formX:\custom\my-installer.exe.
After completing configuration and generating the recovery media, the most recent successful settings are preserved in the Windows registry for the next use.
Booting WinRE
Comet generates the recovery media using parts of your installed operating system. No additional download is required to create the drive.
- The generated media preserves the custom branding of the installed Comet Backup application.
- The generated media impersonates your own Device ID and, if booted on the same physical hardware, will appear to Comet as the same device.
- The generated media will be either x86_32 only, or x86_64 only, depending on your installed Windows OS version.
The generated media uses a hybrid MBR/EFI boot and should boot correctly on both MBR and UEFI PCs.
- The drive uses the Microsoft
ntldrbootloader and should boot correctly on UEFI PCs requiring Secure Boot. If you experience issues booting the generated media, you could try to temporarily disable Secure Boot from your UEFI firmware menu.
There may be a black screen for a minute while the recovery OS is decompressed into memory.
The generated media is not compatible with Ventoy's default boot options. If you use Ventoy, open the ExMenu and choose the advanced "WIMBoot" boot mode for best compatibility.
Using WinRE

When booting the generated WinRE-based media, the Comet desktop app will appear directly. You can use Comet to restore data.
The "Tools" menu at the top of the screen allows you to access some utilities:
- Command Prompt
- Task Manager
- Web Browser
- Timezone
The "Timezone" option opens a wizard dialog allowing you to reset the configured timezone and the current date and time for the recovery media environment. A device which is out-of-sync with internet time may experience difficulties with backups to some cloud storage providers.
After completing your restore, you should use the Tools > Shutdown option to exit the WinRE environment. The Shutdown menu allows you to shut down/restart the device, or, to exit it to the Microsoft Windows Recovery Environment. Exiting to the Windows Recovery Environment can allow you to perform any other pre-boot tasks (e.g. boot repair or access Command Prompt) before rebooting the PC normally.
Limitations
Some features are currently unavailable from inside the created WinRE environment:
Wifi support
Wifi support may or may not be available inside the WinRE environment.
One workaround is to connect to the network via wired Ethernet instead. Another workaround is to manually configure Wifi networking as follows:
- Find the currently used driver for your hardware's Wifi adapter
- Open Windows Device Manager (
devmgmt.msc) - In the "Network Adapters" section, find your wifi adapter
- Right-click the adapter and choose Properties
- On the "Driver" tab, click the "Driver Details" button
- Note the filenames ending in
*.sys
- Open Windows Device Manager (
- In Comet's Recovery Media wizard, choose 'add custom driver', find the folder with the same name as the
*.sysdriver, and choose its*.inffile - Generate the Comet Recovery Media
- Boot the Comet Recovery Media drive and open a Command Prompt
- Start the Wifi subsystem using
net start wlansvc - Ensure that the wifi network interface appears in
netsh wlan show interfaces - Browse wifi Access Points using
netsh wlan show networksand connect to one
Missing features
- VSS for backup operations
- Workaround: It should not be necessary to use VSS for backup operations from inside the WinRE boot environment
- The Windows Disk Management GUI
- Workaround: Use
diskpartcommands
- Workaround: Use
Drive letters may differ
When using the recovery media environment, the available hard drives are enumerated as-found. If a Local Path Storage Vault has been used for backups, sometimes the listing of drives will correspond to drive-letter-mappings in the existing Windows system, but when it does not, the drive letters will need to be explicitly set.
You can work around this issue as follows:
- Boot into the recovery media
- Open a command-line via 'Tools' -> 'Command Prompt'
- Type
DISKPARTto start the program - Type
LIST VOLUMEto show all available volumes and their current drive letters - Identify which volume is the one which needs to be reassigned the label 'F' (e.g. volume 5)
- Type
SELECT VOLUME 5 - Type
ASSIGN LETTER=F - Type
LIST VOLUMEto verify
Usage of UNC paths for Storage Vault locations, rather than drive-letters, normally avoids this issue
Version Compatibility
The resulting WinRE USB drive is based on your PC's version of WinRE. WinRE is provided and updated by Microsoft and contains a version of the Windows kernel that is specific to the latest feature upgrade (e.g. 1903 / 1909 / 2004). For best results when using the "fix Windows boot problems" feature after a full disk restore, you should avoid using an old USB Recovery Media drive for a newer version of Windows (e.g. using a 2004-based WinRE should be able to boot-repair a 1903-based Windows installation, but perhaps not vice versa).
Legal notice
The resulting WinRE image contains components of the Microsoft Windows operating system that can only be used under the terms of your Windows license.
Windows To Go
Windows To Go is an alternative option for creating USB Recovery Media within the Comet Backup application.
Selecting this option allows you to create a full Windows boot environment. It requires an external hard drive of at least 32GB in size.
System requirements
This option requires the Portable Workspace Creator (pwcreator.exe) to be installed and available on your PC. This tool is included with Windows Server 2012, Windows 8 Pro, Windows 8.1 Pro, and Windows 10 Pro, but was removed in Windows 10 update 2004 owing to the impracticality of deploying critical software updates to this platform.
Using Windows To Go
No customizations are applied to the generated Windows To Go boot drive. You should boot into the drive, then install Comet normally and use it to perform recovery operations such as restoring data.
Linux
This feature requires Comet 24.6.6 or later.
The "Linux ISO" option is an alternative option for creating a recovery media. It supports creating a standalone recovery media as an ISO file.
System requirements
This option is available if the Comet Backup device is running either Windows or Linux.
Comet uses a container to perform the process of building the recovery media. When building the media, the PC must have one of the following supported containerization systems available:
- Docker (Windows default)
- On a Windows or Linux host OS, any Docker distribution can be used to build the recovery media:
- Docker Desktop
- Rancher Desktop
- docker.io Debian/Ubuntu package
- Podman installed with Docker compatibility (Comet 26.2.3 or later)
- Podman (Comet 26.2.3 or later)
- Chroot (Linux default)
- On a Linux host OS, a chroot can be used without requiring any additional software installed.
- This execution engine is available in Comet 25.3.2 or later.
On a Windows host OS, using Docker requires that hardware virtualization features are available on the device. Hardware virtualization features are enabled by default in the firmware for all PCs shipped with Windows 11 or later. PCs that shipped with an older version of Windows may require manually enabling virtualization features in the firmware (BIOS/EFI) before Docker can be used.
The necessary Linux operating system files will be downloaded from the internet. Your machine must allow internet access to the following domains:
ftp.debian.org- If using Docker:
hub.docker.comand any other URLs described by your Docker distribution
Configuration
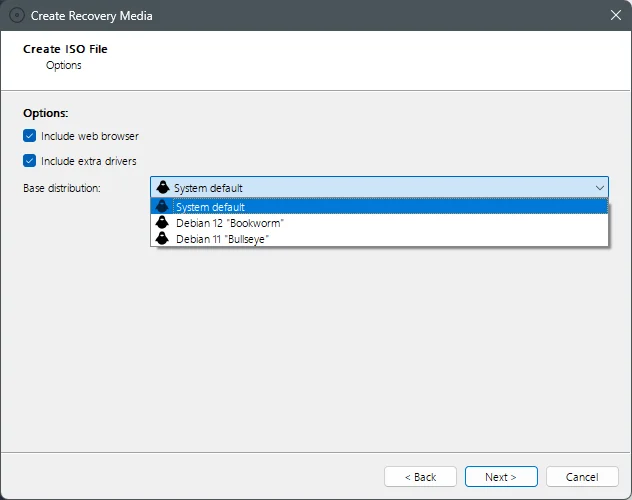
You can choose whether the recovery environment includes a web browser. Enabling this option installs a recent ESR version of Firefox inside the generated ISO file.
You can choose whether the recovery environment includes additional drivers. Enabling this option installs the linux-firmware-nonfree package. It is recommended to enable this option for best network, wifi, and graphics support in the recovery media. It does increase the generated file size of the resulting ISO file.
You can choose the Linux distribution that the resulting recovery environment uses as a base environment.
- The "System default" option is recommended to be used by default. At the time of writing, this corresponds to the "Debian 12" option, but may change in future versions of Comet.
- Debian 12 "Bookworm" is recommended for best hardware compatibility.
- Debian 11 "Bullseye" is available as a legacy option that produces a smaller size ISO image.
Depending on your configured options, the resulting ISO image ranges between approximately 300MB and 700MB in size.
The resulting ISO image is fully branded according to the current user interface branding of the Comet Management Console. The branding affects the generated ISO filename, the labelled options in the boot process, the image assets, and the branding of the installed Comet Backup software inside the recovery environment.
Booting the Linux ISO
The ISO can be booted directly in a virtual environment.
To create a bootable USB drive for physical hardware, you should image the USB drive directly with Rufus, or dd, or any similar program.
The Linux ISO is not compatible with Ventoy. You may experience an issue Unable to find a medium containing a live file system when attempting to use Ventoy.
The image supports both BIOS and UEFI boot modes. The bootloader menu will inform you which mode is in use.
The image does not support UEFI Secure Boot.
When booting the operating system, the bootloader will offer you the option to boot normally or with the nomodeset option. The default option should work well in all cases. However, if you experience no graphics after booting (e.g. error message (EE) Fatal server error), try to reboot and swap to the other nomodeset option from the bootloader menu.
Using the Linux recovery environment

When booting the generated Linux-based media, the Comet desktop app will appear directly. You can use Comet to restore data.
The device will automatically connect to an ethernet network using DHCP. Wifi support is available on supported hardware. The Wifi network can be configured using the "Network Manager" menu option.
The recovery media is a single-user operating system running as the root user.
Many additional programs are available from Debian via the apt package manager. To install additional software, open a terminal window and type apt install program_name.
Limitations
If you switch a PC between Windows and Linux, the system's time may appear to differ, as by default the device's hardware clock is used for local time (Windows) or UTC time (Linux). You may need to change the system time before accessing TLS servers.
Legal notice
The chosen base Linux distribution is licensed to you under various open source terms, including the GNU General Public License (GPL). You have certain rights and responsibilities when using and redistributing the chosen base Linux distribution.
The Comet Backup software includes proprietary code for you to use to generate a Linux-based recovery media. The Comet Licensing Ltd company does not redistribute the base Linux distribution itself, and is therefore not subject to the GPL's source code redistribution clause.
Other boot environments
You may also create a recovery environment in any other way. Either Windows or Linux can be used as a suitable recovery environment. Some possible methods include
- creating a Linux bootable USB drive, or
- using a third-party tool like Rufus to create a Windows To Go drive, or
- using recovery media from your PC OEM vendor (e.g. Lenovo / Dell / HP)
In these cases you will need to manually launch the Comet Backup app once booted into the recovery environment.