Comet-Hosted Management Console configuration
Overview
The Comet-Hosted Management Console settings can be configured via:
- Comet Account Portal
- your Comet-Hosted Management Console
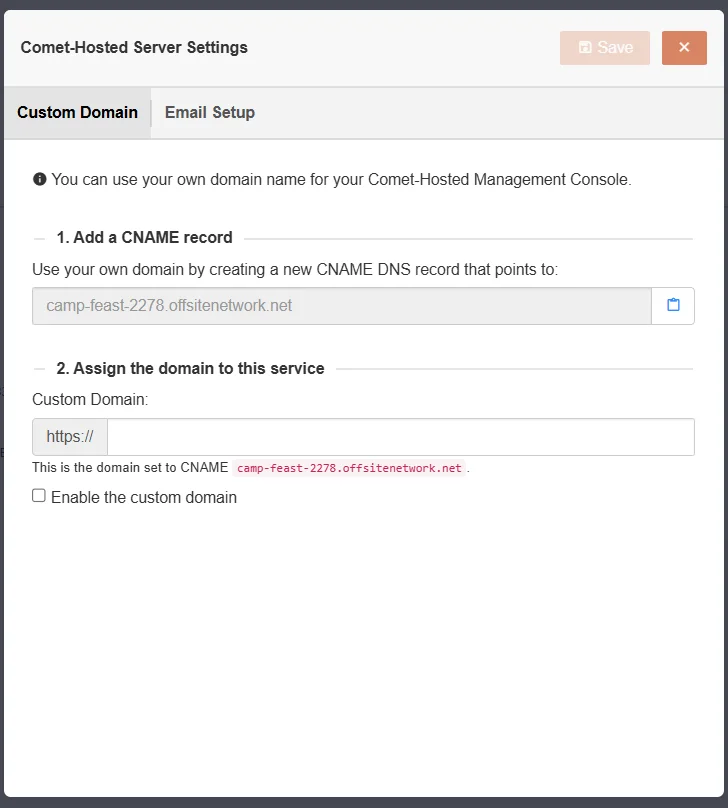
Configure a custom domain
In the "My Services" section of your Comet Account Portal, select "Actions" on the right, then select "DNS/Email Setup".
Email Reporting
Configure email reporting sending option
Configure your email sendin options. These are used for sending reports to end users or admins.
Delivery Method: Default
The default email delivery method uses AWS SES to send emails on behalf of a verified email. During the creation of your Comet-Hosted Server you will recieve an Email Address Verification email from noreply@cometbackup.com
. Click the link in this email to verify your send-as account.
To configure DMARC compliance when sending email reports from a Comet-Hosted Server you need to configure a couple DNS record on the top-level of your domain. This is recommended to prevent reports going to spam.
Name | Type | Value |
---|---|---|
cb-dmarc.<domain> | MX | 10 feedback-smtp.us-west-1.amazonses.com |
cb-dmarc.<domain> | TXT | v=spf1 include:amazonses.com ~all |
To confirm that these values are correct, click the 'Validate DNS Records' button. Note: Some providers may take up to 72 hours to propagate these changes.
Delivery Method: Custom SMTP Server
Use this option if you want to send emails using an Office 365 or Google SMTP relay.
If the default email deliver method does not suit your needs, it is possible to confirm email reports to be sent using a custom SMTP server. Switch the 'Delivery Method' option to 'Custom SMTP Server', and enter the authentication details for your custom SMTP server/relay. You can test that the server can connect to this server by clicking the 'Test SMTP Credentials' button.
Configure email reports
Refer to our guide on managing backups efficiently with email reporting for more information on setting up email reports.
Storage Template
The Storage Template will automatically assign a bucket location within the storage location. It is possible to configure it with your Self-Hosted Storage Gateway location/s and to a cloud storage provider directly.
Configure a Storage Template to backup directly to a cloud provider
You can configure a Storage Template with one of the supported cloud storage providers. When using this Storage Vault, the data will backup directly to the storage location and not pass through your Self-Hosted Storage Gateway (unlike using your cloud storage as the storage destination for Storage Gateway). When assigning this Storage Vault to an account, the access keys granted will only have permissions for its own subdirectory and won't be able to access other accounts data.
Create a new Storage Vault, change the Type dropdown to one of the supported cloud providers, and input your cloud storage details (Master key is required).
Current supported providers for direct-to-cloud Storage Template
- Amazon AWS
- Backblaze B2 Cloud Storage
- Comet Storage
- IDrive e2
- Impossible Cloud
- Storj DCS
- Wasabi Hot Cloud Storage
- Custom IAM-Compatible
Video Tutorial
See our videos on how to configure Storage Templates with Comet:
System Branding
You can configure the appearance of the Comet Management Console web interface.
For more information on re-branding the Comet Management Console, please refer to our re-branding guide.
Backup Agent Branding
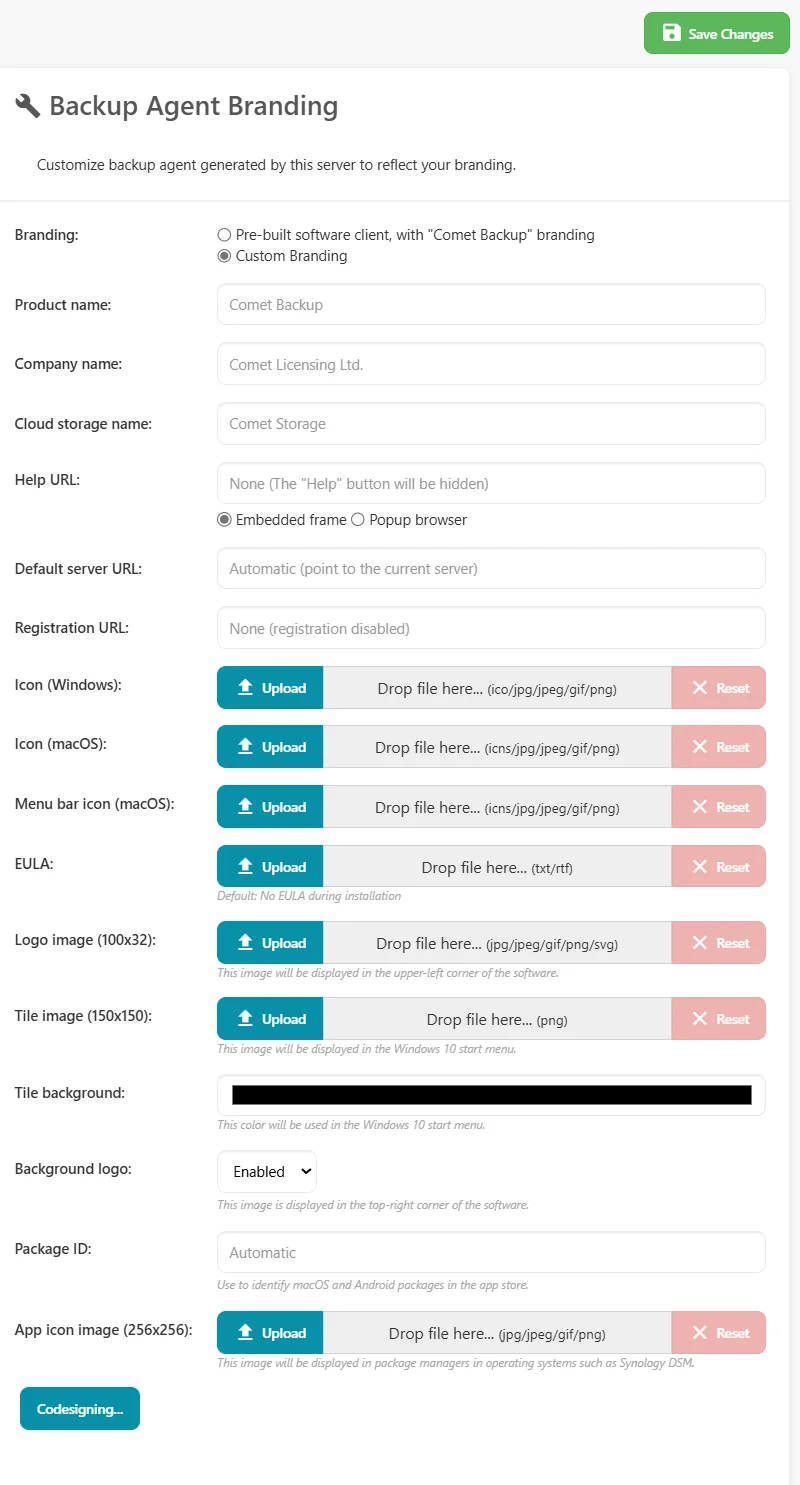
The Backup Agent Branding section is for rebranding the Comet desktop client. This can also be configured within cometd.cfg
. When you make changes to your branding, it is required to update the desktop clients for the changes to apply. It is possible to update the branding for multiple devices at once using the Bulk device upgrade feature).
For more information, please refer to our full guide on re-branding the Comet Backup Client.
There is also a separate guide on re-branding the Comet interface.
Codesigning
Windows and macOS have introduced measures to encourage distributing code-signed installers. We recommend configuring codesigning in order to streamline the process of installing the Comet Backup desktop app.
Codesigning for Windows
Microsoft's "Authenticode" programme for codesigning Windows programs helps you ensure the authenticity of an .exe file.
Comet Management Console is able to automatically sign the generated Comet Backup Windows installer using your Authenticode certificate (PKCS#12), hardware token (PKCS#11), or Azure Key Vault cloud HSM.
Signing the installer is recommended to reduce "SmartScreen" / "unknown publisher" prompts when installing the software, and to improve compatibility with some antivirus (AV) software.
When you do NOT have a codesigning certificate enabled, the Windows software download is in the form of a zip file, containing a small loader .exe
(Authenticode-signed by a partner company of Comet Software Ltd) and a data file. When you DO have a codesigning certificate enabled, the Windows software download is in the form of a zip file containing a single signed .exe
.
Codesigning the generated Windows client is supported regardless of what operating system Comet is running on. It is possible to cross-sign a Windows client from a Linux Comet Management Console.
As of June 1st 2023, all new Authenticode certificates must be provisioned in an HSM or equivalent secure storage. It will no longer be possible to purchase new File (PKCS#12) certificates.
Azure Key Vault is currently the recommended method, especially on Comet-Hosted, as it is not possible to attach a physical HSM to the Comet-Hosted Management Console. More options will be made available in future releases.
The following codesigning options are available:
File (PKCS#12)
As detailed above, it is no longer possible to purchase new PKCS#12 certificates for Authenticode signing. If you have an existing certificate that is not yet up for renewal, Comet Management Console still supports uploading the PKCS12 (*.pfx
/ *.p12
) file to the code-signing section of the Comet Management Console's client branding settings.
Smartcard (PKCS#11)
This section relates to Comet 23.6.7 and later. Older versions of Comet Management Console supported PKCS#11 using different options. For more specific information, please consult the documentation bundled with your Comet Management Console installation.
Comet Management Console supports performing Authenticode codesigning for Windows using a hardware device or smartcard. Your hardware device or smartcard must have a PKCS#11-compatible driver available.
The following options must be configured:
Option | Description |
---|---|
Token label | The label that identifies the token's slot. The token's label must be unique |
Module | The local disk path to the PKCS#11 module *.dll (Windows) or *.so (Linux) file for your specific hardware |
Certificate | The public key, in X509 format. If not present, Comet will try and find a matching certificate from inside the PKCS#11 hardware device. |
Key ID | The reference to the particular key inside your PKCS#11 hardware device. Must be in hex format. |
Password | If a password is required for this slot in your PKCS#11 hardware device, enter it here |
If you have a USB hardware dongle with no physical USB access (for example, if the Comet Management Console is on a cloud VM), third-party solutions are available to remotely forward the USB device:
- VirtualHere
- USB/IP protocol client/server implementations
- Upstream Linux kernel USB/IP support - see the
usbip-utils
package in your distribution - Open-source USB/IP clients for Windows: vadimgrn/usbip-win2, cezanne/usbip-win
- Upstream Linux kernel USB/IP support - see the
Azure Key Vault
This feature requires Comet 23.3.0 or later.
Azure Key Vault is a cloud service from Microsoft that offers HSM devices in compliance with current and upcoming Authenticode security requirements.
Some commercial Authenticode certificate providers can provision new Authenticode certificates to Azure Key Vault:
- https://www.globalsign.com/en/lp/certificates-for-azure-key-vault
- https://trustzone.com/knowledge-base/how-to-set-up-install-and-use-an-ev-code-signing-certificate-in-azure/
- https://learn.microsoft.com/en-us/azure/key-vault/certificates/create-certificate#partnered-ca-providers
You should work with your choice of Certificate Authority (CA). First, create the HSM inside Azure Key Vault, create a CSR, arrange to have the CSR signed by the CA, and then import the CA-signed certificate into the Azure Key Vault. The following options are then required in Comet:
Option | Description |
---|---|
Azure Key Vault name | The specified name of the entire Key Vault in Azure |
Certificate name | The specified name of the single certificate from the Certificates section in Azure Key Vault |
Application ID | You must register a new Azure application in Azure Active Directory > "App registrations" screen. Then in the Azure Key Vault settings, you can choose either the "Vault access policy" or "Azure role-based access control" permission models, and then follow the specific authorization steps outlined below to grant the new application access to perform signing with certificates inside this Key Vault. |
Application Secret | In the Azure application settings, you must generate an Application Secret that Comet Management Console can use to authenticate as this configured Application |
Tenant ID | The Azure or Office 365 Tenant ID that describes your company organization |
To allow Comet to access and use the certificates, the following permissions are required:
- When using Azure role-based access controls (RBAC), assign the application you previously registered the following roles:
- Key Vault Certificates Officer
- Key Vault Crypto Officer
- When using access policies, assign the application the following permissions:
- Key Management Operations: all permissions other than "Delete"
- Cryptographic Operations: all permissions
- Certificate Management Operations: all permissions other than "Delete"
Codesigning for macOS
Comet Management Console is able to automatically sign and notarize the Comet Backup macOS installer using your supplied Apple Developer codesigning certificates.
Signing the installer is recommended to avoid "Gatekeeper" security prompts when installing the Comet Backup client app.
The signing process itself can be performed either
- within the Comet Management Console, by uploading your codesigning certificate files (recommended); or
- by connecting by SSH into a macOS machine on demand; or
- by manually signing the default unsigned package and distributing it separately.
Codesigning for macOS requires a certificate signed by Apple. To get one, you must first register for Apple's developer program. This requires a DUNS number (for organisations) and payment of a 99USD fee. You may be required to accept any Apple Developer license agreements in App Store Connect. Once you have enrolled in the Apple Developer program, visit https://developer.apple.com/account/ and click "Certificates, IDs & Profiles" in the left-hand menu to generate and download certificates. You should create both a "Developer ID Installer" and a "Developer ID Application" certificate.
Once you have successfully acquired the certificate, the following options must be configured in the Comet Management Console settings:
Level
The Level can be one of the following options:
Level | Description |
---|---|
Sign only | Fastest, lowest compatibility. Does not work with macOS 10.15+ after February 2020. Only the "Developer ID Installer" certificate is required. The Apple ID or App Store Connect keys are not required. |
Sign and notarise | Fast, good compatibility. The customer's Mac will make one network request to Apple servers when first installed |
Sign, notarise, and staple | Slowest (perhaps 10 minutes or longer on first download), best compatibility. The codesigning will work offline without any prompting. Comet will wait until notarisation has completed before serving the generated client installer; this has the additional benefit that any notarisation validation issues will appear in the Comet Management Console system logs. |
Upload method (recommended)
This option is available with Comet 22.3.3 or later. The following settings describe the requirements as of Comet 22.6.9; for older versions, please check the documentation shipped alongside your Comet Management Console installation.
To sign the package, upload your "Developer ID Application" and "Developer ID Installer" certificates in PKCS12 (*.pfx
/ *.p12
) file format to the Comet Management Console. If you created the Apple developer certificates on macOS, use the "Keychain Access" app to export your certificates including the private key.
To notarize the package, there is an additional requirement:
- Create an App Store Connect API key from https://appstoreconnect.apple.com/access/integrations/api and get its Issuer, Key ID, and Key file.
SSH method
This codesigning method works by connecting to a macOS machine over SSH, and running the official macOS codesigning toolchain that Apple distribute with XCode. On your Mac, you must install the XCode developer tools from the Mac App Store. You must either run XCode once, or run sudo xcodebuild -license
from Terminal.app, in order to accept the XCode license agreement.
Comet Management Console then requires you to adjust some of the certificate permissions in order for it to be accessible to remote SSH processes. In the Keychain Access app on your Mac, make the following changes:
- First, move or copy the certificate into the "System" keychain
- Secondly, grant the codesigning tools permission to access this certificate
- Unfold the certificate row, to see the "private key" row
- Double-click the "private key" row to open the Info panel
- On the "Access Control" tab, click the "+" button
- In the file picker, browse to
/usr/bin/codesign
- You can press Apple+Shift+Period to temporarily show hidden files, such as the
/usr/
folder in the root drive
- You can press Apple+Shift+Period to temporarily show hidden files, such as the
- Repeat for
/usr/bin/productsign
- Save and close this dialog
You should configure the full certificate name in the Comet Management Console settings.
Your macOS machine must be connected to the internet in a way that is reachable from the Comet Management Console. You must enable SSH access to your Mac by running: sudo systemsetup -setremotelogin on
. If the Mac is on a different network, you may need to enable port-forwarding to allow the Comet Management Console to reach out to your Mac.
WARNING: Enabling SSH will open your Mac up to internet attacks, including but not limited to brute-force password guessing attempts, and credential-stuffing attacks. Please ensure that your Mac is receiving current security updates, and that all user accounts on the Mac have very strong passwords.
Comet Management Console requires your Apple ID email address to perform Notary submission. Comet Management Console requires an App-Specific Password for your Apple ID, to perform Notary submission. Your primary Apple ID password is not sufficient. You can create an App-Specific Password from https://appleid.apple.com/account/manage by clicking the "App-Specific Passwords" link. The password will be auto-generated by the Apple ID website. If you have set the "Level" parameter to "Sign only", these two fields are not required.
Codesigning for Linux
Linux applications do not contain embedded codesigning. You can achieve codesigning support for Linux by GPG-signing the hash of the binary and making this information available on your website independently.
Backup Agent Downloads
The Backup Agent Downloads is the part of Comet Management Console responsible for generating branded client software installers.
Options
Video Tutorial
Integrations
Comet integrates with a handful of third party services. Check out the Third-party Service Addons for more details.