Managing your backups with Self-Hosted Management Console
NOTE: The Self-Hosted Management Console was previously referred to as the Self-Hosted Server.
This guide provides an overview of features on your self-hosted instance to manage your day-to-day backup and restore operations.
First use
Start the Comet Management Console background service.
Once Comet Management Console has started, you should be able to load the Comet Management Console web interface in your web browser, and then log in using your configured credentials.
The default web address is http://127.0.0.1:8060/.
Log in
From version 24.9.8 there is no default admin account, the most common ways to create the first admin account is either by,
- The Comet Core Service Manager setup wizard
- When first opening the Comet Management Console web interface
Alternatively you can use the 'admin/add-first-admin-user' API endpoint to create the first admin user. Or simply edit the cometd.cfg file directly.
Prior to version 24.9.8 the default username and password are both admin. There is no default two-factor authentication code.
Web browser compatibility
The Comet Management Console web interface supports all recent desktop and mobile web browsers.
The Comet 23.3.x series was the last release to support Internet Explorer. Internet Explorer no longer receives security patches from Microsoft and is unsafe to use on the public internet.
The Comet 18.8.x series was the last release to support Internet Explorer 8. IE 8 no longer receives security patches from Microsoft and is unsafe to use on the public internet.
Safari and "Ghostery" extension
If you experience an error logging in to the Comet Management Console web interface with the Safari web browser, please check whether the "Ghostery" browser extension is installed. The Safari version of this extension has not been updated in several years and prevents the use of the Comet Management Console web interface. Updated versions of this extension are safe to use on other web browsers.
Log out
Once you are logged in, you can log out at any time by using the "Log out" option in the user menu in the top right corner.
Web-based login sessions will expire after 30 minutes of inactivity. After this inactivity timer expires, the Comet Management Console will refuse any requests from the web interface. The session timeout can be modified on the Settings page. Check out this guide for more details.
Time display
Comet Management Console uses universal time (UTC) internally for all time calculations. A single worldwide instant can be displayed in any local timezone.
When you log in to the web interface, all times displayed (e.g. backup job start / stop times) will be converted to your browser's timezone (which is inherited from your operating system timezone).
Table views
All table views in Comet Management Console have the following features:
Pagination
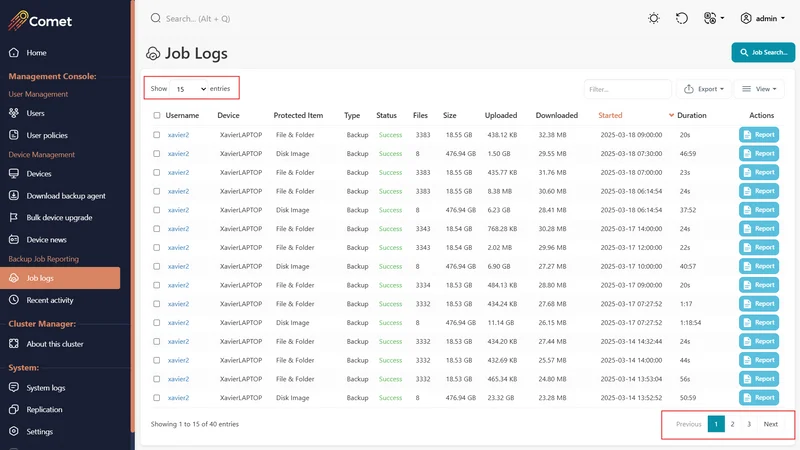
The "Show ## entries" dropdown in the top-left corner of a table allows you to choose the number of rows that are displayed in the table. By default, only the first 15 items are displayed in a table.
You can switch between pages of the table by using the page selector in the bottom-right corner of the table.
Your current page is displayed in the bottom-left corner of the table.
Filter
The "Filter..." text field allows you to enter text that will be used to filter the result set in the table. The search filter is applied in realtime as you type.

Export
You can export the contents of any in table in the Comet Management Console.
The following export formats are supported:
- the clipboard, with tab-separated columns
- a CSV (Comma Separated Values) file
- an Excel (
*.xlsx) spreadsheet

Column selection
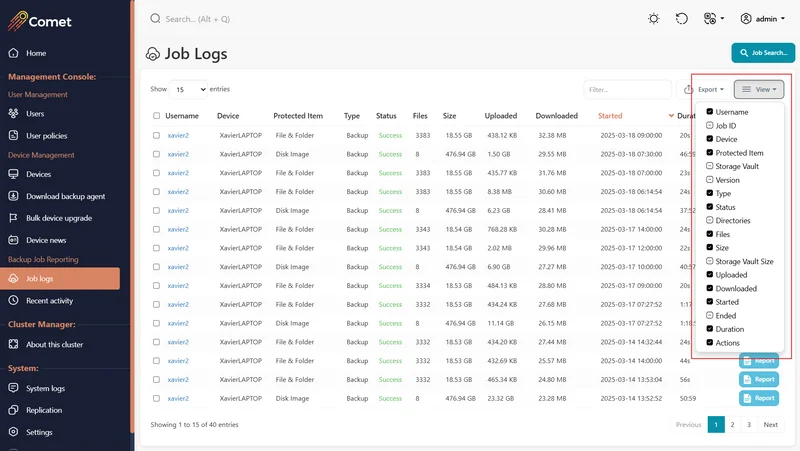
You can use the column selection icon to choose individual columns to hide. It may be possible to show additional information in a table by enabling a column that was hidden by default.
User menu
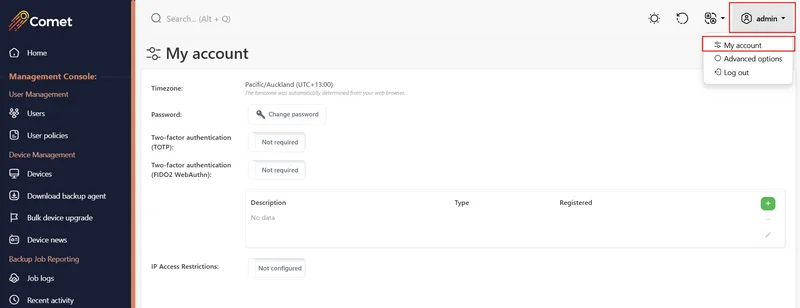
My Account
The My Account page allows you to view and change basic details about your administrative login account.
Configure two-factor authentication
Two-factor authentication is an additional layer of protection for your Comet Management Console and/or Storage Gateway administrative login account. When this feature is enabled, an additional device (such as a cellphone app, or a hardware token) is also required to log in to the web interface. This means that a stolen password is insufficient to break into the web interface.
If you have any external API integrations that are accessing Comet using your user account, this may prevent that functionality. In order to continue using the API simultaneously with protecting your account with two-factor authentication, you should create an additional separate administrator user account exclusively for API usage, with a long randomly generated password.
TOTP
The Comet Management Console application supports two-factor authentication for administrator accounts in compliance with the TOTP standard. This standard describes a six-digit code that changes every 30 seconds.
You can enable TOTP-based two-factor authentication for your account as follows:
- Click the "Regenerate TOTP code" button
- Scan the displayed QR code with any TOTP application.
- At the time of writing, we recommend the following applications:
- Android: FreeOTP, Google Authenticator
- iOS: FreeOTP, Google Authenticator
- Configure the Comet Management Console so that a TOTP code is required to log in to the web interface.
- For more information, see the this guide.
FIDO2 WebAuthn
The Comet Management Console supports using a WebAuthn authenticator as two-factor authentication for administrator accounts. This includes the following authenticator types:
- CTAP1/CTAP2-compatible hardware security keys (e.g., a YubiKey)
- Any U2F-compatible hardware security keys can be seamlessly used with WebAuthn
- Android devices using screen lock authentication (e.g., fingerprint or PIN)
- Windows Hello (e.g., fingerprint, facial recognition, or PIN) on Windows devices with a valid TPM
As of Comet 21.12.1, the Comet Management Console does not support using Apple Face ID or Apple Touch ID as a WebAuthn authenticator.
WebAuthn registration and login are only available if your Comet Management Console is using HTTPS.
WebAuthn is supported in all major modern browsers. WebAuthn is not available in Internet Explorer 11.
You can enable WebAuthn-based two-factor authentication for your account as follows:
- Click the green "+" button in the FIDO2 WebAuthn table
- Select the authenticator you would like to use, if prompted
- If only one authenticator is available on the device you are using, you won't be prompted
- Follow the on-screen prompts on your device to allow the Comet Management Console web interface to access and use your authenticator
- Close the WebAuthn registration dialog. If the registration succeeded, the newly-registered authenticator should be displayed in the WebAuthn table
- Enable WebAuthn two-factor authentication at login by toggling from "Not required" to "Required" and clicking the "Save changes" button
FIDO U2F
Prior to Comet 21.12.1, Comet supported FIDO U2F for two-factor authentication. U2F is no longer available from Comet 21.12.1 onwards, as it is deprecated and will be removed from the only major browser supporting it by default, Google Chrome, in Google Chrome 98 (expected in February 2022).
The Comet Management Console's WebAuthn implementation is fully backwards-compatible with existing U2F registrations. Existing U2F registrations will be automatically migrated to WebAuthn registrations when the Comet Management Console is updated to Comet 21.12.1; this upgrade process does not require any manual intervention by an administrator. If U2F was enabled for login for an admin user, WebAuthn will automatically be enabled.
Advanced options
You can select this checkbox to enable some additional features in the Comet Management Console web interface.
The exact functionality is subject to change, and mostly covers highly technical and/or uncommon functionality, that may be useful in specific situations.
As of Comet 21.12.8, the following features are enabled:
| Page location | Advanced action |
|---|---|
| All users page | Bulk replace addresses |
| User detail page | Edit raw profile |
| User detail page | Login as user |
| Add user dialog | Create multiple accounts by CSV |
| Live connected device actions dialog | (Multiple actions) |
| Restore dialog | Delete single snapshot (>= 19.12.2) |
| Restore dialog | View snapshot IDs (>= 21.12.8) |
| Policy page | Edit raw policy |
| Device News page | Remove all |
| About this Server page | Shut down server |
| About this Server page | Restart server |
| About this Server page | Edit raw settings |
Management Console menu
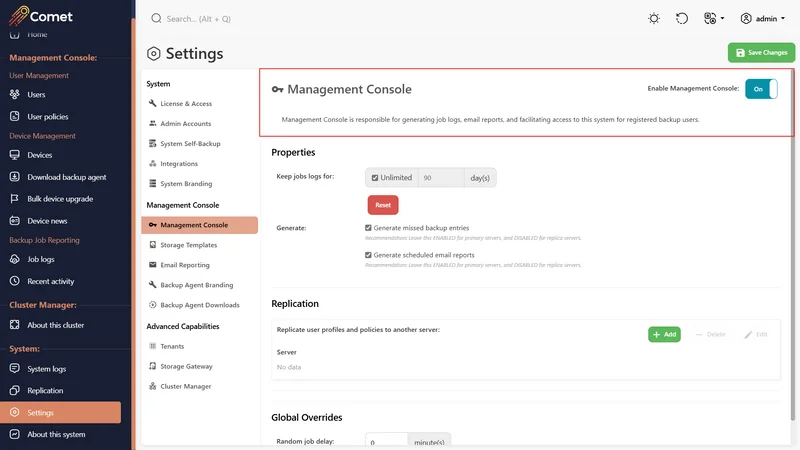
When Management Console is enabled, the "Management Console" menu will appear when logged in, containing "User Management", "Device Management" and "Backup Job Reporting" entries.
Users page
Add user
The "Add user" button allows you to create a new customer account.
On a Comet Management Console (default), take the following steps:
- Select the "Users" menu item > "Add user" button
- Enter a username and password
- Click the Add User button
If the account was created successfully, it is then possible to install and log in to the client software as this user.
There are some character and length restrictions on the username and password. For more in depth details, check out the Username and Password guides.
User groups
This feature requires Comet 24.12.0 or later.
Comet Management Console allows you to organize users into groups to simplify managing collections of related users. The Users page provides both grouped and ungrouped views of your user list, which can be freely toggled between. Each user group belongs to a specific tenant, and only users from that tenant can be added to the group. Groups are an admin-only feature for user management; a user cannot change, view, or assign their own group.


Groups can be created in several ways:
- Using the "Add user group..." button
- Using the "Move users to group..." Bulk Action after selecting one or more users from the same tenant, then selecting the "[custom]" entry at the bottom of the list
Once a group has been created, users can be added to it in several ways:
- Using the "Move users to group..." Bulk Action after selecting one or more users from the same tenant, then selecting an existing group from the list
- On the user account page of a specific user, using the "Assign user to group" button if the user does not belong to a group or the "Change user group" button if they are already in a group
- When creating a user using the "Add user..." button, the new user can be assigned to an existing group. If the "Add user..." button on a group page is used, the new user will automatically be assigned to the current group.
Users can be removed from a group using the "Remove users from group" Bulk Action, and using the "Remove user from group" button on the user account page of a user who is in a group.
Groups can be renamed and deleted from the group page, which can be accessed by clicking on the group name in the user list or on the user account page of a user who is in a group.
In addition to organizing users in the user list, groups simplify management of the users within the group. In the grouped user list view, all users within a group can be selected using the checkbox in the group row, allowing Bulk Actions to easily be applied to all users in the group in only a few clicks. This can also be done using the select all checkbox in the user list on a group page. Users who are not in a group will appear in the special default "Ungrouped" group; these users can be selected and have Bulk Actions executed on them in the same way, but there is no group page for these users.
Copy and paste
Comet Management Console allows you to copy and paste Protected Item configurations, between users or devices. If a user has more than one device, simply choose the device to copy the Protected Item to.
To perform this action, on the user page > Protected Items tab, click the "Copy" link on the right-hand side.
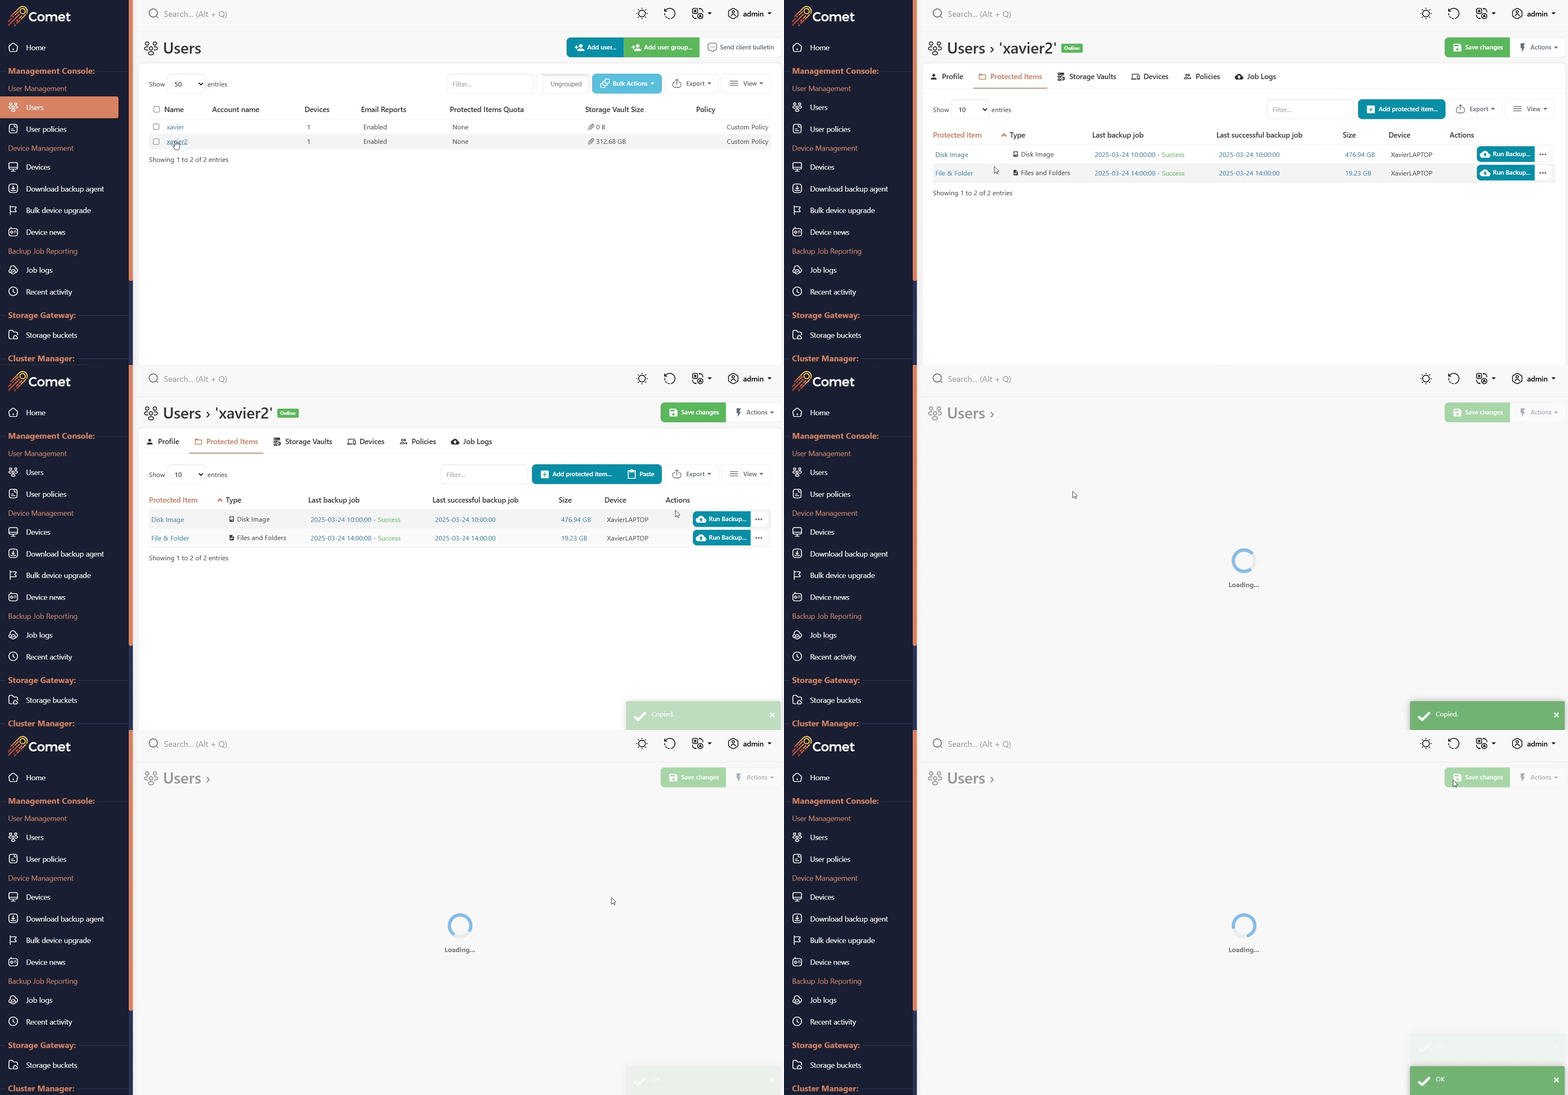
A "Paste" button appears in the top bar, allowing you to paste this configuration into any device. You can also navigate to a different user and paste the protected item.
Copying and pasting a Protected Item does not copy nor share any backup data nor encryption keys between the accounts or devices. Protected Items are private to each device.
Storage Vault analysis
A Storage Vault can contain data from multiple Protected Items, all deduplicated together. It is possible to analyze the content of a Storage Vault to see how the data usage is distributed between different Protected Item sources and how much deduplication is being applied.
On the user page > Storage Vaults tab, the value in the "Stored" column may be a blue link. If so, clicking this link opens a dialog window displaying information about the storage breakdown.
Current = The most recent backup job for that Protected Item within that Storage Vault. Historic = The accumulated backup jobs for that Protected Item, except for the most recent one.
The analysis is generated as part of a retention pass. Because retention passes only run when necessary, the analysis information may become outdated by a few jobs; or, no analysis may yet be available for a newly created Storage Vault. In this case, the "Stored" column will be black and cannot be clicked.
You can regenerate the analysis by running a Retention Pass for this Storage Vault, via the Devices tab or the "Devices" page.
Browsing job history
The job log report can be retrieved in the user tab, under the Job Logs tab.
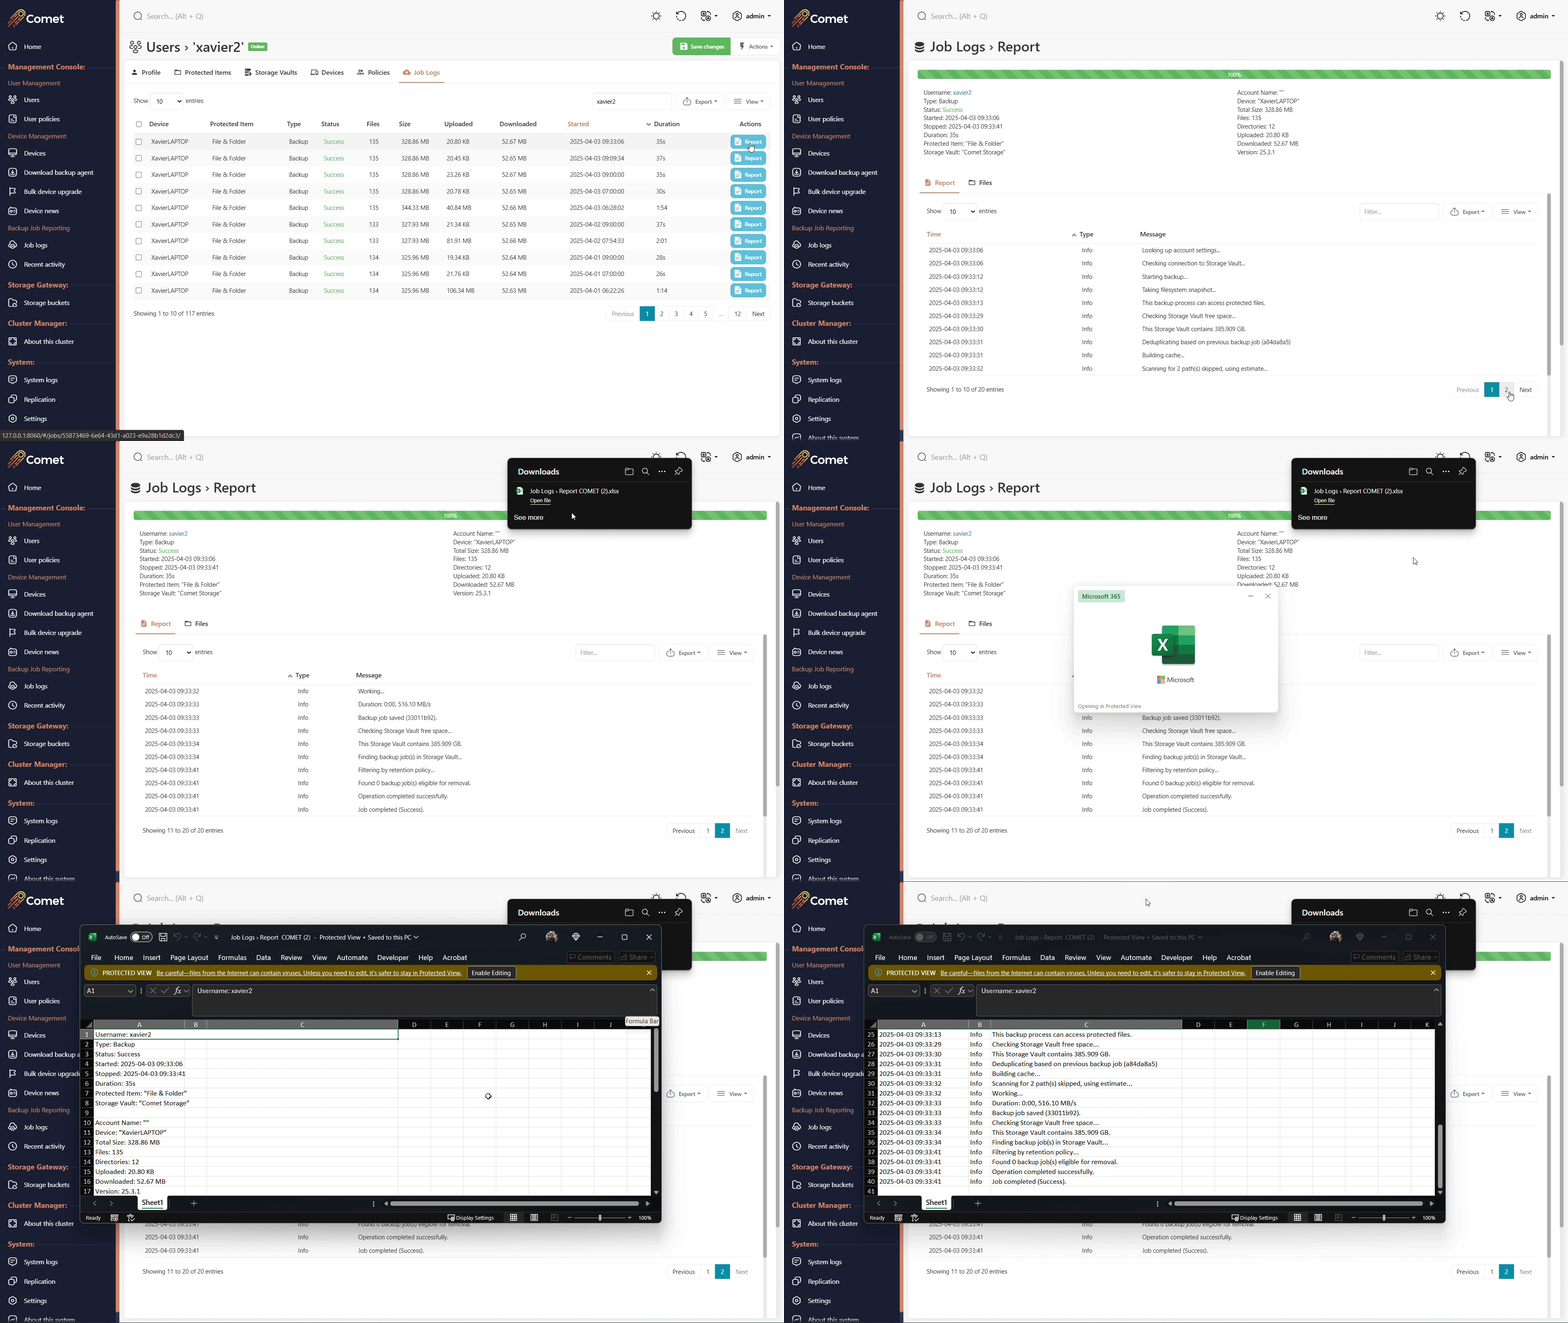
The reports can be exported and included when raising a support ticket for diagnostic purposes.
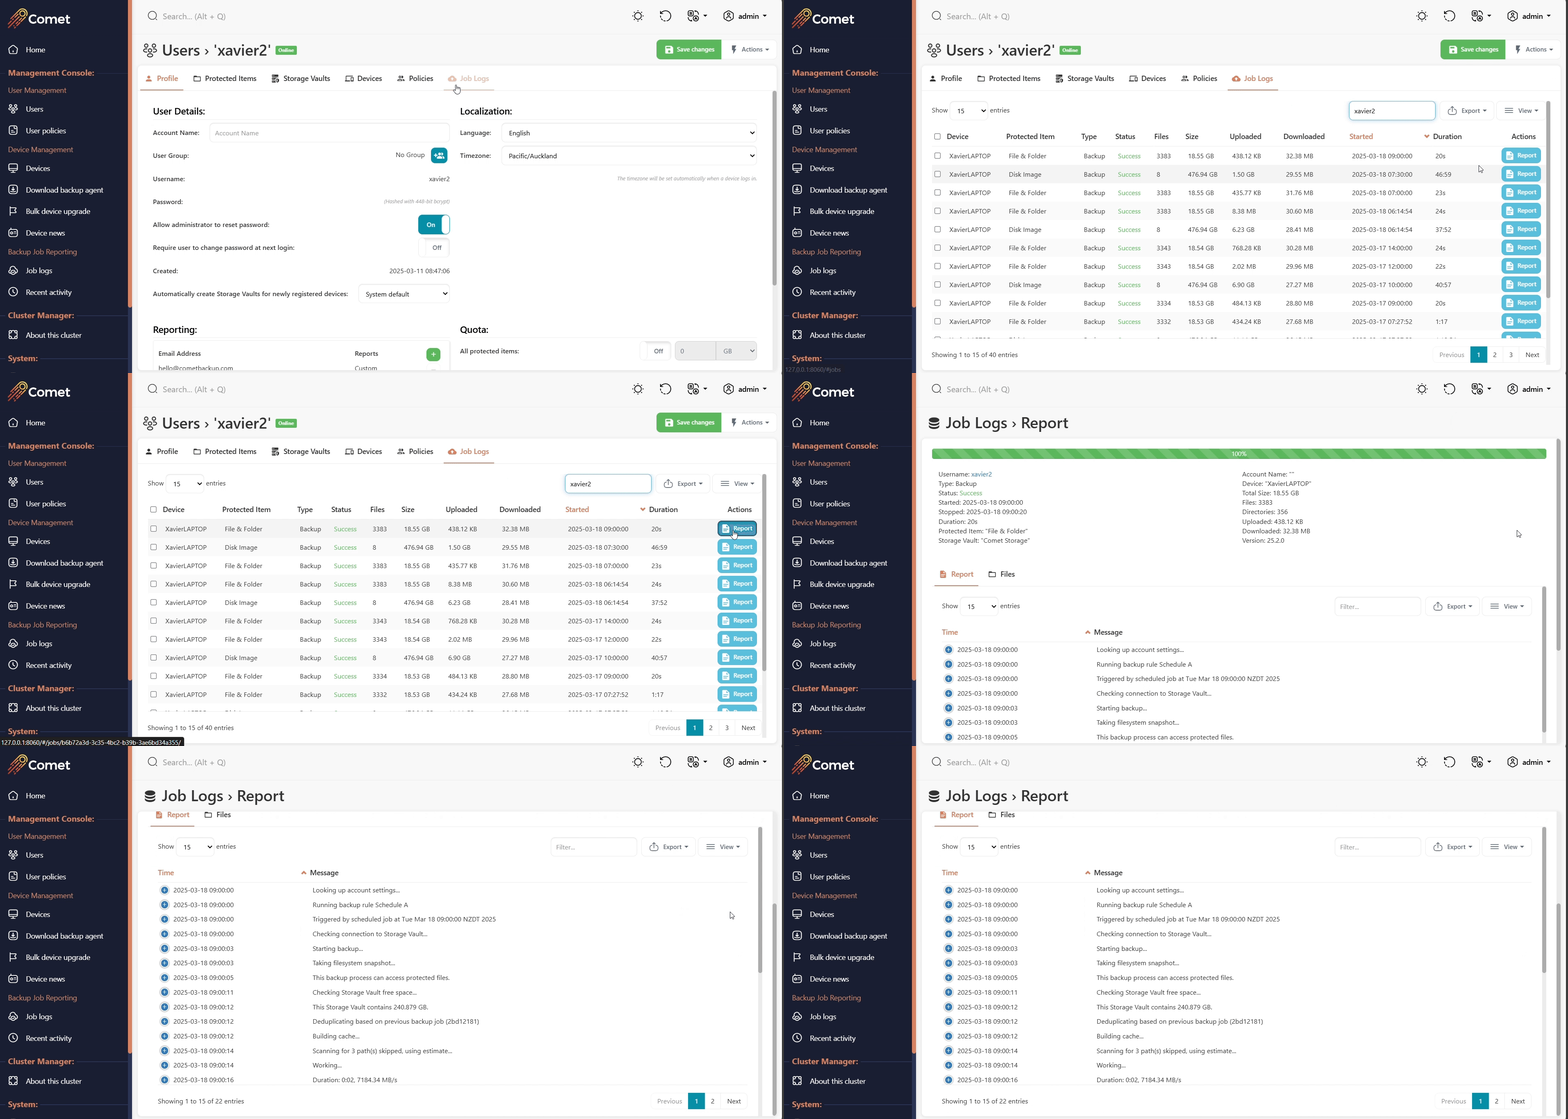
All job reports can also be accessed in the job log section by performing a job search.
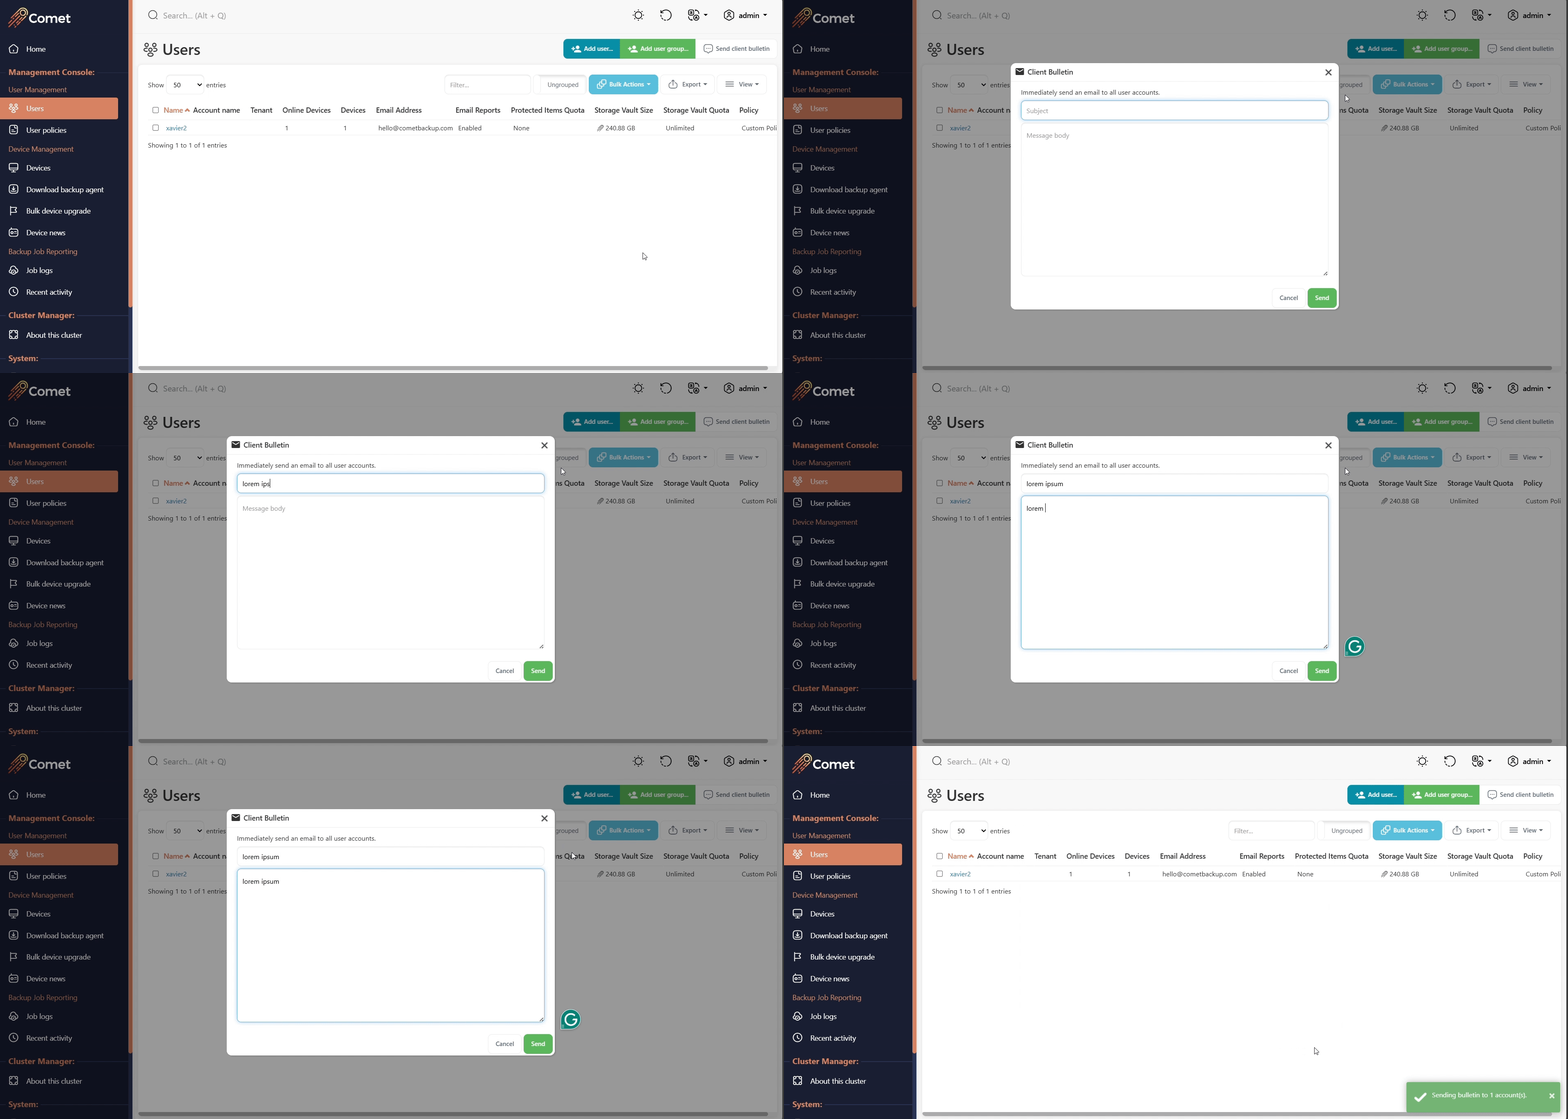
Send a client bulletin email
A client bulletin is an email message sent to all users. The Comet Management Console will send the email bulletin to all users using your configured email settings.
You can customize the email subject and body text.
No body text formatting options are available. Any embedded URLs will not be made clickable.
User policies
An administrator can create policy restrictions to assign to user accounts. A policy can also be assigned during user account creation.
For more information on all available policy settings, please refer to our full guide on how to apply User policies
Device Management menu
Devices
The Devices page shows all the physical devices registered and connected to your Comet Management Console.
Device status
A device can have one of the following three statuses:
- Online. The device is logged in to the backup agent, connected to the internet and has the latest software version.
- Online (outdated). The device is logged in to the backup agent, connected to the internet and an older version of the software.
- Offline. The device is either logged out of the backup agent or not connected to the internet.
Connected device actions
You can instruct the connected devices to perform an action remotely. At the time of writing, the following actions are available:
- Immediately run backup
- Immediately run a scheduled backup
- Remotely restore
- Update software
- Uninstall software
- Update Login URL
- Refresh profile
- Drop connection (only available when "Advanced Options" is selected)
- Terminate process (only available when "Advanced Options" is selected, or if a device is double-connected)
- Import / scan for other installed products
- Apply retention rules now
- Unlock / clean up lock files (only available when "Advanced Options" is selected)
- Reindex (only available when "Advanced Options" is selected)
- Deep verify Vault contents ((only available when "Advanced Options" is selected)
Note: The above functionalities are not available for offline devices.
Double-connections
In some cases, the same device might connect to the Comet Management Console multiple times. This can occur if the Comet Backup software is launched multiple times on the client's device. This behavior is prevented in almost all cases, across all operating systems, but it may still occur.
If this happens,
- the device will have two entries on the "Connected Devices" table
- the device will show "Online (2)" on the Users page > Devices tab
- scheduled backups might run twice
- a "terminate" button will appear in the corresponding row on the "Connected Devices" table to allow for resolving this issue.
Download backup agent
You can use the "Download backup agent" menu item to produce and download branded software client installers. The Comet Management Console will generate a new installer on demand based on your current backup agent branding settings.
The client software can be downloaded for a range of target platforms. For more information on the client software installation, check out the Comet Backup Installation guide.
Copy (as cURL / wget)
When installing Comet Backup on a remote Linux server by SSH, it can be inconvenient to transfer an installer file. The "Copy (as cURL)" / "Copy (as wget)" options copy a bash shell command to your clipboard, that will automatically download the Linux installer file.
Bulk Device Upgrade
Comet maintains a live-connection to user devices. This allows you to remotely initiate a software update via the Device Actions dialog (from the Devices page, or from the Devices tab on a user page. You can perform this at any time.
A bulk software upgrade across all devices must take on additional responsibility:
- The update should be delayed for devices that are currently offline, or are currently backing up
- The update should be delivered exactly once - preventing cascading failures if the update does not apply successfully
- It should be possible to track the status of the bulk upgrade across the entire customer base
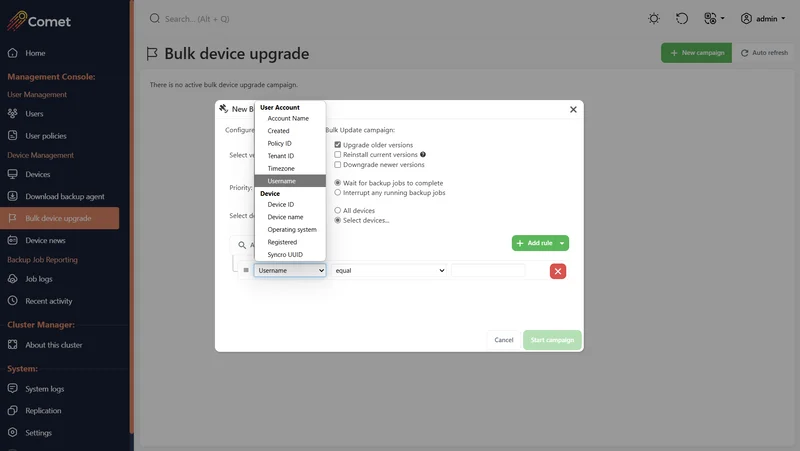
The bulk device upgrade system allows you to create a "Campaign". The Campaign allows you to target which users should receive the software update.
Targeted upgrades
Comet allows you to target devices to be affected for the Campaign by the following properties:
- Software version
- Upgrade older versions
- Reinstall current versions (Enable this option if you have updated client branding settings on the same software version.)
- Downgrade newer versions
You can also target specific devices by using the search filter (by selecting "Select devices...")
- Configure the filter so that the devices must match either "All of", "At least one of", "Not all of", or "None of" the rules set
- Specifically target devices via their Device ID, Device name, or Operating system, or their user's Tenant ID or Username
- Select one of the many operators such as equal, not equal, contains, matches regex, etc.
- Add multiple rules to the filter with the "Add rule" button
- Target multiple groups in one campaign by clicking the dropdown arrow next to "Add rule" button and selecting "Add group"
If you receive the message "Ineligible" when running a Bulk device upgrade, this means one or more of the target device/s is already on the latest version. Make sure to enable "Reinstall current versions" or "Downgrade newer versions" if required.
Upgrade logic
The bulk device upgrade campaign system may initiate a remote update for a device when
- (A) the bulk device upgrade campaign is created for the first time; or
- (B) immediately when a device comes online; or
- (C) in the background, on a timer interval.
If a device is currently performing a backup job, the bulk device upgrader does not initiate a remote update. In this situation, the device would be left as "Pending" until either #C occurs above, or if the device goes offline and #B reoccurs above.
Device news
The news system allows you to create messages that appear to end-users. Messages are displayed in chronological order (newest-first).
News messages appear in
- the Comet Backup app, and
- when an end-user logs in to the Comet Management Console.
Adding and deleting news items causes the updated news item to be immediately reflected in the client app.
URLs will be converted into clickable links, but other formatting is unavailable.
Backup Job Reporting menu
Job logs
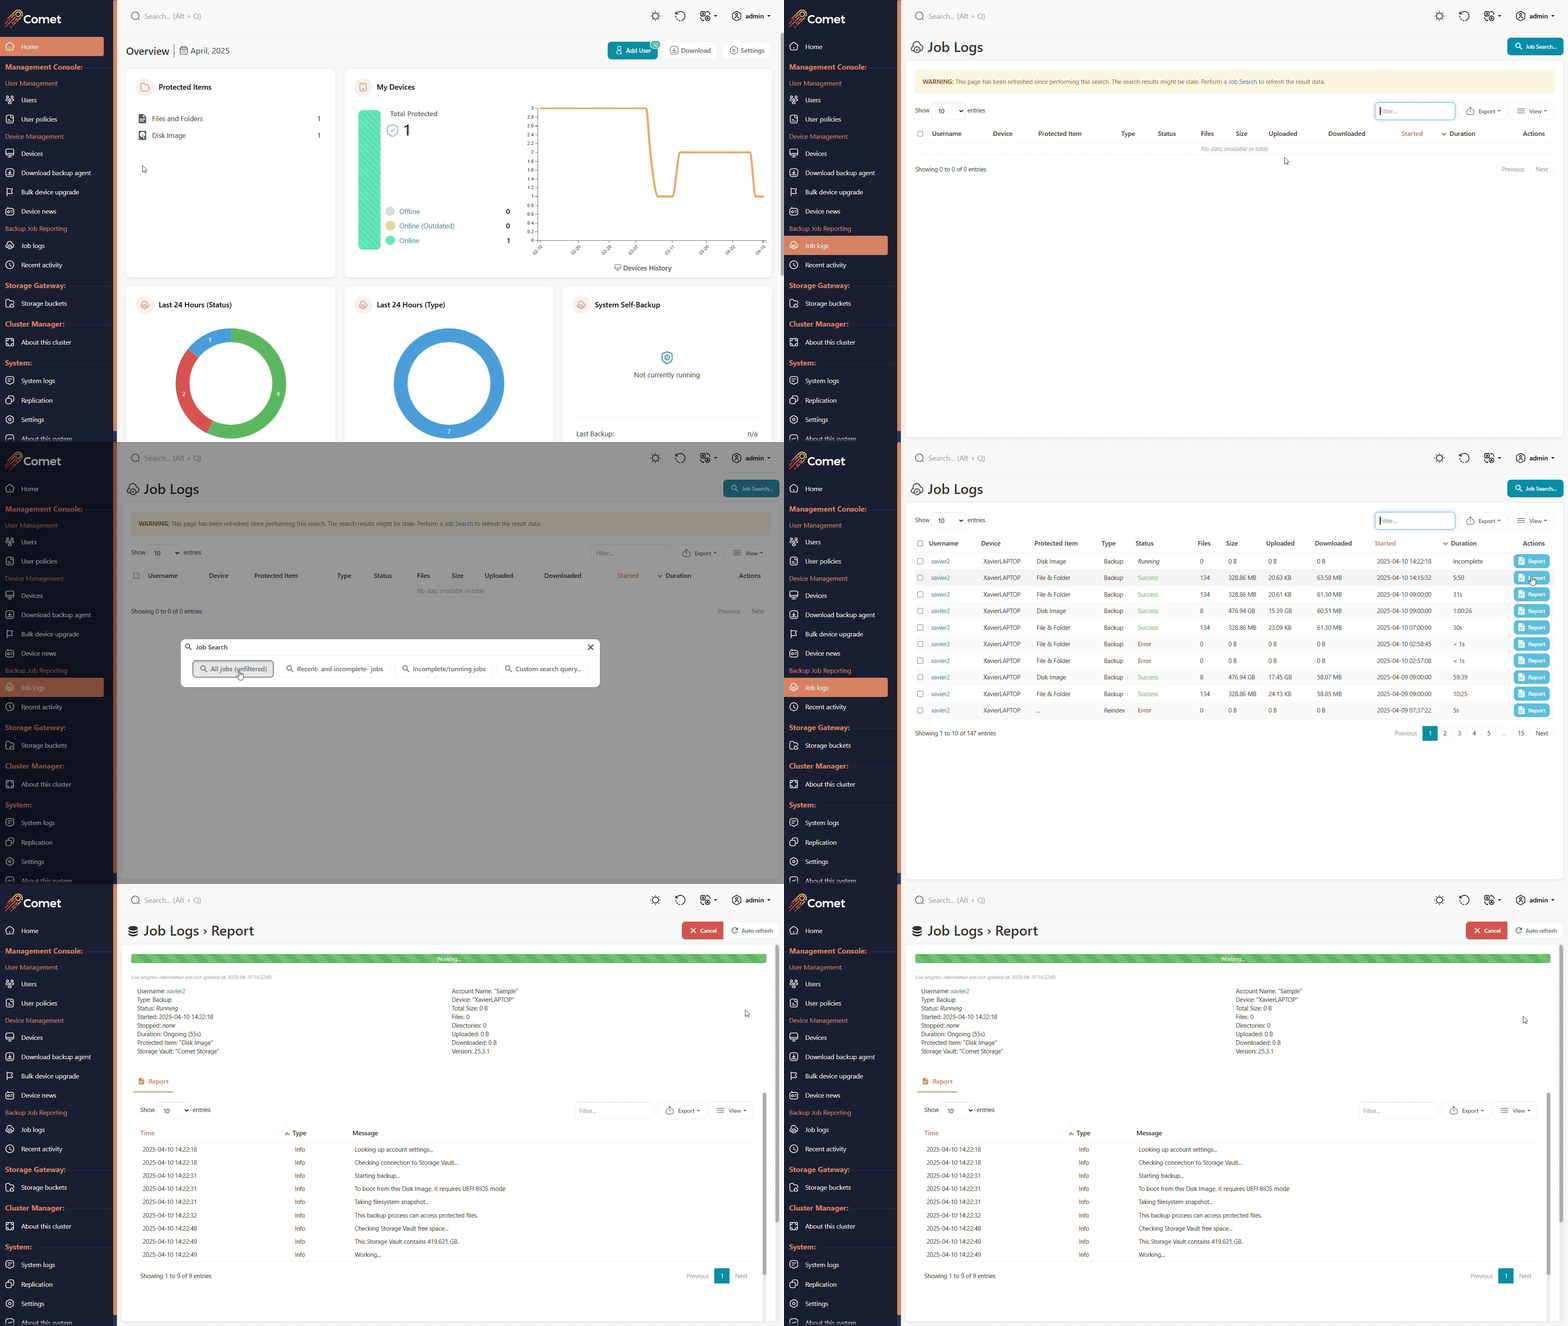
The Job logs page will allow you to search for all type of jobs that has been ran or are currently running.
If you view a running job, you can then cancel it by clicking the red Cancel button.
Recent activity
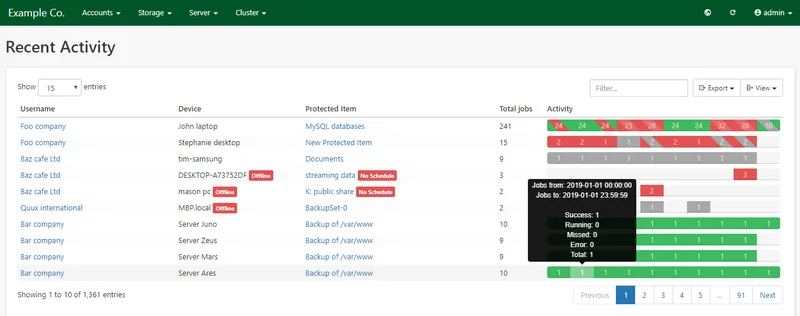
The Recent Activity page shows you an overview of the last 10 days' of user job history.
There is a row for every Protected Item, for every device, in every user account. By default, the rows are sorted alphabetically by Username > Device name > Protected Item name.
A red "Offline" alert badge is displayed beside the device name if a device is offline.
A yellow "Outdated" alert badge is displayed besides the device name if a device has outdated client software. You can update client software via bulk device upgrade.
A red "No Schedule" alert badge is displayed beside the Protected Item name if a Protected Item has no schedules. You can click the Protected Item name to immediately edit its settings to repair common problems.
The "Activity" section shows a timeline of the last 10 days, from oldest (left) to newest (right), interpreted in your local timezone. Each segment on the bar represents one day of jobs, and shows the number of backup jobs for that day. You can click the segment to go to a dedicated job search.
The right-most segment may show a blank day-block for devices which have not yet run a backup job for the current day.
The segment is colored based on the worst status of all jobs which ran on that day. If all jobs which occurred that day were successful, the segment will be green; if one or more jobs which occurred on that day was unsuccessful, the segment will be red. If multiple statuses appeared on that day, the segment will be striped between the worst and next-worst status color.

Storage Gateway menu
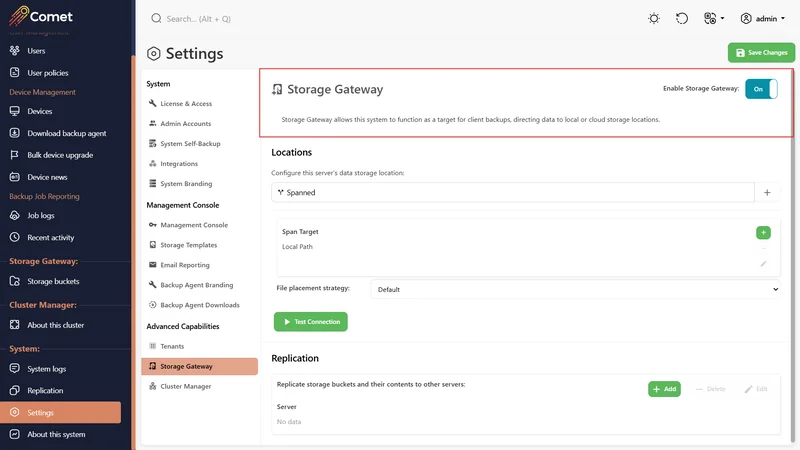
If Storage Gateway is enabled, the "Storage buckets" menu option should be available when logged in.
Storage buckets
The Storage Gateway consists of a number of buckets. The buckets are abstracted from the underlying data storage, which could be on any supported storage platform. Check out the Storage configuration guide for available data storage location.
Comet allows you to list and browse the buckets, as well as see the total size of data stored within the bucket.
Note: Comet shows Size in Tebibyte/Gibibyte. Cloud-storage providers may display Size in Terabyte/Gigabyte, which can cause some confusion.

Deleting buckets
If you are certain that a bucket is not in use by any Comet account, it may be safe to remove a bucket. You can remove a bucket by clicking the "Delete" button on the right-hand side of this screen.
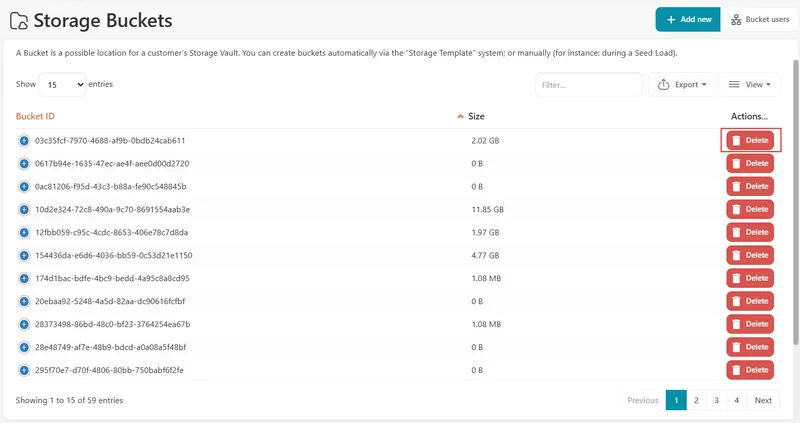
WARNING: If you delete a bucket that is still in use by a Comet account's Storage Vault, the user's Comet Backup application will not be able to backup data to their Storage Vault nor restore data from their Storage Vault.
Because of the risk in this operation, it is recommended to leave the process of deleting unused buckets up to the Cluster Manager. Please see our Cluster Manager guide for more information on these settings.
Adding a new bucket
You can add a new bucket on the Storage Gateway. The new Bucket will be generated with a random name and access key.
The Comet Management Console will display the necessary hostname, bucket name, and bucket key that can be copied into the Comet Backup Storage Vault configuration in order to store data in this bucket.
It is not normally necessary to manually add buckets in this way. You can use the "request" system to automatically create buckets and attach them to a user's account.
Cluster Manager menu
If Cluster Manager is enabled, the "Cluster Manager" menu option should be available when logged in.
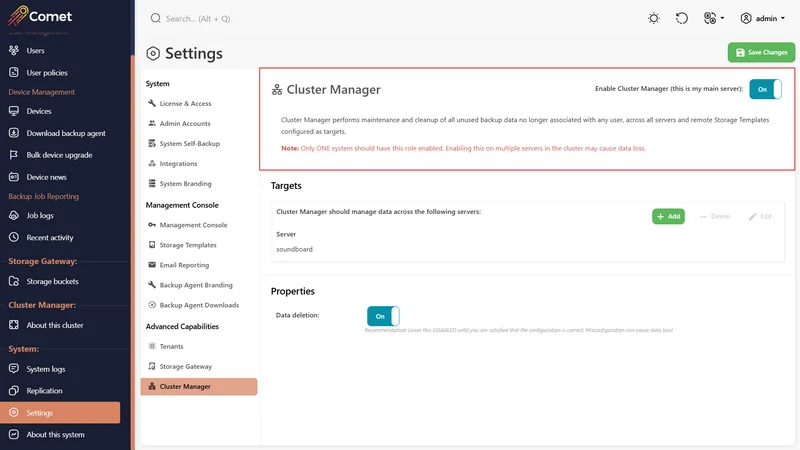
About this cluster
You can use the "About this cluster" menu item to perform global operations across all your Comet Management Consoles.
Bucket users
Use this section to generate a report to see current buckets within the server and see information about them.
You may want to view this information to find unused buckets.
Cluster Manager configuration video tutorial
System menu
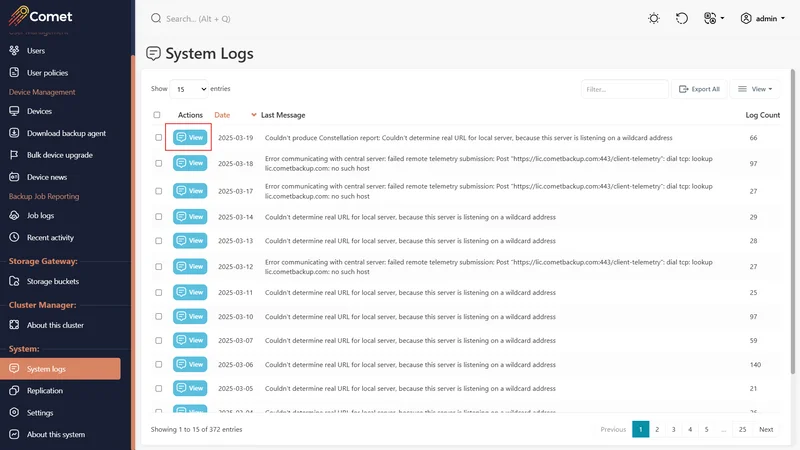
System Logs
View the system logs to find more information when having difficulty configuring your Comet Management Console or backup agent.
You can also find the system logs on your Self-Hosted Comet install at C:\ProgramData\Comet\logs on Windows and /var/log/cometd for Debian/Ubuntu by default.
Replication
About Replication
The replication page displays the current replication status. Comet supports replicating user profiles as well as stored data. Replication in Comet Management Console happens in one direction only from a primary to a replica Comet Management Console.
The replication system uses a queue-and-worker model. When the Comet Management Console starts for the first time, it will inspect all local data and remote data to determine what needs to be transmitted. Once this inspection is complete, data that needs to be updated will be queued for transfer.
The primary Comet Management Console will monitor new changes and sync them over to the replica. You generally shouldn't need to make any changes on the replica; changes on the replica are not synced back to the primary. When the primary next restarts, it will detect any changes on the replica and fix them to match the primary version.
Comet will replicate multiple objects simultaneously in parallel via multithreading.
Comet replication does not replicate System logs or job logs.
Replicating deletions
You can configure separate replication targets for Management Console data (user accounts and policies) and Storage Gateway data (buckets, and bucket content).
When data is deleted from the primary Server, it may be deleted on the replica Comet Management Console, depending upon the copy-settings.
For Storage Gateway, the replication system will synchronise deletion actions for data within a bucket. However, it will not synchronise the action of deleting a bucket; the Cluster Manager is responsible for deleting buckets across your entire Comet cluster.
For Management Console, you can choose between the following options:
| Option | Description |
|---|---|
| None (Add/Update only) | No deletion actions will be applied to the replica server. |
| Partial (Delete from remote only when deleted locally; do not delete unknown users) | Deletion actions will be applied to the replica server, but, unknown objects on the replica server will not be deleted. This option may be used if you are using replication to combine multiple Management Consoles together |
| Complete (Synchronise remote with local) | Deletion actions will be applied to the replica server, and all unknown objects on the replica will be deleted. |
Failing over (Storage Gateway)
A Storage Gateway hands out chunks from the disk, to whomever has the right password. Recovering a Storage Gateway from the data on a replica or secondary server, or failing-over to your secondary Storage Gateway, is as simple as making sure the files are intact, and all the DNS entries point to the right places. The replication system has already ensured that all the bucket names and bucket passwords are mirrored.
This simplicity allows for different approaches depending on your exact failure scenario:
In all cases, we strongly recommend that you use the System Self-Backup feature to safely make a copy of the server and client configuration files before they are needed in any sort of data-loss or disaster scenario
Option 1: Recover files
Start the primary storage server. Make sure it is running normally. Copy all the data from the secondary back to the primary.
You could do that either by drag-and-drop via a GUI, copy files via command-line or terminal, or by replicating in reverse. The transfer should run at line-speed regardless of method.
You need to copy all the vault data as well as the cometd-buckets.db file.
Option 2: DNS failover
Switch your secondary to be the primary, by pointing the primary's DNS record to point to the secondary. As replication is one way, the failed primary should not be brought back online without first disabling replication to avoid any data loss.
You will need to update any other installs that refer to this install by DNS, e.g. the Cluster Manager.
If your primary Comet Management Console uses HTTPS, you will need to update the secondary's SSL certificate settings to work with the primary's domain name.
Option 3: Client address failover
Switch your secondary to be the primary, by updating all the Storage Vaults in each user's profile to point to the DNS name of the secondary Comet Management Console.
The Comet Management Console interface includes a helpful tool to modify Storage Vault URLs in bulk.
This is an option for Storage Gateway failover, however, it is not a suitable option for Management Console failover.
Failing over (Management Console)
An Management Console is where you manage user profiles and policy group configurations. The user profiles are critical for accessing the encrypted Storage Gateway data.
Option 1: Recover files
Get your primary Management Console physically up and running, then copy all the data from the secondary back to the primary.
You need to back up the configuration file and .db files. The config file is called cometd.cfg and it will be in the same folder with the database files (.db). The main data base file you need is comet-users.db.
In the event of a failure:
- Reinstall Comet
- Recover the files
- 'Relax' the serial number and now you are back online.
Option 2: DNS failover
Switch your secondary to be the primary, by pointing the primary's DNS record to point to the secondary. To avoid data loss, the failed primary should not be brought back online without first disabling replication.
You will need to update any other installs that refer to this install by DNS, e.g. the Cluster Manager.
If your Comet Management Console is using HTTPS, you will need to update the secondary's SSL certificate settings to work with the primary's domain name.
You may also want to change the "generate missed backup reports" setting; we recommend this is enabled on primary Management Console and disabled on secondary Management Consoles.
Settings
Settings of your Comet Management Console is covered in-detail in the Comet Management Console configuration guide.
About this System
The "About this system" page shows basic information about the system.
The following information is available:
- System version and codename
- System start time
- "Serial number valid offline until"
- Self-Hosted Comet installs have a time-limited exclusive lease to use its serial number, and can remain running without any communication to the central licensing sytem until the date specified. For more information, please see the Overview and Concepts section.
- Comet features
- The available features are listed. If a role is currently enabled, it is displayed in green. If a role is not currently enabled on the service, it is displayed in red.