Third-party service addons
Overview
Comet Management Consoles have a versatile API that can be used to integrate with third-party products and services. This may include
- Billing functionality
- Customer management (CRM) functionality
- Additional monitoring functionality
- Other professional services functionality
A non-exclusive list of third-party service integrations is below. If you represent an third-party service provider that integrates with Comet, please reach out to be added to this list.
None of the following companies offer end-user backup services, and do not compete with you as an MSP.
MyClient

MyClient is a product of MyClient Global.com Ltd.
MyClient is a backup monitoring and CRM tool.
"MyClient brings together CRM, Support, Sales, Billing, Communication, Resellers, Automation and Server Management in a single unified fully customisable interface."
MyClient provides an official integration for Comet Backup, that allows you to create and manage customer accounts.
There is a close relationship between the MyClient and Comet companies. Comet CloudView is a Comet-focused edition of MyClient.
WHMCS

WHMCS is a product of WHMCS Ltd.
WHMCS is an ecommerce and billing platform.
"WHMCS is the leading web host billing automation platform powering tens of thousands of web hosting companies."
Comet provides an official plugin for WHMCS, that allows you to use WHMCS to create and manage customer accounts.
For more information and installation instructions, please see https://github.com/CometBackup/comet-whmcs-module .
The plugin is also available via the WHMCS Marketplace.
HostBill

HostBill is a product of HostBill Krzysztof Pająk.
Hostbill is an ecommerce and billing platform.
"All-in-One Hosting Command Center - Hosting Automation, Client Management, Help Desk System, Automated Billing, Domain Management"
HostBill provide an official module for Comet, that allows you to use Hostbill to create and manage customer accounts.
For more information and installation instructions, please see https://hostbillapp.com/products-services/cometbackup/ .
See also:
- Announcement: http://blog.hostbillapp.com/2019/10/14/sell-cometbackup-space-with-hostbill/
- Module documentation: https://hostbill.atlassian.net/wiki/spaces/DOCS/pages/750747649/CometBackup
figaro

figaro is a product of figaro.
figaro is a backup monitoring and CRM tool.
"Reduce the running cost of your Comet backup business and increase your sales. figaro gives you the opportunity to add a new dimension to your sales approach, streamline your working practice, and offers business changing savings."
Figaro provides an official integration for Comet Backup, that allows you to create and manage customer accounts.
CheckCentral

CheckCentral is a product of Binary Fortress Software.
CheckCentral is an email alert monitoring tool.
"CheckCentral handles your email alerts & notifications for you! Simply tell us what emails to expect and when to expect them. We'll let you know when something needs your attention."
For more information and installation instructions, please see "Monitoring Comet Backup with CheckCentral".
PRTG

PRTG is a product of Paessler AG.
PRTG is a commercial solution for monitoring server health.
"PRTG monitors your whole IT infrastructure 24/7 and alerts you to problems before users even notice. Find out more about the monitoring software that helps system administrators work smarter, faster, better."
There are many ways to integrate Comet Management Consoole with PRTG.
Monitoring Comet Management Console replication with PRTG
One possible way is by using the "REST Custom Sensor" plugin to connect to the Comet Management Console API (AdminReplicationState).
To use this sensor, set
- Method:
POST - Post data:
Username=admin&AuthType=Password&Password=my-password, replacing any special characters in your password with their URL-encoded equivalents - HTTP Authentication:
None - Custom HTTP headers:
Content-Type: application/x-www-form-urlencoded; charset=UTF-8 - REST Query:
:8060/api/v1/admin/replication/state
This should make Comet Management Console's replication status available in PRTG.

Once the information is available in PRTG, you can then continue to configure alerts based on queue length.
You can also adapt this example to monitor other properties of Comet Management Console, using the Comet Management Console API.
Klipfolio

Klipfolio is a product of Klipfolio Inc.
Klipfolio is a web-based dashboard platform.
"Klipfolio is an online dashboard platform for building powerful real-time business dashboards for your team or your clients."
You can view information from your Comet Management Console in Klipfolio, by using the "REST/URL" Core Connector to create a Data Source, and then building custom "Klip" widgets based on this data.
Comet Management Console data sources
Klipfolio reaches out to your Comet Management Console over the internet. You should create a separate admin account in your Comet Management Console for Klipfolio's use.
User accounts
In the Klipfolio web interface, click Data Sources > "Create a New Data Source" > "REST/URL" Core Connector.
Fill in the options as follows:
| Option | Value |
|---|---|
| Query URL | The full URL to your Comet Management Console, followed by /api/v1/admin/list-users-full |
| Data Format | JSON |
| Encoding | UTF-8 |
| Method | POST |
| Body | Username=KlipfolioUserAccount&AuthType=Password&Password=xxxx, replacing any special characters in the password with their URL-encoded equivalents |
| Query Parameters | Name Content-TypeValue application/x-www-form-urlencoded; charset=UTF-8Type Header |

Click the "Submit" button to preview the data source. The user accounts on your Comet Management Console should be visible, along with all the settings for each user account.
Click the "Continue" button to confirm the data source.
Online devices
Create a new Data Source as above, making the following changes:
- Query URL: The full URL to your Comet Management Console, followed by
/api/v1/admin/dispatcher/list-active
Server Replication
Create a new Data Source as above, making the following changes:
- Query URL: The full URL to your Comet Management Console, followed by
/api/v1/admin/replication/state
Job history - Last 48 hours
Create a new Data Source as above, making the following changes:
- Query URL: The full URL to your Comet Management Console, followed by
/api/v1/admin/get-jobs-for-custom-search - Body: As above, but add to the end:
&Query=%7B%22ClauseType%22%3A%22and%22%2C%22ClauseChildren%22%3A%5B%7B%22ClauseType%22%3A%22%22%2C%22RuleField%22%3A%22BackupJobDetail.TimeSinceStarted%22%2C%22RuleOperator%22%3A%22int_gt%22%2C%22RuleValue%22%3A%22172800%22%7D%5D%7D
Other data sources
The above data sources are examples based on the Comet Management Console API. You can also adapt the above examples to monitor other properties of Comet Management Console, using the Comet Management Console API.
Klips
Once the data source is imported into Klipfolio, you can create widgets using this data.
No further documentation is currently available for this topic.
Prometheus

Prometheus is copyright © Prometheus Authors and copyright © The Linux Foundation.
Prometheus is a server health metrics, monitoring, and alerting application.
"From metrics to insight - Power your metrics and alerting with a leading open-source monitoring solution."
Comet provides an official exporter for Prometheus, that you can run as a sidecar container to pull metrics from Comet Management Console and export them in a Prometheus-compatible format.
For more information and installation instructions, please see https://github.com/CometBackup/comet-prometheus-exporter .
Collectd

Collectd is a flexible, open-source application for server health metrics collection and monitoring.
"
collectd- The system statistics collection daemon"
Comet provides an official exporter for Collectd, that you can run as an Exec plugin to pull metrics from Comet Management Console into Collectd for use with any of its export or storage plugins.
For more information and installation instructions, please see https://github.com/CometBackup/comet-collectd-exporter .
Backup Radar

Backup Radar is a product of Backup Radar LLC.
BackupRadar helps you identify blind spots in your backup monitoring and reporting.
Catch missed or failed backups in real time. Integrate with 14+ of your favourite MSP platforms including PSA, RMM, and other productivity tools. Streamline your policies and workflows, reduce overhead and human error with our world-class intelligent automation.
Setup is simple. Use these step-by-step instructions: https://help.backupradar.com/hc/en-us/articles/16883892673819-Integrating-with-Comet-API
For more information on this integration visit: https://www.scalepad.com/backup-radar/integrations/comet/
Integrations Webinar
In this Webinar, we explain in more detail about the various product integrations that can be used with Comet Backup.
Syncro

Syncro - Helps you scale your MSP buisness with efficiency and ease.
Transform how you manage customers and your business with RMM, PSA and remote access in a single platform. The streamlined workflow allows you to focus your time and energy on what you're an expert in – providing solutions for your clients.
Integration Guide
With Comet's Syncro integration, you can access RMM alerts when a backup fails or a backup job doesn't run, so you can troubleshoot before you lose any business critical data.
Setup Prerequisites
For the Syncro Integration to work with Comet, the Syncro Agent must be installed on each device you would like to receive alerts for. A setup guide can be found here. Backup jobs are tied to a specific Syncro asset making it very easy to determine what device the job alert is for.
Setup Guide
Step One: Create a Syncro API Token
To send RMM alerts to Syncro, Comet needs a API token with the following permissions:
- Assets - List/Search
- RMM Alerts - List
- RMM Alerts - Create
- RMM Alerts - Delete
- RMM Alerts - Clear/Manage

Step Two: Configure Integration In Comet
Once the API token has been created, you can configure the integration in the Comet Management Console. On the Comet Management Console, navigate to the Settings Page, then the Integrations tab. The Syncro Integration will appear as an option when configuring PSA & Alerting Services.
Enter the Syncro Domain and API token configured from Step One, click Save and then Save Changes in the top right hand side of the screen.

Once the changes have been saved, the integration setup is complete. You will now receieve RMM alerts in Syncro about backup failures.
Alerts
When a backup job fails, a new RMM alerts will be created. You can see this on the Open RMM Alerts page in Syncro. An example of how this will look is:

If the failure is due to an intermittent issue, Comet will clear the alert when the backup job succeeds again.
NinjaOne

NinjaOne is a unified IT management platform combining RMM, endpoint management, and ticketing.
Integration Guide
With Comet's NinjaOne integration, backup job status is written to each device's custom fields in NinjaOne, and — optionally — failure tickets are opened, updated, and resolved automatically based on backup outcomes.
Setup Prerequisites
For the NinjaOne Integration to work with Comet, the NinjaOne Agent must be installed on each device you want to receive backup information for. An installation guide can be found here. Each Comet device maps to a NinjaOne device to identify which backup job belongs to which NinjaOne device.
Setup Guide
Step One: Create a NinjaOne OAuth Client App
In NinjaOne, navigate to Administration → Apps → API, open the Client app IDs tab, then click Add client app. For NinjaOne's own reference on this configuration, see OAuth Token Configuration.

Fill in the form as follows:
- Name — A recognisable name for the client application. This is shown to administrators on the NinjaOne consent screen (e.g.
Comet Backup). - Application Platform — Select Web.
- Redirect URLs — Enter the full URL of your Comet Management Console (e.g.
https://backup.example.com/). This must match exactly what an administrator sees in their browser when logging in to Comet. - Scopes — Enable Monitoring, Management, and Refresh Token.
- Allowed Grant Types — Enable Authorization Code.

Save the application. NinjaOne will display the Client ID and Client Secret — record both, as the Client Secret is only shown once at creation time. You will need them in the next step.
Step Two: Configure Integration In Comet
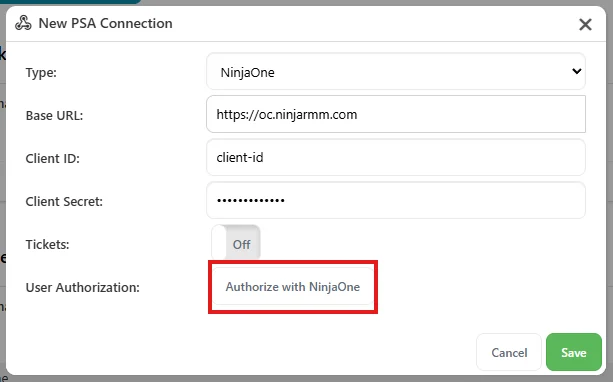
On the Comet Management Console, navigate to the Settings page, then the Integrations tab. The NinjaOne integration will appear as an option when configuring PSA & Alerting Services.

Fill in:
- Base URL — Your NinjaOne region base URL (e.g.
https://app.ninjarmm.com,https://eu.ninjarmm.com,https://oc.ninjarmm.com). Must be HTTPS. - Client ID — From Step One.
- Client Secret — From Step One.
- Tickets — Enable this if you want Comet to open, update, and resolve NinjaOne tickets for backup failures. Leave disabled if you only want the device custom fields to be updated.
Step Three: Authorize with NinjaOne
Click Authorize with NinjaOne. A popup will open on NinjaOne's consent screen. Sign in as a NinjaOne administrator and grant the requested scopes. Once approved, the popup closes automatically and Comet stores an encrypted refresh token — you will not be asked to re-authorize again unless you change the Base URL, Client ID, or Client Secret.
Step Four: Select the NinjaOne Organization
If you enabled Tickets in Step Two, a NinjaOne Organization dropdown will appear. Click Load to fetch the list of organizations visible to the authorized OAuth app, then select the organization that tickets should be created against.
Click Save and then Save Changes in the top-right hand side of the screen. The integration setup is now complete.
Custom Fields
After the first backup job runs, Comet will create the following custom fields on each device's NinjaOne page and populate them from the most recent backup:
| Custom field | Contents |
|---|---|
| Last Backup Status | Status of the most recent backup job |
| Last Backup Time | Timestamp of when the most recent backup finished |
| Last Backup Destination | Storage Vault the backup was written to |
| Last Backup Total Size | Size of the backup |
| Last Backup Job ID | Comet job ID |

The field names in NinjaOne are prefixed with your Comet Server's configured product name (default: CometBackup) so they don't collide with fields from other integrations.
Tickets
This section applies only if you enabled Tickets in the integration configuration.
When a backup job fails, Comet opens a ticket against the affected NinjaOne device. The ticket subject identifies the affected user, device, and Protected Item; the ticket body contains a link back to the Comet job log alongside a summary table of the job.

Repeated failures on the same device and Protected Item add a comment to the existing open ticket rather than creating a duplicate. If the severity of the newest failure is higher than the current ticket severity, the ticket is escalated automatically.
When the next backup succeeds, Comet resolves the open ticket and adds a resolution comment with details of the successful run.

If your NinjaOne workspace has multiple ticket forms or ticketing boards, Comet uses the first active ticket form and the first ticketing board. Confirm during setup that these are correct for your environment.