Codesigning
About codesigning
Windows and macOS have introduced measures to encourage distributing code-signed installers. We recommend configuring codesigning in order to streamline the process of installing the Comet Backup desktop app.

Codesigning for Windows
Microsoft's "Authenticode" programme for codesigning Windows programs helps you ensure the authenticity of an .exe file.
Comet Management Console is able to automatically sign the generated Comet Backup Windows installer using your Authenticode certificate (PKCS#12), hardware token (PKCS#11), or Azure Key Vault cloud HSM.
Signing the installer is recommended to reduce "SmartScreen" / "unknown publisher" prompts when installing the software, and to improve compatibility with some antivirus (AV) software.
When you do NOT have a codesigning certificate enabled, the Windows software download is in the form of a zip file, containing a small loader .exe (Authenticode-signed by a partner company of Comet Software Ltd) and a data file. When you DO have a codesigning certificate enabled, the Windows software download is in the form of a zip file containing a single signed .exe.
Codesigning the generated Windows client is supported regardless of what operating system Comet is running on. It is possible to cross-sign a Windows client from a Linux Comet Management Console.
As of June 1st 2023, all new Authenticode certificates must be provisioned in an HSM or equivalent secure storage. It will no longer be possible to purchase new File (PKCS#12) certificates.
Azure Key Vault is currently the recommended method, especially on Comet-Hosted, as it is not possible to attach a physical HSM to the Comet-Hosted Management Console. More options will be made available in future releases.
The following codesigning options are available:
File (PKCS#12)
As detailed above, it is no longer possible to purchase new PKCS#12 certificates for Authenticode signing. If you have an existing certificate that is not yet up for renewal, Comet Management Console still supports uploading the PKCS12 (*.pfx / *.p12) file to the code-signing section of the Comet Management Console's client branding settings.
Smartcard (PKCS#11)
This section relates to Comet 23.6.7 and later. Older versions of Comet Management Console supported PKCS#11 using different options. For more specific information, please consult the documentation bundled with your Comet Management Console installation.
Comet Management Console supports performing Authenticode codesigning for Windows using a hardware device or smartcard. Your hardware device or smartcard must have a PKCS#11-compatible driver available.
The following options must be configured:
| Option | Description |
|---|---|
| Token label | The label that identifies the token's slot. The token's label must be unique |
| Module | The local disk path to the PKCS#11 module *.dll (Windows) or *.so (Linux) file for your specific hardware |
| Certificate | The public key, in X509 format. If not present, Comet will try and find a matching certificate from inside the PKCS#11 hardware device. |
| Key ID | The reference to the particular key inside your PKCS#11 hardware device. Must be in hex format. |
| Password | If a password is required for this slot in your PKCS#11 hardware device, enter it here |

USB Remoting
If you have a USB hardware dongle with no physical USB access (for example, if the Comet Management Console is on a cloud VM), third-party solutions are available to remotely forward the USB device:
- VirtualHere
- USB/IP protocol client/server implementations
- Upstream Linux kernel USB/IP support - see the
usbip-utilspackage in your distribution - Open-source USB/IP clients for Windows: vadimgrn/usbip-win2, cezanne/usbip-win
- Upstream Linux kernel USB/IP support - see the
You can also attach the PKCS#11 device to a networked machine running the open-source SAS Relic server, and use the "SAS Relic server" codesigning option in Comet described below.
Security
WARNING: The PKCS#11 driver runs custom code. Misuse of the Module field can cause a code execution vulnerability in the Comet Core server. To avoid this, the Module field is restricted only to files that the system administrator has installed on the Comet Core server machine, and does not allow uploading driver files directly. If you allow other administrators or Tenant administrators to upload files elsewhere on the same server running Comet, it may be possible for a malicious administrator to takeover the Comet Core server.
Sectigo (SafeNet Gemalto ID Prime MD)
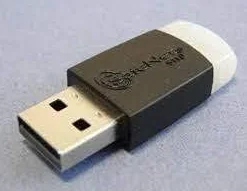
Sectigo are a vendor offering Windows Authenticode codesigning certificates via a hardware USB token (HSM). As of August 2025, the supplied token model was "SafeNet Gemalto ID Prime MD".
To use these tokens in Comet Core on Windows:
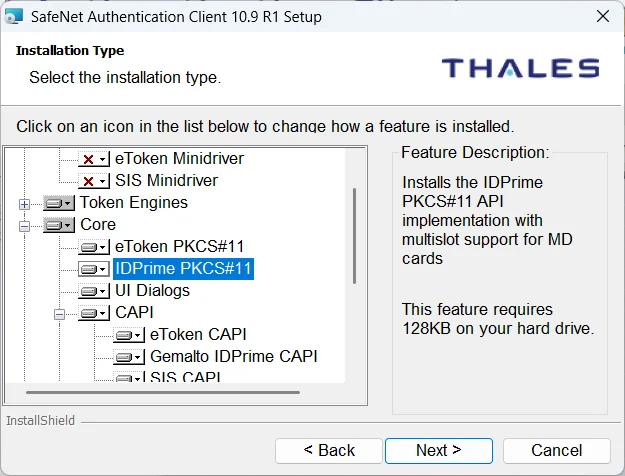
- Download the Sectigo SafeNet software installer from sectigo.com, making sure to select the Windows version.
- When installing the software, use the "Custom" installation mode, and ensure the IDPrime PKCS11 driver is installed:
- Install the Free and Open-Source Pkcs11admin app from pkcs11admin.net or from GitHub.
- Open the Pkcs11admin app. When prompted for the PKCS#11 driver module, choose the file
C:\Program Files\SafeNet\Authentication\SAC\x64\IDPrimePKCS1164.dll.- Enter this path in the Comet "Module" settings field.
- On the "Basic Info" tab, scroll down to the "Token info" section, and note the "Label" field.
- Enter this in the Comet "Token label" settings field.
- On the "Certificates" tab, right-click the certificate and choose "Export to file".
- Upload this to the Comet "Certificate" settings field. The exported file can be used as-is (DER format with
*.cerextension) without converting the certificate file format.
- Upload this to the Comet "Certificate" settings field. The exported file can be used as-is (DER format with
- On the "Keys" tab, note down the ID. It should match the ID in the "Certificates" tab.
- Enter this in the Comet "Key ID" settings field, removing all spaces.
- Enter the token password in the Comet "Password" field. The token password was emailed to you separately by Sectigo.
Save the Comet dialog and the Comet settings page. Then, when downloading the client software, it will be codesigned using the ID Prime USB dongle.
To use these tokens in Comet Core on Linux:
- Download the Sectigo SafeNet software installer from sectigo.com, making sure to select the Linux version.
- Install the SafeNet driver.
- On Debian and Ubuntu: Inside the downloaded
SafeNet Authentication Client 10.8 R1 GA Linux.zipfile, extract thesafenetauthenticationclient-core_10.8.1050_amd64.debdeb package, and install it usingapt install safenetauthenticationclient-core_10.8.1050_amd64.deb. - This installs the PKCS#11 driver to the path
/usr/lib/libIDPrimePKCS11.so. - Enter this path in the Comet "Module" settings field.
- On Debian and Ubuntu: Inside the downloaded
- Install the
pkcs11-toolprogram.- On Debian and Ubuntu:
apt install opensc opensc-pkcs11
- On Debian and Ubuntu:
- Run
pkcs11-tool --module /usr/lib/libIDPrimePKCS11.so --show-infoand verify that the token appears correctly. - Run
pkcs11-tool --module /usr/lib/libIDPrimePKCS11.so --list-token-slots.- Note down the "Token Label" field. Enter this in the Comet "Token label" settings field.
- Run
pkcs11-tool --module /usr/lib/libIDPrimePKCS11.so --list-objects- Note down the "ID" field. This ID should be the same for both the "Certificate Object" and the "Public Key Object".
- Enter this in the Comet "Key ID" settings field.
- Extract the public certificate from the USB device and save it as a local file:
pkcs11-tool --module /usr/lib/libIDPrimePKCS11.so --read-object --id ENTER_ID_HERE --type cert > cert.cer- Replace ENTER_ID_HERE with the ID from step 6.
- Upload the new
cert.cerfile to the Comet "Certificate" settings field.
- Enter the token password in the Comet "Password" field. The token password was emailed to you separately by Sectigo.
Save the Comet dialog and the Comet settings page. Then, when downloading the client software, it will be codesigned using the ID Prime USB dongle.
Azure Key Vault
This feature requires Comet 23.3.0 or later.
Azure Key Vault is a cloud service from Microsoft that offers HSM devices in compliance with current and upcoming Authenticode security requirements.
Some commercial Authenticode certificate providers can provision new Authenticode certificates to Azure Key Vault:
- https://www.globalsign.com/en/lp/certificates-for-azure-key-vault
- https://trustzone.com/knowledge-base/how-to-set-up-install-and-use-an-ev-code-signing-certificate-in-azure/
- https://learn.microsoft.com/en-us/azure/key-vault/certificates/create-certificate#partnered-ca-providers
You should work with your choice of Certificate Authority (CA). First, create the HSM inside Azure Key Vault, create a CSR, arrange to have the CSR signed by the CA, and then import the CA-signed certificate into the Azure Key Vault. The following options are then required in Comet:
| Option | Description |
|---|---|
| Azure Key Vault name | The specified name of the entire Key Vault in Azure |
| Certificate name | The specified name of the single certificate from the Certificates section in Azure Key Vault |
| Application ID | You must register a new Azure application in Azure Active Directory > "App registrations" screen. Then in the Azure Key Vault settings, you can choose either the "Vault access policy" or "Azure role-based access control" permission models, and then follow the specific authorization steps outlined below to grant the new application access to perform signing with certificates inside this Key Vault. |
| Application Secret | In the Azure application settings, you must generate an Application Secret that Comet Management Console can use to authenticate as this configured Application |
| Tenant ID | The Azure or Office 365 Tenant ID that describes your company organization |
To allow Comet to access and use the certificates, the following permissions are required:
- When using Azure role-based access controls (RBAC), assign the application you previously registered the following roles:
- Key Vault Certificates Officer
- Key Vault Crypto Officer
- When using access policies, assign the application the following permissions:
- Key Management Operations: all permissions other than "Delete"
- Cryptographic Operations: all permissions
- Certificate Management Operations: all permissions other than "Delete"
SAS Relic server
This feature requires Comet 25.9.2 or later.
SAS Relic is an open-source (Apache-2.0 licensed) codesigning utility with client/server functionality. Relic supports many signing backends including PKCS#12 files, PKCS#11 tokens, GnuPG-compatible smartcards, Azure Key Vault, Amazon AWS KMS, Google Cloud KMS, and more.
By hosting a Relic server in your network, you can have Comet reach out to it for codesigning installers on-demand. This option is also suitable for sharing a single PKCS#11 USB token or smartcard between multiple Comet Core servers.
Comet is compatible with Relic 8.x including Relic 8.2.
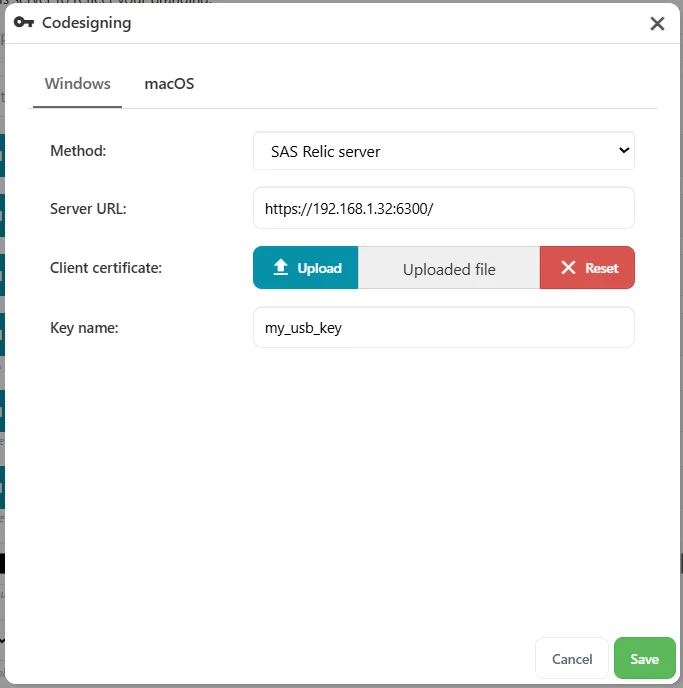
The following options should be configured in Comet:
| Option | Description |
|---|---|
| Server URL | The URL of the Relic server, including protocol (http or https) and trailing slash. If using HTTPS, Comet does not verify the TLS server certificate; it relies entirely on the TLS client certificate for authentication. |
| Client certificate | Upload a X.509 PEM certificate to use for TLS Client Certificate authentication. You can generate this by running relic remote register --url URL, and then authorize the generated TLS certificate by adding its fingerprint to the Relic server's list of allowed clients. |
| Key name | The name of the key to select, out of the available keys on the Relic server. You can list the available keys by running relic remote list-keys |
Setting up Relic for Sectigo PKCS#11 USB token
The following guide walks you through setting up Relic on Debian GNU/Linux. Following this guide is optional; you may find more resources online.
- Install Linux, create a user account for relic, and download the binary:
# User account
adduser relic

# Download version 8.2 from https://github.com/sassoftware/relic/releases/tag/v8.2.0
wget 'https://github.com/sassoftware/relic/releases/download/v8.2.0/relic-linux-amd64'
chmod +x ./relic-linux-amd64
- Generate self-signed certificate for HTTPS for the relic server.
The certificate must be valid for the hostname you intend to use; however, you do not need a public chain of trust for the certificate, because the security instead relies on preshared client-certificates. For instance, if your Relic server will be accessible on internal.example.com and also 192.168.1.1, try the following command:
openssl req -x509 -newkey rsa:4096 -keyout relic-server-key.pem -out relic-server-cert.pem -sha256 -days 3650 -nodes -subj "/CN=internal.example.com" -addext "subjectAltName=DNS:internal.example.com,IP:192.168.1.1"
-
Install the IDPrime PKCS11 driver for Linux from the documented steps.
-
Determine the properties of the PKCS11 key from the documented steps and save the extracted certificate file.
-
Set up relic configuration to serve up access to this PKCS11 key:
nano /home/relic/relic-config.yml
---
tokens:
  my_usb_token:
    type: pkcs11
    provider: /usr/lib/libIDPrimePKCS11.so
    label: 'The Label Of The Token'
    pin: 'REDACTED_PASSWORD_GOES_HERE'

keys:
  my_usb_key:
    token: my_usb_token
    id: 'MY_TOKEN_ID_HEX_CODE'
    roles: ['my_remote_signing_permission']
    x509certificate: '/home/relic/usb-key-extracted-certificate.cer'
    timestamp: true

server:
  listen: ":6300"
  keyfile: '/home/relic/relic-server-key.pem'
  certfile: '/home/relic/relic-server-cert.pem'

timestamp:
  urls:
    - 'http://timestamp.digicert.com'
    - 'http://timestamp.comodoca.com/authenticode'
    - 'http://timestamp.globalsign.com/scripts/timestamp.dll'

  msurls:
    - 'http://timestamp.digicert.com'
    - 'http://timestamp.comodoca.com/authenticode'
    - 'http://timestamp.globalsign.com/scripts/timestamp.dll'

  timeout: 60
- Set up a systemd unit to start Relic at system boot:
As root: nano /etc/systemd/system/relic.service
[Unit]
Description=comet codesigning server

[Service]
ExecStart=/home/relic/relic-linux-amd64 serve --config /home/relic/relic-config.yml
User=relic
Group=relic

[Install]
WantedBy=default.target
- Enable the systemd unit and start the relic server:
systemctl daemon-reload
systemctl enable relic
systemctl start relic
- The relic server is now installed and working, but has no clients allowed to access the USB key. We must create a client authentication keypair to allow Comet to log into Relic and sign data using the USB key.
Using Relic as a client instead of a server, request a registration from the server:
mkdir client-files
./relic-linux-amd64 remote register -c client-files -u 'https://192.168.1.1:6300' --ca-cert ./relic-server-cert.pem
New key fingerprint: NEW_KEY_FINGERPRINT_HERE
This saves configuration into the new ./client-files temporary directory:
remote:
    url: https://192.168.1.1:6300
    keyfile: /home/relic/client-files/client.pem
    certfile: /home/relic/client-files/client.pem
    cacert: /home/relic/client-files/cacert.pem
    interactive: false
- Add the client's key fingerprint above, to the bottom of the server's
relic-config.ymlfile as follows, to allow this client to connect:
clients:
  NEW_KEY_FINGERPRINT_HERE:
    nickname: optional-person-name-just-to-remember-who-made-this
    roles: ["my_remote_signing_permission"]
- Restart the Relic server so it can pick up the new configuration:
systemctl restart relic
You can now use this client.pem file and the key name, to remotely use the Relic server inside Comet.
You can also independently codesign files remotely from another machine, by using the relic remote list-keys and relic remote sign commands.
Codesigning for macOS
Comet Management Console is able to automatically sign and notarize the Comet Backup macOS installer using your supplied Apple Developer codesigning certificates.
Signing the installer is recommended to avoid "Gatekeeper" security prompts when installing the Comet Backup client app.
The signing process itself can be performed either
- within the Comet Management Console, by uploading your codesigning certificate files (recommended); or
- by connecting by SSH into a macOS machine on demand; or
- by manually signing the default unsigned package and distributing it separately.
Codesigning for macOS requires a certificate signed by Apple. To get one, you must first register for Apple's developer program. This requires a DUNS number (for organisations) and payment of a 99USD fee. You may be required to accept any Apple Developer license agreements in App Store Connect. Once you have enrolled in the Apple Developer program, visit https://developer.apple.com/account/ and click "Certificates, IDs & Profiles" in the left-hand menu to generate and download certificates. You should create both a "Developer ID Installer" and a "Developer ID Application" certificate.

Once you have successfully acquired the certificate, the following options must be configured in the Comet Management Console settings:

Level
The Level can be one of the following options:
| Level | Description |
|---|---|
| Sign only | Fastest, lowest compatibility. Does not work with macOS 10.15+ after February 2020. Only the "Developer ID Installer" certificate is required. The Apple ID or App Store Connect keys are not required. |
| Sign and notarise | Fast, good compatibility. The customer's Mac will make one network request to Apple servers when first installed |
| Sign, notarise, and staple | Slowest (perhaps 10 minutes or longer on first download), best compatibility. The codesigning will work offline without any prompting. Comet will wait until notarisation has completed before serving the generated client installer; this has the additional benefit that any notarisation validation issues will appear in the Comet Management Console system logs. |
Upload method (recommended)
This option is available with Comet 22.3.3 or later. The following settings describe the requirements as of Comet 22.6.9; for older versions, please check the documentation shipped alongside your Comet Management Console installation.
To sign the package, upload your "Developer ID Application" and "Developer ID Installer" certificates in PKCS12 (*.pfx / *.p12) file format to the Comet Management Console. If you created the Apple developer certificates on macOS, use the "Keychain Access" app to export your certificates including the private key.
To notarize the package, there is an additional requirement:
- Create an App Store Connect API key from https://appstoreconnect.apple.com/access/integrations/api and get its Issuer, Key ID, and Key file.

SSH method
This codesigning method works by connecting to a macOS machine over SSH, and running the official macOS codesigning toolchain that Apple distribute with XCode. On your Mac, you must install the XCode developer tools from the Mac App Store. You must either run XCode once, or run sudo xcodebuild -license from Terminal.app, in order to accept the XCode license agreement.
Comet Management Console then requires you to adjust some of the certificate permissions in order for it to be accessible to remote SSH processes. In the Keychain Access app on your Mac, make the following changes:
- First, move or copy the certificate into the "System" keychain
- Secondly, grant the codesigning tools permission to access this certificate
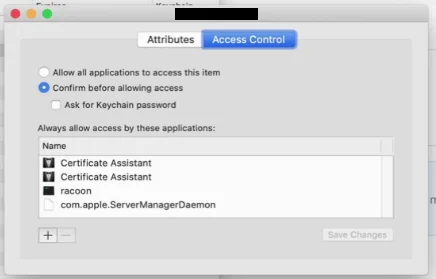
- Unfold the certificate row, to see the "private key" row
- Double-click the "private key" row to open the Info panel
- On the "Access Control" tab, click the "+" button
- In the file picker, browse to
/usr/bin/codesign- You can press Apple+Shift+Period to temporarily show hidden files, such as the
/usr/folder in the root drive
- You can press Apple+Shift+Period to temporarily show hidden files, such as the
- Repeat for
/usr/bin/productsign - Save and close this dialog
You should configure the full certificate name in the Comet Management Console settings.
Your macOS machine must be connected to the internet in a way that is reachable from the Comet Management Console. You must enable SSH access to your Mac by running: sudo systemsetup -setremotelogin on. If the Mac is on a different network, you may need to enable port-forwarding to allow the Comet Management Console to reach out to your Mac.
WARNING: Enabling SSH will open your Mac up to internet attacks, including but not limited to brute-force password guessing attempts, and credential-stuffing attacks. Please ensure that your Mac is receiving current security updates, and that all user accounts on the Mac have very strong passwords.
Comet Management Console requires your Apple ID email address to perform Notary submission. Comet Management Console requires an App-Specific Password for your Apple ID, to perform Notary submission. Your primary Apple ID password is not sufficient. You can create an App-Specific Password from https://appleid.apple.com/account/manage by clicking the "App-Specific Passwords" link. The password will be auto-generated by the Apple ID website. If you have set the "Level" parameter to "Sign only", these two fields are not required.
Codesigning for Linux
Linux applications do not contain embedded codesigning. You can achieve codesigning support for Linux by GPG-signing the hash of the binary and making this information available on your website independently.