Other APIs
Introduction
The main Comet Server API is described in detail in the API Guide. As well as making API requests to your Comet Server instances as described there, additional APIs are available for different purposes.
Comet Server web interface postMessage API
An API is also available for the Comet Server web interface frontend.
This additional API allows you to control some parts of the web interface by making postMessage calls in Javascript. Messages will be sent in either direction, as Javascript objects, in the general form {msg: "message_type", other_parameters: .... }.
To use this API, create a Comet Server web interface window (e.g. by using window.open() or <iframe>), and add a message event listener to wait for the AppLoaded API message described below.
AppLoaded
Notification sent to the opener window when the Comet Server web interface is ready to receive other postMessage requests.
- Message format: Object
- Direction: Response (Sent by Comet Server web interface to caller)
Object parameters:
| Parameter name | Value |
|---|---|
msg | app_loaded |
SessionLogin
Perform a single sign-on (SSO) login to the Comet Server web interface, as an administrator account.
- Message format: Object
- Direction: Request (Sent by caller to Comet Server web interface)
Object parameters:
| Parameter name | Value |
|---|---|
msg | session_login |
username | Admin username |
sessionkey | Pre-generated admin session key from the AdminAccountSessionStart or HybridSessionStart server API |
UserSessionLogin
Perform a single sign-on (SSO) login to the Comet Server web interface, as an end-user account.
- Message format: Object
- Direction: Request (Sent by caller to Comet Server web interface)
Object parameters:
| Parameter name | Value |
|---|---|
msg | user_session_login |
username | Customer username |
sessionkey | Pre-generated end-user session key from the UserWebSessionStart or AdminAccountSessionStartAsUser or HybridSessionStart server API |
Comet Server live event streaming
Additional Comet Server APIs are available to receive live, realtime notifications from the Comet Server of new jobs, completed jobs, and user profile configuration changes.
Because of the reversed direction of information, these APIs do not entirely fit the general documented pattern and are documented separately here.
There are two ways to configure these live event notifications: either as a webhook or as a websocket.
Webhooks
This feature is available in Comet Server 20.6.1 and later.
You can configure a URL to receive events. The Comet Server will submit events by HTTP POST and must be able to reach the configured URL from its network position. The webhook's body is an event structure in JSON as described below in the "Message types" section.
An x-Comet-Tracing-Id header is present in the webhook request. Your webhook endpoint should respond with an HTTP 200 OK code to all POST events. If your webhook endpoint fails to do so, the failure will be logged in the Comet Server log, along with its corresponding x-Comet-Tracing-Id header value; and Comet Server will retry the request a finite number of times.
Custom headers to be included in the webhook POST request can be configured using the CustomHeaders field of WebhookOption. This field can be set using the API endpoints as described below, or directly in the cometd.cfg file:
    ...
    "WebhookOptions": {
        "ExampleOrganization": {
            "URL": "http://example.com/webhooks",
            "WhiteListedEventTypes": [],
            "Level": "full",
            "CustomHeaders": {
                "Authorization": "Bearer f1d2d2f9",
                "X-Custom-Header": "Custom header value"
            }
        }
    },
    ...
Webhook messages are sent in parallel and may be unordered when received. When a webhook experiences an error and retries, the submission is not ordered.
Payload format
The PayloadFormat field is available in Comet Server 26.5.4 and later.
The PayloadFormat field of WebhookOption controls how each event is encoded in the outgoing POST request: This allows MSPs to integrate Comet Backup's webhook system to send Slack notifications for backup job events.
""(the default, also writtenWEBHOOK_FORMAT_RAW) sends the raw event structure as JSON, exactly as described in the "Message types" section below. This is the behavior for all existing webhooks, so leaving the field unset does not change anything."slack"(WEBHOOK_FORMAT_SLACK) reformats each event as a Slack Incoming Webhook message, so the webhook target can be a Slack Incoming Webhook URL and the event will render natively in a Slack channel. Backup job completion events (SEVT_JOB_COMPLETED) are rendered as a colour-coded summary card (status, type, user, device, data, files, uploaded, and duration); all other event types use a generic message format so that no event is silently dropped.
This can also be configured from the Settings > Webhooks area of the Comet Management Console by choosing the message format when adding or editing a webhook. To configure a Slack webhook directly in cometd.cfg:
    ...
    "WebhookOptions": {
        "ExampleOrganization": {
            "URL": "https://hooks.slack.com/services/T00000000/B00000000/XXXXXXXXXXXXXXXXXXXXXXXX",
            "WhiteListedEventTypes": [],
            "Level": "full",
            "PayloadFormat": "slack"
        }
    },
    ...
You can use the webhook feature as follows:
-
Use the
AdminMetaWebhookOptionsGetAPI to retrieve the current webhook configuration -
Modify the data structure to add your own additional webhook endpoint in
WebhookOptionformat.- If the
WhiteListedEventTypesarray is empty, all event types are sent. Otherwise, only the specified event types are sent.
- If the
-
Use the
AdminMetaWebhookOptionsSetAPI to replace the server's current webhook configuration with the updated configuration. -
You should immediately receive the initial SEVT_META_HELLO webhook event to your configured endpoint.
- A SEVT_META_HELLO message will be sent every time the webhook queue is flushed. For instance, it will occur if the Comet Server is restarted.
The webhook configuration will be persisted in the cometd.cfg file. You may also choose to make changes to this file directly.
Websocket
This feature is available in any version of Comet Server.
Instead of using a Webhook, you can make an outbound websocket connection. This method does not require your application to have a public URL. Messages will always be delivered sequentially in-order and will be delivered for as long as the websocket is held open.
If the websocket client is unable to drain messages sufficiently quickly from the TCP stream, event messages will be queued for publication up to an implementation-defined limit. After this limit, the websocket connection would be dropped by the Comet Server; in this case, a client should reconnect and perform a remedial sync using the standard Comet Server APIs to catch up on any missed status changes.
You can use the websocket feature as follows:
-
Make a GET request to
/api/v1/events/stream.- Set the
Originheader to a URL of your choice (e.g.https://cometbackup.com). No filtering is yet done on this value, but that may change at a later time. - Optionally, limit which events are received by adding the query param
allowListwith a comma-delimited list of streamable event numbers to filter on (e.g.?allowList=4100,4101).
- Set the
-
The server will perform an HTTP Upgrade to a WebSocket connection.
-
The client must emit five text message frames in order, containing
Username,AuthType,Password,SessionKey, andTOTPparameter values respectively. An empty-string text message frame can be used to skip providing a value. -
If the authentication failed, the server will emit a text message frame containing the string
403 Unauth, and then drop the connection. If the authentication succeeded, the server will emit a text message frame containing the string200 OK. -
The server will then send a text message frame for each event, containing an event structure in JSON as described below in the "Message types" section.
Message types
For both webhook and websocket sources, you will receive a JSON-encoded StreamableEvent structure. The Type field indicates the type of the event and will be one of the SEVT_ constant values.
The first message you receive will have the SEVT_META_HELLO type. This indicates that a new live-event-streaming session has been created.
Two-Factor Authentication for the Comet Server API
We would recommend against using two-factor authentication for the Comet API. It is possible to do this, but (A) it's not really meaningful for an automated process to have two factors of authentication; and also (B) it's not currently supported by our PHP SDK on GitHub.
We would recommend creating a new Comet Server admin account just for API purposes with a long random password.
Advanced usage
If it's really seriously needed, it is possible to make any of the API requests using these authentication types: any Comet Server API request needs to be authenticated, and you can authenticate by setting the AuthType parameter to any one of Password, SessionKey, PasswordTOTP, or PasswordU2F; the latter two (TOTP / U2F) being the two currently supported methods of two-factor authentication in Comet Server.
We would suggest only using PasswordTOTP and PasswordU2F only with the AdminAccountSessionStart API, that will give you a single SessionKey token to use with other API calls. Performing the entire TOTP / U2F handshake on every API call is probably an unreasonable amount of overhead. To authenticate using SessionKey mode, the API request should contain a valid SessionKey parameter that you get from the AdminAccountSessionStart API back in the SessionKeyRegeneratedResponse response structure.
To authenticate using Password mode, the API request should contain a valid Password parameter (of the admin account's password), as per the examples in https://cometbackup.com/docs/api#quick-start-examples . Then, if a password-only is insufficient for the account, the API will respond with a HTTP 449 status ("Retry With"), and a X-Comet-TOTP-Requested: 1 header or a X-Comet-U2F-Challenge: ... header. You should use this information to determine if a TOTP or U2F login is suitable.
To authenticate using PasswordTOTP mode, the API request should contain both a valid Password parameter (of the admin account's password) and a valid TOTP parameter. A TOTP code is a 6-digit number that changes every 30 seconds. Both the client and server calculate it from a shared secret. You should find the current secret by decoding the QR code for the user, and then use a library in your programming language to generate the current 6-digit value for the current timestamp.
To authenticate using PasswordU2F mode, the API request should contain a valid Password parameter (of the admin account's password) and a valid U2FSign POST parameter. You can use the information from the previous X-Comet-U2F-Challenge response header, to generate a U2F signature with your U2F hardware device, and fill in the U2FSign POST parameter as a U2FSignResponse struct in JSON encoding.
Custom Remote Bucket
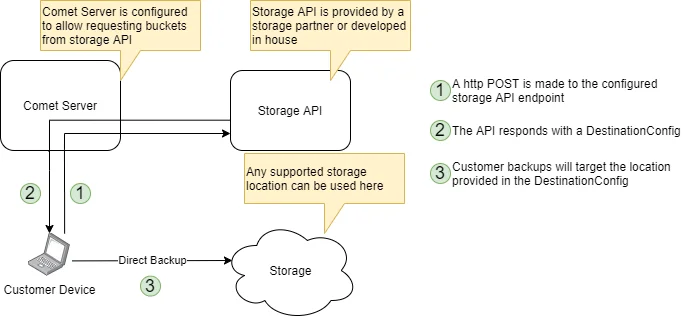
The "Custom Remote Bucket" is a possible Storage Template option in the Comet Server configuration settings. The Storage Template system allows administrators and authorized users to easily provision new, private per-user Storage Vaults inside a user account that are attached to a real storage location created by the storage provider.
As well as the built-in provider types for allocating Comet Storage Gateway, Backblaze B2, or Wasabi buckets, you can use the "IAM-compatible" or "Custom Remote Bucket" provider type to implement a custom storage location.
This is of interest for MSPs that want to bring an advanced direct-to-cloud storage option, or storage providers that want to develop an integration that easily plugs into Comet Servers to provide direct-to-cloud storage. The resulting Storage Vault can use any storage protocol supported by Comet, such as S3-compatible, Local Path, or SFTP.
To use this feature, you should provide a URL endpoint.
- Comet Server will make an HTTP POST request to your configured endpoint
- Your endpoint should respond with a HTTP 2xx status code.
- Your endpoint should respond with a
DestinationLocationstructure in JSON format - Comet Server will add the resulting
DestinationLocationstructure into the requesting user's profile as a new Storage Vault.
Sample endpoint implementation (Python)
#!/usr/bin/env python3
#
# This is an example script to show how Comet Server can request custom
# buckets from a web server script
#
# Usage:
#   1. python3 ./sample-custom-remote-bucket.py
#   2. Set up a Custom Remote Bucket in Comet Server using the URL: http://127.0.0.1:8000/request-bucket
#
# Configuration:

BIND_IP   = "127.0.0.1" # could be any IP; leave blank to bind to all IP addresses
BIND_PORT = 8000

#

import http.server
import socketserver

# CustomRemoteBucketHandler is the HTTP server that is able to respond to
# Comet Server's requests when they happen.
class CustomRemoteBucketHandler(http.server.BaseHTTPRequestHandler):

	def __init__(self, request, client_addr, server):
		"""Boilerplate for a custom HTTP service"""
		super().__init__(request, client_addr, server)

	def do_GET(self):
		"""Handle GET requests (regular page loads)"""
		if self.path == "/":
			self.do_homepage()
		else:
			self.send_error(404)

	def do_POST(self):
		"""Handle POST requests (form submissions)"""
		if self.path == "/request-bucket":
			self.do_requestBucket()
		else:
			self.send_error(404)

	def do_homepage(self):
		"""Render the home page for users who visit this server directly"""
		self.send_response(200)
		self.send_header('Content-Type', 'text/html;charset=UTF-8')
		self.end_headers()
		self.wfile.write("""<!DOCTYPE html>
<p style="color:red;font-weight:bold;">
This is a test server for the custom remote bucket feature! Not to be used directly!
</p>
		""".encode())

	def do_requestBucket(self):
		"""Accept a Custom Remote Bucket request from Comet Server"""
		self.send_response(200)
		self.send_header('Content-Type', 'application/json')
		self.end_headers()

		# Talk to your storage platform to allocate new access credentials
		# TODO

		# Respond with a Comet DestinationLocation object in JSON format
		# The DestinationType should be a DESTINATIONTYPE_ number from https://docs.cometbackup.com/latest/api/api-constants#destinationtype
		# Use any of the keys from https://docs.cometbackup.com/latest/api/api-data-structures/#api-struct-DestinationLocation
		self.wfile.write("""{
	"DestinationType": 1000,
	"S3Server": "minio.example.com",
	"S3UsesTLS": false,
	"S3AccessKey": "",
	"S3SecretKey": "",
	"S3BucketName": "",
	"S3Subdir": "",
	"S3UsesV2Signing": false
}""".encode())

# Application starts up here if it is run directly
if __name__ == "__main__":
	with socketserver.TCPServer((BIND_IP, BIND_PORT), CustomRemoteBucketHandler) as httpd:
		print("Serving at %s:%s..." % (BIND_IP, BIND_PORT))
		httpd.serve_forever()
Sample endpoint implementation (PHP)
<?php

// This is an example script to show how Comet Server can request custom buckets from a web server script.
// Save this file as request-bucket.php

if ($_SERVER['REQUEST_METHOD'] !== "POST") {
    header("HTTP/1.1 400 Invalid Request");
    die('Expected POST');
}

// Talk to your storage platform to allocate new access credentials
// TODO

$result = [
    DestinationType => 1000,
    S3Server => "minio.example.com",
    S3UsesTLS => false,
    S3AccessKey => "",
    S3SecretKey => "",
    S3BucketName => "",
    S3Subdir => "",
    S3UsesV2Signing => false
];

header('Content-Type: application/json');
echo json_encode($result);
Comet Integrated MCP Server
This feature requires Comet 26.5.5 or later, an Advanced or Enterprise plan, and a Self-Hosted Management Console.
Model Context Protocol (MCP) is a standard way of adding capabilities to AI tools using LLMs. The Comet Core server supports exposing its API surface via the MCP protocol. You can attach it to an MCP-compatible AI tool such as Copilot, Claude Code, Cursor, Windsurf, or Zed, and control all of Comet from that tool.
Comet's API has strict backwards-compatibility guarantees, but MCP and LLMs are an evolving technology. The exact details of how Comet's API surface is projected into MCP may change over time. You should not rely on specific instruction text or tool availability.
The MCP is fully featured and allows access to every part of Comet. This exposes a large number of tools, which consumes tokens in the LLM's context window. To reduce context usage, you can enable only specific tools from the MCP server.
You must authenticate to the MCP server with your existing Comet admin credentials. The feature is available for both top-level and tenant-level admin accounts. It is not currently available for end users.
The MCP server allows access to anything your Comet credentials are capable of. This includes dangerous and destructive actions, such as deleting user accounts and backup settings. To restrict the LLM from performing such actions, you can add the optional header below. We recommend configuring your AI tool to prompt you to accept all tool calls before they are run.
Connection details
The MCP integration is available in your Comet Core instance as follows:
- Type: HTTP (SSE, stateless)
- URL:
https://your-comet-server/mcp/ - Required header:
Authorization: Basic XXXXXX, whereXXXXXXis the Base64 encoding ofusername:passwordfor your Comet admin account - Optional header:
X-Comet-AllowDangerous: 1- By default, the MCP server only shows safe, readonly tools. Add this header to expose read/write tools to the MCP.
The Authorization header value must contain the word Basic, then a single space, then the Base64 value. For example, the credentials admin:examplepassword produce this header:
Authorization: Basic YWRtaW46ZXhhbXBsZXBhc3N3b3Jk
To generate the Base64 value on macOS or Linux, run echo -n 'ADMIN_USER:ADMIN_PASS' | base64. On Windows, run [Convert]::ToBase64String([Text.Encoding]::UTF8.GetBytes('ADMIN_USER:ADMIN_PASS')) in PowerShell.
Base64 is an encoding, not encryption. Anyone who sees the header value can recover your username and password from it. Treat the full header value as a secret, and change your admin password if the value is ever shared.
Choosing a connection method
- Claude Code, OpenAI Codex, and most other command-line AI tools connect directly to the URL above. They need no extra software. See the examples below.
- Claude Desktop, Cursor, Windsurf, and Zed cannot connect directly to an HTTP MCP server. Use the
mcp-remotebridge described in Using the MCP server with Claude Desktop and other local-only clients. - We do not recommend the "Add custom connector" feature in Claude Desktop and claude.ai for Comet. Custom connectors connect from Anthropic's cloud rather than from your computer, so they can only reach a Comet Server published on the public internet with a valid HTTPS certificate. On Claude Team and Enterprise plans, the option is also only visible to users with an Owner role. For a Comet Server on a private network, use the
mcp-remotebridge instead.
Using the MCP server with Anthropic Claude Code
claude mcp add \
    --transport http myserver https://MY_COMET_SERVER/mcp/ \
    --header "Authorization: Basic $(echo -n 'ADMIN_USER:ADMIN_PASS' | base64)" \
    --header "X-Comet-AllowDangerous: 1"
Using the MCP server with OpenAI Codex
At the time of writing, Codex supports at most 128 tools from an MCP server. Above this limit, the harness enables virtual-tool selection techniques that may reduce compatibility. To stay under the limit, you can use the MCP server in readonly mode (without supplying the X-Comet-AllowDangerous header).
Edit the ~/.codex/config.toml file as follows:
[mcp_servers.my_comet_server]
url = "https://your-mcp-server.com"
enabled = true

[mcp_servers.my_comet_server.http_headers]
Authorization = "Basic XXXXXX"
Replace XXXXXX with the Base64 encoding of your username:password, as described in Connection details above.
Using the MCP server with Claude Desktop and other local-only clients
Some AI tools, including Claude Desktop, Cursor, Windsurf, and Zed, can only run an MCP server as a local program on your own computer (known as "stdio" transport). They cannot connect directly to an HTTP MCP server like Comet's.
Claude Desktop does offer built-in "connectors" for remote servers, but those connections are made from Anthropic's cloud rather than from your computer. This means a connector can only reach a Comet Server that is published on the public internet with a valid HTTPS certificate. It cannot reach a Comet Server on your local network.
The simplest way to connect these tools, including to a Comet Server that is only reachable on your local network, is mcp-remote, a small bridge that runs on your computer and forwards the connection on to Comet's HTTP MCP endpoint. It requires Node.js 18 or later, which provides the npx command used below. Install Node.js first if your computer does not already have it.
For Claude Desktop, open Settings > Developer > Edit Config to edit the claude_desktop_config.json file, and add the following:
{
    "mcpServers": {
        "comet": {
            "command": "npx",
            "args": [
                "-y",
                "mcp-remote",
                "https://MY_COMET_SERVER/mcp/",
                "--header",
                "Authorization:${AUTH_HEADER}",
                "--header",
                "X-Comet-AllowDangerous:1"
            ],
            "env": {
                "AUTH_HEADER": "Basic XXXXXX"
            }
        }
    }
}
Replace XXXXXX with the Base64 encoding of your username:password, exactly as in the Connection details above. Remove the X-Comet-AllowDangerous header line to stay in the default readonly mode.
If claude_desktop_config.json already contains settings, keep them. Add the "comet" entry inside your existing "mcpServers" object if there is one, or add the whole "mcpServers" object alongside the existing top-level keys. Entries in a JSON object are separated by commas, and the file must remain valid JSON. If the client reports a syntax error after saving, check for a missing or extra comma near the line it mentions.
If your Comet Server is only reachable over plain HTTP on your local network (for example http://192.168.1.10:8060/mcp/), also add "--allow-http" to the args list.
Save the file and fully restart the client. The same mcp-remote command can be placed in the configuration file of any other stdio-only client.
Troubleshooting the MCP connection
You can test the connection with curl, independent of any AI tool. Run this command on the machine where the AI tool runs:
curl -i https://MY_COMET_SERVER/mcp/ \
    -H "Authorization: Basic XXXXXX" \
    -H "Content-Type: application/json" \
    -d '{}'
If the response is one of the plain-text errors below, follow the matching fix. Any other response indicates the endpoint is reachable and your credentials were accepted.
Feature unavailable (HTTP 400). Your Comet Server's license does not include the MCP feature. The feature requires an Advanced or Enterprise plan with a Self-Hosted Management Console. If you changed your plan recently, restart the Comet Server service so it picks up the new license features. The server checks the license before it checks your credentials, so fix this error first if you see it.
Supply HTTP Basic authentication (HTTP 403). The Authorization header is missing or in the wrong format. The value must be the word Basic, then a single space, then the Base64 encoding of username:password. Sending the Base64 value alone, without the Basic prefix, produces this error.
spawn npx ENOENT in Claude Desktop. Claude Desktop tried to start the mcp-remote bridge but could not find the npx command. Install Node.js 18 or later, then fully quit and restart Claude Desktop. If the error persists on Windows, run where npx in a terminal and set the "command" value in claude_desktop_config.json to the full path it prints, ending in npx.cmd.
Server disconnected in Claude Desktop. This is a generic failure message. Run the curl test above to see the real error from the Comet Server, then follow the matching fix.
No "Add custom connector" option in Claude Desktop. On Claude Team and Enterprise plans, only users with an Owner role can add custom connectors. You do not need a custom connector to use Comet's MCP server. Use the mcp-remote bridge described above instead.